Creating and changing Remote Settings
Note: Unity Remote Config is now available as a preview package. Remote Config is an improved offering that allows you to change the behavior and appearance of your game without requiring a new binary. You can remotely enable or disable features, change the specifics of your game to target specific audiences, or run special events by scheduling new content releases.
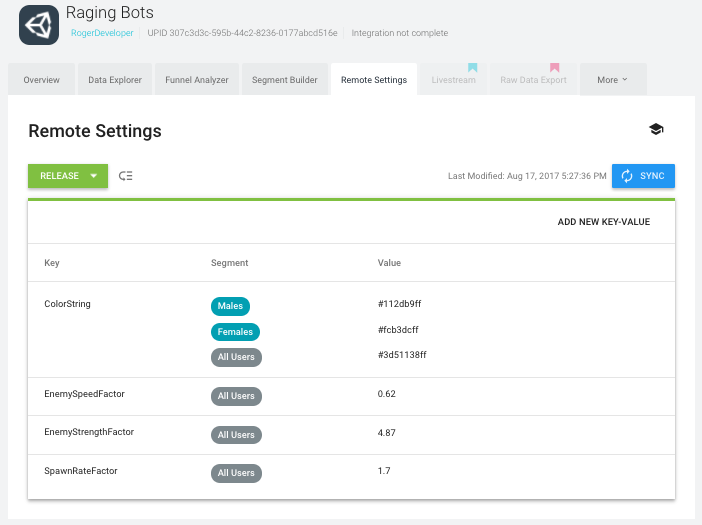
Before using Remote Settings, you must first enable Unity Services and the Unity Analytics Service for your Unity project. Once you have enabled Analytics, open the Analytics dashboard and go to the Remote Settings page to create and change the Remote Settings values. See Using Remote Settings in a Unity project to learn how to access these Remote Settings values in your game or application.
The Analytics Service provides two Remote Settings configurations:
The Analytics Service sends Release configuration settings to computers and devices running regular, non-development builds of your application.
The Analytics Service sends Development configuration settings to computers and devices running development builds (that is, builds created with the Development Build flag checked on the Build Settings window). Play mode in the Unity Editor counts as a development build.

Each Remote Setting consists of a key, a default value, and, optionally, segmented values. When a setting contains segmented values, the segments that the current player is in determine which values are included in the configuration. If more than one segment applies, the configuration includes the value from the highest priority segment.
You can create 200 values per configuration. A setting with one segment, uses one value; a setting with two segments uses two; and so on.
Setting names and value rules
An individual remote setting is a key-value pair. The rules for key names are:
Key names must be unique within the same configuration.
Key names must start with a letter.
Key names may contain only letters, digits, and the characters: “.”, “_”, and “-”.
A setting value can be any of the following primitive types: Int, Float, String, or Bool. The rules for setting values are:
Int values are 32-bit integers (–2147483648 to 2147483647).
Float values are single-precision, 32-bit floating-point numbers (about –3.4x1038 to 3.4x1038).
Strings are limited to 1024 characters.
You must specify boolean values with the strings “true” or “false”.
Adding Remote Settings
To add a Remote Setting:
In your Analytics dashboard, open the Remote Settings page.
Set Configuration to Release or Development for the setting.
Click ADD NEW KEY-VALUE (at the top of the settings list).
Enter a name for the key.
Set the type for the value.
Enter the default value.
Click the Save button.
Click the Sync button to publish your changes. (You do not need to click the Sync button after creating each individual setting; you can wait to synchronize your settings until you finish making all changes to the current configuration.)
Note: To add values targeted to different segments, save the default key-value setting and then edit it. The segment options only appear when you edit a setting, not when you first create one.
Editing Remote Settings
To edit a Remote Setting:
Open the Remote Settings page in your Analytics dashboard.
Choose the Release or Development Configuration.
-
Click the edit icon next to the setting you want to change.

Make your changes. Note that changing a key name has the same effect as deleting the old key and creating a new one.
Click the Save button.
Click the Sync button to publish your changes. Unity reads the updated settings the next time players start a session.
Resolving simultaneous edits
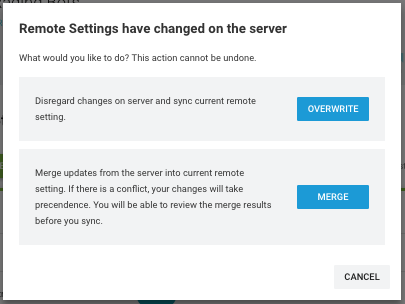
If two people on your team edit the Remote Settings on a project at the same time, you can get a conflict when trying to synchronize the modified settings with the service.

When a conflict occurs, you have the following options:
OVERWRITE
Discards all changes on the service since you last synced and pushes your settings to the service. When you choose overwrite, the settings on the service will match your current settings exactly.
MERGE
Combines your current settings with the modified settings from the service and gives you the opportunity to make changes before completing the synchronization operation.
If you edit the same setting value, your changes overwrite the version from the service. In addition, values and settings deleted on the service are restored (since they still exist in your version). Otherwise, changes from the service since you last synced are retained.
After merging, your Remote Settings page is updated to reflect the merger, but the combined settings are not pushed to the server. You can review the updated changes and click the Sync button again when you are ready.
CANCEL
Cancels the synchronization operation and closes the conflict dialog without making any changes. Your settings are not saved to the service.
Adding different values for different segments
You can assign multiple segmented values to a single Remote Settings key. When a player is a member one of the segments for which a specific value exists, Unity sends that value to the player instead of the default, All Users value. (If a player qualifies for several segmented values, Unity sends the value from the highest priority segment.)
To set a value specific to a given segment:
Open the Remote Settings page in your Analytics dashboard.
Choose the Release or Development Configuration.
Add the Remote Setting if it does not already exist.
Click the edit icon at the far right of the setting.
Click ADD EXISTING SEGMENT.
In the new row, choose the segment from the drop-down list and enter a value.
Click the Save button.
Deleting Remote Settings
To delete a Remote Setting, first open the edit view for the setting:
Open the Remote Settings page in your Analytics dashboard.
Set Configuration to Release or Development for the setting.
-
Click the edit icon next to the setting you want to delete to open the edit view:

To delete a value for a particular segment, click the minus button to the right of the edit view and then click Save. (You cannot delete the default All Users value.)
To delete the entire setting, click the delete icon at the bottom of the edit view and then confirm you want to delete the setting.
Click the Sync button to publish your changes.
Setting segment priority
When a player is a member of more than one segment, Unity sends the value assigned for highest priority segment. (If a setting doesn’t have any segmented values, or the player isn’t a member of the segments that do have different values for a key, then Unity sends the All Users value.) You can set the order of your segments to specify which segmented values should take precedence when there is an overlap.
To set the segment priority:
Open the Remote Settings page in your Analytics dashboard.
Choose the Release or Development Configuration.
-
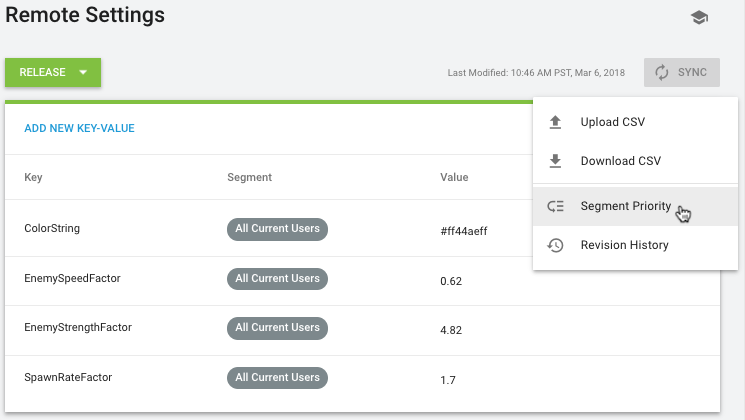
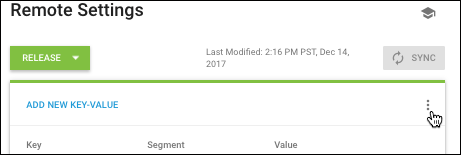
Click the menu icon at the top, right corner of the settings list:

-
Click the segment priority icon.

The Segment Priority window opens, showing your current order. Only segments already assigned values for any Remote Settings appear in the window.
-
Reorder the segments by clicking and dragging the items into place.

When the order is correct, click Save.
Click the Sync button to publish your changes.
The segment priority applies to all settings within a configuration, but you can have a different priority for the Development and Release configurations.
Importing and Exporting Settings
You can import and export settings using comma-separated-value (CSV) format files.
To export your current settings:
Navigate to the Remote Settings page on your Unity Analytics dashboard.
Choose the configuration, either Release or Development that you want to export.
-
Click the menu icon at the right side of the list header:

Choose Download CSV to export the current settings to your computer.
The Analytics Service downloads your current settings as a CSV file.
Note that if you download the CSV file before creating any setting, the file is completely empty. A valid file for uploading must contain the header row. See Remote Settings CSV Format.
To import settings into your project:
Navigate to the Remote Settings page on your Unity Analytics dashboard.
Choose the configuration, either Release or Development that you want to overwrite with the imported settings.
Click the menu icon at the right side of the list header.
Choose Upload CSV to import a new settings file to the project.
Choose the CSV file containing the new settings.
-
Click Open.
The Analytics Service uploads the settings file and replaces all the current settings in the selected configuration, but does not commit the values yet.
If a format or value error exists in the file, the service gives you an option to download a CSV file detailing the errors. No changes are made to the settings when an error occurs.
Click Sync to commit the setting changes and make them live. (Refresh the page or navigate away without synchronizing to discard any uploaded settings.)
When you import settings, ALL the keys and values are changed to match the uploaded file. If an existing setting or segment value does not appear in the file, that setting is deleted.
Creating and Deleting Settings during Import
In addition to editing setting values, you can create and delete settings when you upload a CSV file to for a configuration.
First, download the current setting CSV file for the configuration. You can then edit this file to make your changes. (See Working with Spreadsheets) if you use a Spreadsheet application to edit the file.)
To create a new setting:
- Add a new row in the file.
- Specify a unique key name.
- Define the data type (int, float, string, or bool).
- Enter “All Current Users” as the segment.
- Leave the last field blank (for the default segment).
A new setting will look like:
a_bool_value,bool,TRUE,All Current Users,
To add a new segmented value for a setting:
Add a row to the file.
Repeat the key name and data type of the setting.
Enter the value for the segment.
Enter the segment name. The segment name must already be defined for the project before you import the settings. Use the Segment Builder page to view the existing segments as well as define new ones.
-
Set the segment priority.
The priorities for all segments in the file must be consecutive integers starting with 1. For example, if you use five segments in your CSV file, the only priorities that are allowed are the numbers 1–5. The same priority must be assigned wherever in the file that a segment is used. For example, if you use the Japan segment for a dozen values in your CSV file, the same priority value must be used in each row.
A setting with segmented values will look like:
a_bool_value,bool,false,All Current Users,
a_bool_value,bool,true,1-3 Days,1
a_bool_value,bool,false,4-7 Days,2
To delete a setting:
Simple delete the row defining the setting from the file. If you delete the row containing the default, “All Current Users” segment, you must also delete any rows defining segmented values. Note that if you delete segmented values you might also need to renumber the segment priorities to maintain the consecutive integer sequence.
Finally, uploaded the modified CSV file and press the Sync button on the Remote Settings page to save the changes and publish the changes.
Remote Settings CSV File Format
The Remote Settings CSV format conforms to ISO rfc4180. The exported file is encoded as UTF–8.
The settings file has five fields. You must include the header row as the first line in the file:
key,type,value,segment,priority
The fields in the file are:
- key – The name of a Remote Settings key.
- type – the setting data type: int, float, string, or bool.
- value – the setting value.
- segment – the name of the segment for a setting value.
- priority – the priority of the segment for a setting value.
Rules for entries in the CSV file:
Each row must contain a unique combination of key and segment.
All segments in the CSV file must already exist. New segments must be created using the Segment Builder page of the Analytics dashboard.
Use the string, “All Current Users” for the default segment.
The default “All Current Users” segment must be associated with each key exactly once in the file.
Do not assign a priority to the “All Current Users” segment (leave the field blank).
Priorities for all other segments must be assigned.
A segment priority must be the same for all keys that segment is used in.
The segment priorities assigned across all segments must be consecutive integers (starting with 1).
Use TRUE and FALSE for Boolean values.
Strings containing commas, double quotes, and line breaks must be enclosed with double-quote characters.
-
Double quote characters in a string must be escaped by repeating the double quote. For example:
"Hello World!"            -> """Hello World!"""
He said, "How do you do?" -> "He said, ""How do you do?"""
The file can contain up to 201 rows (including header).
Tip: Create sample Remote Settings values on the dashboard and download to generate a sample file.
Working with Spreadsheets
The CSV file format is not rigorously standardized, so you may experience variations when opening or saving CSV files in different spreadsheet applications. Always test that the fields in your Remote Settings file are properly preserved after making the round trip from the Remote Settings page, to your editing application, and back. Especially check that Unicode characters (Emoji, symbols, characters outside the basic ASCII range, etc) are not altered and that floating point numbers are not truncated.
Usually when importing a CSV file, spreadsheet applications interpret strings starting with ', +, -, or = characters as expressions rather than plain strings. You can try enclosing such strings in double quotes and adjusting the import options of the spreadsheet you are using. For example, in Google Sheets you can turn off the “Convert strings to numbers and dates” option; while in LibreOffice you can turn on, “Quoted Strings As Text”.
For settings of type float, make sure that all significant digits of the setting value are displayed in the spreadsheet cell. Otherwise, the spreadsheet application truncates the value and you lose precision when you export the spreadsheet to a CSV file.
2017–12–12 Page amended
2017–08–28 - Service compatible with Unity 5.5 onwards at this date but version compatibility may be subject to change.
2017–06–30 - Added: Allow the characters “.”, “_”, and “-” in key names.
2017–06–30 - Added: CSV import and export.
New feature in 2017.1
2017–08–28 - Added segmented Remote Settings: set different values for different segments in 2017.1