Unity Test Runner
The Unity Test Runner is a tool that tests your code in both Edit mode and Play mode, and also on target platforms such as Standalone, Android, or iOSApple’s mobile operating system. More info
See in Glossary.
To access the Unity Test Runner, go to Window > General > Test Runner.

The Unity Test Runner uses a Unity integration of the NUnit library, which is an open-source unit testing library for .Net languages. For more information about NUnit, see the official NUnit website and the NUnit documentation on GitHub.
UnityTestAttribute is the main addition to the standard NUnit library for the Unity Test Runner. This is a type of unit test that allows you to skip a frame from within a test (which allows background tasks to finish). To use UnityTestAttribute:
In Play mode: Execute
UnityTestAttributeas a coroutine.In Edit mode: Execute
UnityTestAttributein the EditorApplication.update callback loop.
Known issues and limitations
There are some known issues and limitations of the Unity Test Runner:
The WebGLA JavaScript API that renders 2D and 3D graphics in a web browser. The Unity WebGL build option allows Unity to publish content as JavaScript programs which use HTML5 technologies and the WebGL rendering API to run Unity content in a web browser. More info
See in Glossary and WSA platforms do not supportUnityTestAttribute.UnityTestdoes not support Parameterized tests (except forValueSource).
How to use Unity Test Runner
This page assumes you already have an understanding of unit testing and NUnit. If you are new to NUnit or would like more information, see to the NUnit documentation on GitHub.
To open the Unity Test Runner, open Unity and go to Window > General > Test Runner. If there are no tests in your Project, click the Create Test Script in current folder button to create a basic test script. This button is greyed out if adding a test script would result in a compilation error. The conditions for adding a test script are in the Editor folder, or any folders using Assembly Definition files that reference test assemblies (NUnit, Unity Test Runner, and user script assemblies).

You can also create test scripts by navigating to AssetsAny media or data that can be used in your game or Project. An asset may come from a file created outside of Unity, such as a 3D model, an audio file or an image. You can also create some asset types in Unity, such as an Animator Controller, an Audio Mixer or a Render Texture. More info
See in Glossary > Create > C# Test Script. This option is disabled if adding a test script would result in a compilation error.
Note: Unity does not include test assemblies (NUnit, Unity TestRunner, and user script assemblies) when using the normal build pipeline, but does include them when using “Run on <Platform>” in the Test Runner Window.
Testing in Edit mode
In Edit mode, Unity runs tests from the Test Runner window.
Edit mode test scriptsA piece of code that allows you to create your own Components, trigger game events, modify Component properties over time and respond to user input in any way you like. More info
See in Glossary are defined by the file location you place them in. Valid locations:
Project Editor folder
Assembly Definition file that references test assemblies that are Editor-only
Precompiled assemblies that are in the Project’s Editor folder
Click the EditMode button, then click Create Test Script in current folder to create a basic test script. Open and edit this in your preferred script editing software as required.
Note: When running in Edit mode, execute UnityTestAttribute in the EditorApplication.update callback loop.
Testing in Play mode
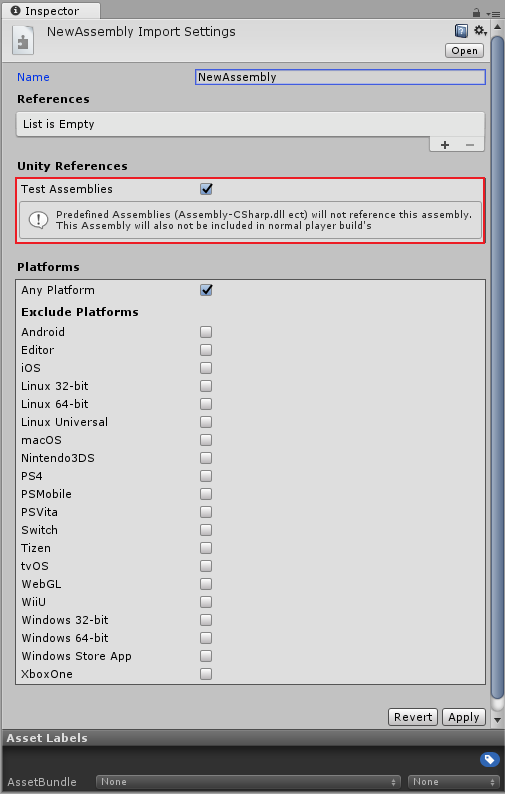
You need to place Play mode test scripts in a folder that an Assembly Definition file includes. The Assembly Definition file needs to reference test assemblies (Nunit and Unity TestRunner). Pre-defined Unity assemblies (such as Assembly-CSharp.dll) do not reference the defined assembly. This Assembly Definition file also needs to reference the assembly you want to test. This means that it’s only possible to test code defined by other Assembly Definition files.
Unity does not include test assemblies in normal player builds; only when running through the Test Runner. If you need to test code in pre-defined assemblies, you can reference test assemblies from all the assemblies. However, you must manually remove these tests afterwards, so that Unity does not add them to the final player build.
To do this:
Save your project.
Go to Window > General > Test Runner.
Click the small drop-down menu in the top-right of the window.
Click Enable playmode tests for all assemblies.
In the dialog box appears, click OK to manually restart the Editor.

Note: Enabling PlayMode tests for all assemblies includes additional assemblies in your Project’s build, which can increase your Project’s size as well as build time.
To create PlayMode test scripts, select PlayMode in the Test Runner window and click Create Test Script in current folder. This button is greyed out if adding the script would result in a compilation error.
Note: Execute UnityTestAttribute as a coroutine when running in Play mode.
- 2018–03–21 Page amended with editorial review
Did you find this page useful? Please give it a rating: