WebGL Player settings
This page details the Player settings specific to the WebGLA JavaScript API that renders 2D and 3D graphics in a web browser. The Unity WebGL build option allows Unity to publish content as JavaScript programs which use HTML5 technologies and the WebGL rendering API to run Unity content in a web browser. More info
See in Glossary platform. For a description of the general Player settings, see Player.
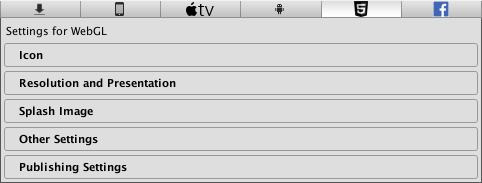
You can find documentation for the properties in the following sections:
Note: Although the Icon panel appears on the WebGL Player settings, there are no icon settings because WebGL games don’t use icons. Also, the only settings on the Splash Image panel are the common Splash Screen settings.
For more information about WebGL Publishing Settings, see the WebGL Building and Running page.
Resolution and Presentation
This section allows you to customize the size and style.
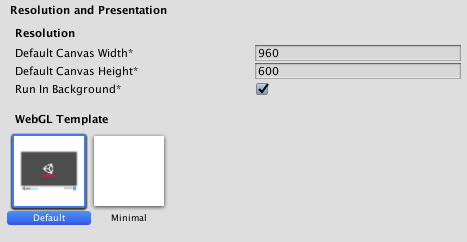
Resolution
| Setting | Function |
|---|---|
| Default Canvas Width | Set the width of the WebGL canvas element. |
| Default Canvas Height | Set the height of the WebGL canvas element. |
| Run In Background | Enable this option to allow your content to continue to run when the canvas or the browser window loses focus. |
WebGL Template
Select a template to use for your WebGL Project:
- The Default page is a simple white page with a loading bar on a grey canvas.
- The Minimal page has only the necessary boilerplate code to run the WebGL content.
You can specify your own template so that you can run your game in a similar environment to the finished game. Follow the instructions in Using WebGL Templates.
Other Settings
This section allows you to customize a range of options organized into the following groups:
- RenderingThe process of drawing graphics to the screen (or to a render texture). By default, the main camera in Unity renders its view to the screen. More info
See in Glossary - Configuration
- Optimization
- Logging
- Legacy
Rendering
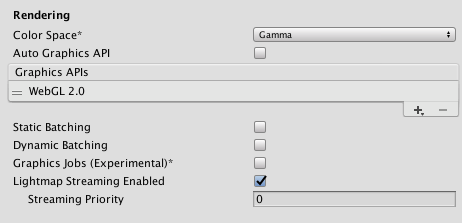
Use these settings to customize how Unity renders your game for the WebGL platform.
| Property | Function |
|---|---|
| Color Space | Choose which color space should be used for rendering: Gamma or Linear. See the Linear rendering overview for an explanation of the difference between the two. |
| Auto Graphics API | Disable this option to manually pick and reorder the graphics APIs. By default this option is enabled, and Unity includes WebGL2.0, with WebGL1.0 as a fallback for devices where WebGL2.0 is not supported. |
| Static BatchingA technique Unity uses to draw GameObjects on the screen that combines static (non-moving) GameObjects into big Meshes, and renders them in a faster way. More info See in Glossary |
Enable this option to use Static batching. |
| Dynamic BatchingAn automatic Unity process which attempts to render multiple meshes as if they were a single mesh for optimized graphics performance. The technique transforms all of the GameObject vertices on the CPU and groups many similar vertices together. More info See in Glossary |
Enable this option to use Dynamic Batching on your build (enabled by default). Note: Dynamic batching has no effect when a Scriptable Render Pipeline is active, so this setting is only visible when nothing is set in the Scriptable Render Pipeline Asset Graphics setting. |
| Graphics Jobs | Enable this option to instruct Unity to offload graphics tasks (render loops) to worker threads running on other CPU cores. This is intended to reduce the time spent in Camera.Render on the main thread, which is often a bottleneck. Note: Unity currently only supports Graphics Jobs when using Vulkan and this setting has no effect when using OpenGL ES. |
| Lightmap Streaming Enabled | Enable this option to load only the lightmap mip maps as needed to render the current game Cameras. This value applies to the lightmap textures as they are generated. Note: To use this setting, you must enable the Texture Streaming Quality setting. |
| Streaming Priority | Set the lightmap mip map streaming priority to resolve resource conflicts. These values are applied to the light map textures as they are generated. Positive numbers give higher priority. Valid values range from –128 to 127. |
Configuration
| Setting | Function | |
|---|---|---|
|
Scripting BackendA framework that powers scripting in Unity. Unity supports three different scripting backends depending on target platform: Mono, .NET and IL2CPP. Universal Windows Platform, however, supports only two: .NET and IL2CPP. More info See in Glossary |
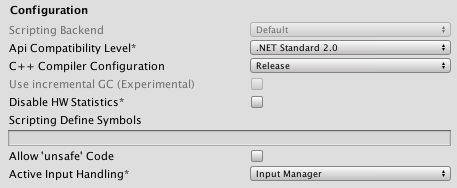
This option is not available for WebGL because WebGL always uses the IL2CPPA Unity-developed scripting back-end which you can use as an alternative to Mono when building Projects for some platforms. More info See in Glossary Scripting backend. |
|
| API Compatibility Level | Choose which .NET APIs you can use in your Project. This setting can affect compatibility with 3rd-party libraries. Tip: If you are having problems with a third-party assembly, you can try the suggestion in the API Compatibility Level section below. |
|
| .Net 2.0 | Maximum .net compatibility, biggest file sizes. Part of the deprecated .NET 3.5 runtime. | |
| .Net 2.0 Subset | Subset of full .net compatibility, smaller file sizes. Part of the deprecated .NET 3.5 runtime. | |
| .Net Standard 2.0 | Compatible with .NET Standard 2.0. Produces smaller builds and has full cross-platform support. | |
| .Net 4.x | Choose this option when using libraries that access APIs not included in .NET Standard 2.0. This option is compatible with the .NET Framework 4, which includes everything in the .NET Standard 2.0 profile as well as additional APIs. Produces larger builds and any additional APIs available are not necessarily supported on all platforms. See Referencing additional class library assemblies for more information. |
|
| Use incremental GC | Not supported. | |
| Scripting Define Symbols | Set custom compilation flags. For more details, see Platform dependent compilation. | |
| Allow ‘unsafe’ Code | Enable support for compiling ‘unsafe’ C# code in a pre-defined assembly (for example, Assembly-CSharp.dll). For Assembly Definition Files ( .asmdef), click on one of your .asmdef files and enable the option in the Inspector window that appears. |
|
| Active Input Handling | Choose how you want to handle input from users. | |
| Input Manager | Use the traditional Input settings. | |
| Input System (Preview) | Use the newer Input system. The Input System is provided as a preview packageA preview package is in development and not yet ready for production. A package in preview might be at any stage of development, from the initial stages to near completion. See in Glossary for this release. To try a preview of the Input System, install the InputSystem package. |
|
| Both | Use both systems side by side. | |
API Compatibility Level
You can choose your mono API compatibility level for all targets. Sometimes a 3rd-party .NET library uses functionality that is outside of your .NET compatibility level. In order to understand what is going on in such cases, and how to best fix it, try following these suggestions:
- Install Reflector for Windows.
- Drag the .NET assemblies for the API compatilibity level you are having issues with into Reflector. You can find these under
Frameworks/Mono/lib/mono/YOURSUBSET/. - Drag in your 3rd-party assembly.
- Right-click your 3rd-party assembly and select Analyze.
- In the analysis report, inspect the Depends on section. The report highlights anything that the 3rd-party assembly depends on, but that is not available in the .NET compatibility level of your choice in red.
Optimization
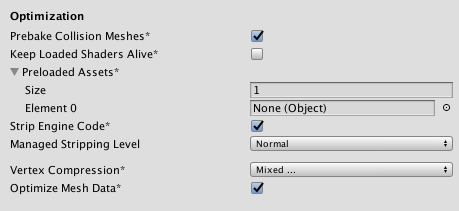
| Setting | Function | |
|---|---|---|
| Prebake Collision Meshes | Enable this option to add collisionA collision occurs when the physics engine detects that the colliders of two GameObjects make contact or overlap, when at least one has a rigidbody component and is in motion. More info See in Glossary data to Meshes at build time. |
|
| Keep Loaded Shaders Alive | Enable this option to prevent shadersA small script that contains the mathematical calculations and algorithms for calculating the Color of each pixel rendered, based on the lighting input and the Material configuration. More info See in Glossary from being unloaded. |
|
| Preloaded Assets | Set an array of Assets for the player to load on startup. To add new Assets, increase the value of the Size property and then set a reference to the Asset to load in the new Element box that appears. |
|
| Strip Engine Code | Enable code stripping. This setting is only available with the IL2CPP Scripting Backend. Most games don’t use all necessary DLLs. With the Strip Engine Code option enabled, you can strip out unused parts to reduce the size of the built player on iOS devices. If your game is using classes that would normally be stripped out by the option you currently have selected, you’ll be presented with a Debug message when you make a build. |
|
| Managed Stripping Level | Choose how aggressively Unity strips unused managed (C#) code. When Unity builds your game or application, the Unity Linker process can strip unused code from the managed dynamically linked libraries used in the project. Stripping code can make the resulting executable significantly smaller, but can sometimes mistakenly remove code that is actually used. |
|
| Normal | Remove unreachable managed code to reduce build size and .NET/IL2CPP build times. | |
| Aggressive | Remove code more aggressively than under the normal option. Code size is further reduced, but this additional reduction may have side effects. For example, some methods may no longer be visible in the debugger and code accessed through reflection can be stripped. You can create a custom link.xml file to preserve specific classes and methods. See Managed bytecode stripping with IL2CPP for more information |
|
| Vertex Compression | Select which vertex channels should be compressed. For example, you can enable compression for everything except positions and lightmap UVs. Compression can save memory and bandwidth but lowers precision. Whole Mesh compression set per imported object overrides where vertex compression is set on objects. Everything else obeys these vertex compression settings. |
|
| Optimize Mesh__ Data__ | Enable this option to remove any data from Meshes that is not required by the Material applied to them (such as tangents, normals, colors, and UVs). | |
Logging
Select what type of logging to allow in specific contexts.

Check one box that corresponds to each Log Type (Error, Assert, Warning, Log, and Exception) when running scriptsA piece of code that allows you to create your own Components, trigger game events, modify Component properties over time and respond to user input in any way you like. More info
See in Glossary (ScriptOnly) , all the time (Full), or never (None).
Legacy
Enable the Clamp BlendShapes (Deprecated) option to clamp the range of blend shape weights in SkinnedMeshRenderers.

Publishing settings

| Setting | Function |
|---|---|
| Enable Exceptions | Choose how to handle unexpected code behavior (generally considered errors) at run time. The options are: None, Explicitly Thrown Exceptions Only, Full Without Stacktrace, and Full With Stacktrace. See the Building and running a WebGL project page for details. |
| Compression Format | Choose the compressionA method of storing data that reduces the amount of storage space it requires. See Texture Compression, Animation Compression, Audio Compression, Build Compression. See in Glossary format to use for release build files. The options are: Gzip, Brotli, or Disabled (none). Note that this option does not affect development buildsA development build includes debug symbols and enables the Profiler. More info See in Glossary. |
| Name Files As Hashes | Enable this option to use an MD5 hash of the uncompressed file contents as a filename for each file in the build. |
| Data caching | Enable this option to automatically cache your contents Asset data on the user’s machine so it doesn’t have to be re-downloaded on subsequent runs (unless the contents have changed). Caching is implemented using the IndexedDB API provided by the browser. Some browsers may implement restrictions around this, such as asking the user for permission to cache data over a specific size. |
| Debug Symbols | Enable this option to preserve debug symbols and perform demangling (displaying the original function names) of the stack trace when an error occurs. For release builds, all the debug information is stored in a separate file which is downloaded from the server on demand when an error occurs. Development builds always have demangling support embedded in the main module and therefore are not affected by this option. |
| WebAssembly Streaming | Allows supporting browsers to compile and instantiate a WebAssembly module directly from a streamed underlying source. |
2019–06–10 Page amended
Publishing settings updated in Unity 2017.3 NewIn20173
Allow ‘unsafe’ code checkbox added in Unity 2018.1
.NET 4.x runtime added in 2018.1
.Net 3.5 scripting runtime deprecated in Unity 2018.3 NewIn20183
WebAssembly Streaming setting added 2019.1 NewIn20191
Input System preview added in Unity 2019.1
Removed asm.js linker target in Unity 2019.1