Visualizing lightmap UVs
It is important to be able to view the lightmap UVs that are being used, and Unity has a visualization tool to help you with this. First, open the Lighting window (menu: Window > RenderingThe process of drawing graphics to the screen (or to a render texture). By default, the main camera in Unity renders its view to the screen. More info
See in Glossary > Lighting) and tick the Auto checkbox at the bottom. This ensures that your bake and precompute are up-to-date, and outputs the data that is needed to view the UVs. Wait for the process to finish (this can take some time for large or complex Scenes).
Visualizing real-time lightmap UVs
To see the UVs for the Realtime Global IlluminationA group of techniques that model both direct and indirect lighting to provide realistic lighting results. Unity has two global illumination systems that combine direct and indirect lighting.: Baked Global Illumination, and Realtime Global Illumination.
See in Glossary system:
- Select a GameObject with a MeshThe main graphics primitive of Unity. Meshes make up a large part of your 3D worlds. Unity supports triangulated or Quadrangulated polygon meshes. Nurbs, Nurms, Subdiv surfaces must be converted to polygons. More info
See in Glossary Renderer in your Scene - Open the Lighting window and select the ObjectThe fundamental object in Unity scenes, which can represent characters, props, scenery, cameras, waypoints, and more. A GameObject’s functionality is defined by the Components attached to it. More info
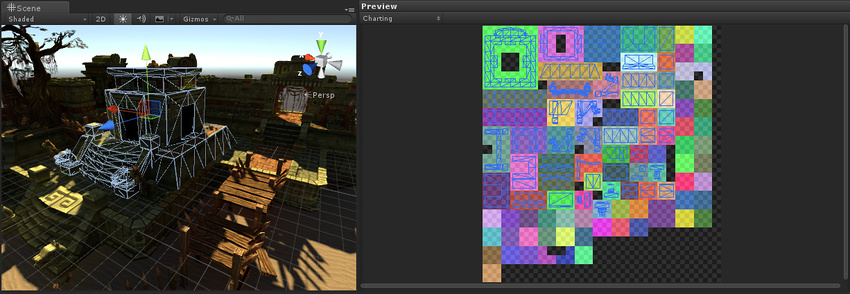
See in Glossary tab - In the Preview area, select Charting from the drop-down.

This displays the UV layout for the real-time lightmapA pre-rendered texture that contains the effects of light sources on static objects in the scene. Lightmaps are overlaid on top of scene geometry to create the effect of lighting. More info
See in Glossary of the selected instance of this Mesh.
- The charts are indicated by the different colored areas in the Preview (show in the image above on the right-hand side).
- The UVs of the selected instance are laid over the charts, as a wireframe representation of the GameObject’s Mesh.
- Dark gray texels show unused areas of the lightmap.
Multiple instances can be packed into a real-time lightmap, so some of the charts you see might actually belong to other GameObjects.
Visualizing baked lightmap UVs
To see the UVs for the Baked Global Illumination system:
- Select an instance.
- Open the Lighting window (menu: Window > Rendering > Lighting) and select the Object tab.
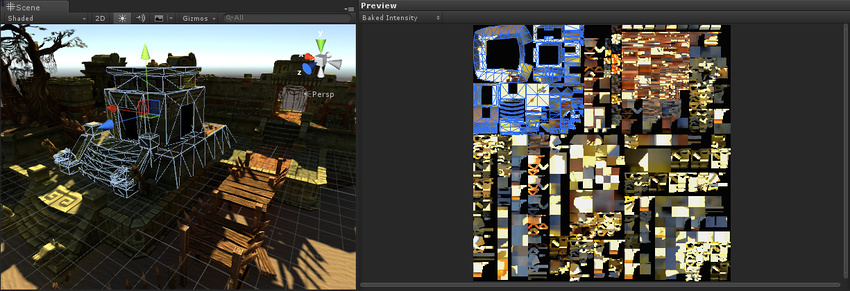
- In the Preview area, select Baked Intensity from the dropdown.

As you can see, the baked UVs are very different to the precomputed real-time UVs. This is because the requirements for baked and precomputed real-time UVs are different.