Using labels to organize “My Assets”
Labels help you organize your Asset packageA collection of files and data from Unity projects, or elements of projects, which are compressed and stored in one file, similar to Zip files, with the .unitypackage extension. Asset packages are a handy way of sharing and re-using Unity projects and collections of assets. More info
See in Glossary list in the Asset StoreA growing library of free and commercial assets created by Unity and members of the community. Offers a wide variety of assets, from textures, models and animations to whole project examples, tutorials and Editor extensions. More info
See in Glossary and in the Package Manager window. Labels are like user-defined categories, or collections that help you find packages easily.
You can only create and use labels on the Asset Store website.

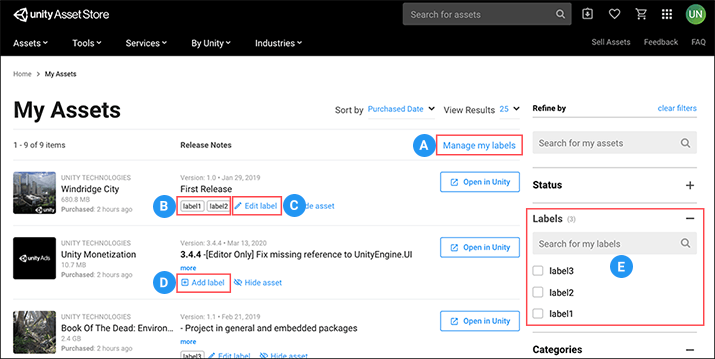
(A) Click Manage my labels to switch to an edit mode where you can assign labels to more than one Asset package at a time.
(B) Labels you have already assigned to this Asset package. If you haven’t assigned any labels to the Asset package yet, Add label appears instead.
(C) Click Edit label to display the Edit Labels window where you can create and assign labels for this Asset package.
(D) Click Add label to display a window where you can create and assign labels for this Asset package. If you have already assigned a label to the Asset package, the label(s) appear instead.
(E) Your list of labels appears here. When you select a label from this list, only those Asset packages that have that label assigned appear in the list. You can select multiple labels at once.
Creating labels
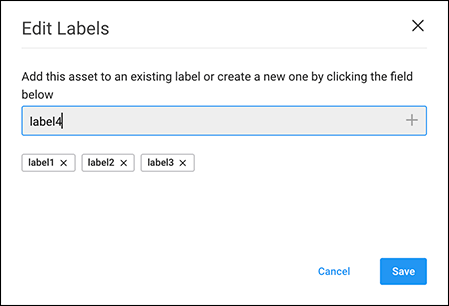
The Edit Labels window lets you create and apply labels at the same time.
To create a new label:
Go to the Unity Asset Store and sign into your Unity account.
-
Go to the My Assets page and click the Add label link.
The Edit Labels window appears.

Create new labels, add labels to or remove them from your Asset package here Enter the name for your new label in the text box.
-
Click Save to save and apply the label to this Asset package or Cancel if you don’t want to create the label at all.
The Edit Labels window closes and you can see the My Assets list again.
Adding and removing labels
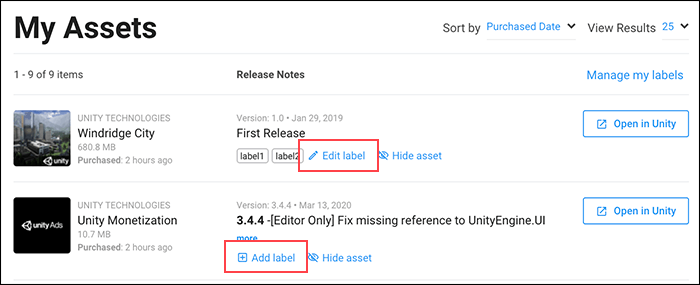
On the My Assets page, if the Asset package already has a label, the Edit label link appears under the release note for that Asset package. If it does not have a label, the Add label link appears. Either of these links open the Edit Labels window, where you can add or remove labels.

To add (apply) an existing label to an Asset package:
- Click either Add label or Edit label to open the Edit Labels window.
- To select a label and add it to the Asset package, on the Edit Labels window, click in the text box. A drop-down shows any labels not yet assigned to this Asset package. Click on the label you want to apply. The label now appears under the text box.
- Click the x on the label underneath the text box to remove any label.
- When you are satisfied with the labels on your Asset packages, click the Save button or Cancel if you don’t want to make any changes.
Adding labels to more than one Asset package at once
-
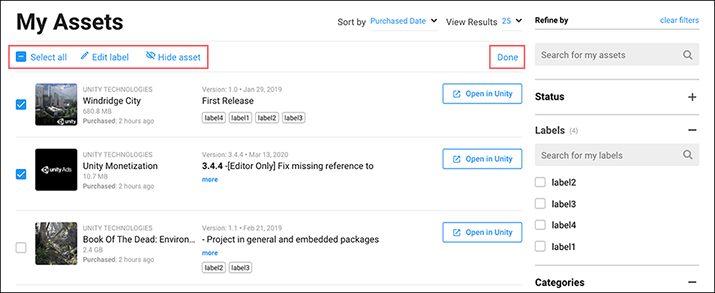
Click Manage my labels to display checkboxes next to each Asset package in the list. A set of group links also appear at the top.

In edit mode, checkboxes appear beside each Asset package and links that apply to all selected Asset packages Enable Select all to select all packages at once or click the checkbox beside each Asset package you want to include. Click Edit label at the top to open the Edit Labels window.
Click inside the text box to choose a label from the list to add that label to the selected Asset package(s).
Click the x on any label underneath the text box to remove that label from the selection Asset package(s).
When you are satisfied with the labels on the selected Asset packages, click the Save button or Cancel if you don’t want to make any changes.
To exit the edit mode, click Done.
Deleting labels
Labels only exist when they are in use, so to delete a label from the list of labels, remove that label from all assets that use it:
In the Unity Asset Store, go to the My Assets page.
Click Manage my labels to display checkboxes next to each Asset package in the list. A set of group links also appear at the top.
Select every package that has the label you want to delete.
-
Click Edit label at the top of the list of Asset packages.
The Edit Labels window appears.
Click the x on the label underneath the textbox to remove them.
Click the the Save button to close the Edit Labels window and return to the My Assets list (still in edit mode).
-
Click Done to exit the edit mode.
The label you deleted no longer appears in the Labels section of the filter sidebar.