Create list and tree views
List and tree views are common features in UI(User Interface) Allows a user to interact with your application. Unity currently supports three UI systems. More info
See in Glossary design. You can use UI Toolkit to create list and tree views inside a custom Editor window or runtime. This example demonstrates how to create list and tree views inside a custom Editor window. You configure the structure of lists and trees with UXML and then dynamically populate them in your C# script.
Example overview
This example creates four Editor windows that display the following:
- A list of planets with a single column
- A list of planets with two columns
- A tree view of planets
- A tree view of planets with two columns
You can find the completed files that this example creates in this GitHub repository.
Prerequisites
This guide is for developers who are familiar with Unity, UI Toolkit, and C# scripting.
This guide references the following concepts:
Create the data in C#
Create data in a C# script that’s made up of two groups of planets and the root nodesA transform in an animation hierarchy that allows Unity to establish consistency between Animation clips for a generic model. It also enables Unity to properly blend between Animations that have not been authored “in place” (that is, where the whole Model moves its world position while animating). More info
See in Glossary for the tree view.
Create a project in Unity with any template.
In your Project windowA window that shows the contents of your
Assetsfolder (Project tab) More info
See in Glossary, create a folder namedEditor.In the
Editorfolder, create a C# script namedPlanetsWindow.cs.-
Replace the contents of
PlanetsWindow.cswith the following:using System.Collections.Generic; using UnityEngine; using UnityEditor; using UnityEngine.UIElements; // Base class for all windows that display planet information. public class PlanetsWindow : EditorWindow { [SerializeField] protected VisualTreeAsset uxml; // Nested interface that can be either a single planet or a group of planets. protected interface IPlanetOrGroup { public string name { get; } public bool populated { get; } } // Nested class that represents a planet. protected class Planet : IPlanetOrGroup { public string name { get; } public bool populated { get; } public Planet(string name, bool populated = false) { this.name = name; this.populated = populated; } } // Nested class that represents a group of planets. protected class PlanetGroup : IPlanetOrGroup { public string name { get; } public bool populated { get { var anyPlanetPopulated = false; foreach (Planet planet in planets) { anyPlanetPopulated = anyPlanetPopulated || planet.populated; } return anyPlanetPopulated; } } public readonly IReadOnlyList<Planet> planets; public PlanetGroup(string name, IReadOnlyList<Planet> planets) { this.name = name; this.planets = planets; } } // Data about planets in our solar system. protected static readonly List<PlanetGroup> planetGroups = new List<PlanetGroup> { new PlanetGroup("Inner Planets", new List<Planet> { new Planet("Mercury"), new Planet("Venus"), new Planet("Earth", true), new Planet("Mars") }), new PlanetGroup("Outer Planets", new List<Planet> { new Planet("Jupiter"), new Planet("Saturn"), new Planet("Uranus"), new Planet("Neptune") }) }; // Expresses planet data as a list of the planets themselves. Needed for ListView and MultiColumnListView. protected static List<Planet> planets { get { var retVal = new List<Planet>(8); foreach (var group in planetGroups) { retVal.AddRange(group.planets); } return retVal; } } // Expresses planet data as a list of TreeViewItemData objects. Needed for TreeView and MultiColumnTreeView. protected static IList<TreeViewItemData<IPlanetOrGroup>> treeRoots { get { int id = 0; var roots = new List<TreeViewItemData<IPlanetOrGroup>>(planetGroups.Count); foreach (var group in planetGroups) { var planetsInGroup = new List<TreeViewItemData<IPlanetOrGroup>>(group.planets.Count); foreach (var planet in group.planets) { planetsInGroup.Add(new TreeViewItemData<IPlanetOrGroup>(id++, planet)); } roots.Add(new TreeViewItemData<IPlanetOrGroup>(id++, group, planetsInGroup)); } return roots; } } }
Create a list view
To create a list view, first use the UI builder to create a ListView UI control. Then, create a custom Editor window with the ListView and define where to get data for the list in a C# script. Finally, reference the UXML file to the C# script.
Right-click in the
Editorfolder.Select Create > UI Toolkit > Editor Window.
In the C# box, enter
PlanetsListViewand clear the USS checkbox. This creates two files:PlanetsListView.uxmlandPlanetsListView.cs.Double-click
PlanetsListView.uxmlto open it in the UI Builder.In the Hierarchy window, delete the Label control and add the ListView control.
Select the ListView control in the Hierarchy window.
In the InspectorA Unity window that displays information about the currently selected GameObject, asset or project settings, allowing you to inspect and edit the values. More info
See in Glossary window, set Fixed Item Height to 20.-
Save your changes. Your
PlanetsListView.uxmlshould look like the following:<ui:UXML xmlns:ui="UnityEngine.UIElements" xmlns:uie="UnityEditor.UIElements" xsi="http://www.w3.org/2001/XMLSchema-instance" engine="UnityEngine.UIElements" editor="UnityEditor.UIElements" noNamespaceSchemaLocation="../../../UIElementsSchema/UIElements.xsd" editor-extension-mode="False"> <ui:ListView fixed-item-height="20" /> </ui:UXML> -
Replace the contents of
PlanetsListView.cswith the following:using UnityEditor; using UnityEngine.UIElements; public class PlanetsListView : PlanetsWindow { [MenuItem("Planets/Standard List")] static void Summon() { GetWindow<PlanetsListView>("Standard Planet List"); } void CreateGUI() { uxml.CloneTree(rootVisualElement); var listView = rootVisualElement.Q<ListView>(); // Set ListView.itemsSource to populate the data in the list. listView.itemsSource = planets; // Set ListView.makeItem to initialize each entry in the list. listView.makeItem = () => new Label(); // Set ListView.bindItem to bind an initialized entry to a data item. listView.bindItem = (VisualElement element, int index) => (element as Label).text = planets[index].name; } } In Unity, select
PlanetsListView.csin the Project window, and then dragPlanetsListView.uxmlinto the Uxml field in the Inspector.From the menu, select Planets > Standard List to see a list of planets.

Create a list view with multiple columns
To create a list view with multiple columns, first create a MultiColumnListView UI control, and define the number of columns and column titles in a UXML file. Then create a custom Editor window with the MultiColumnListView and define where to get data for the list in each column in a C# script. Finally, reference the UXML file to the C# script.
Right-click in the
Editorfolder.Select Create > UI Toolkit > UI Document to create a UXML file and name it as
PlanetsMultiColumnListView.uxml.Open
PlanetsMultiColumnListView.uxmlin a text editor.-
Replace the contents of
PlanetsMultiColumnListView.uxmlwith the following:<ui:UXML xmlns:ui="UnityEngine.UIElements" xmlns:uie="UnityEditor.UIElements" xsi="http://www.w3.org/2001/XMLSchema-instance" engine="UnityEngine.UIElements" editor="UnityEditor.UIElements" noNamespaceSchemaLocation="../../../UIElementsSchema/UIElements.xsd" editor-extension-mode="False"> <ui:MultiColumnListView fixed-item-height="20"> <!-- Columns and Column aren't Visual Elements or controls. They are considered attributes of MultiColumnListView. --> <ui:Columns> <ui:Column name="name" title="Name" width="80" /> <ui:Column name="populated" title="Populated?" width="80" /> </ui:Columns> </ui:MultiColumnListView> </ui:UXML> In the
Editorfolder, create a C# file namedPlanetsMultiColumnListView.cs.-
Replace the contents of
PlanetsMultiColumnListView.cswith the following:using UnityEditor; using UnityEngine.UIElements; public class PlanetsMultiColumnListView : PlanetsWindow { [MenuItem("Planets/Multicolumn List")] static void Summon() { GetWindow<PlanetsMultiColumnListView>("Multicolumn Planet List"); } void CreateGUI() { uxml.CloneTree(rootVisualElement); var listView = rootVisualElement.Q<MultiColumnListView>(); // Set MultiColumnListView.itemsSource to populate the data in the list. listView.itemsSource = planets; // For each column, set Column.makeCell to initialize each cell in the column. // You can index the columns array with names or numerical indices. listView.columns["name"].makeCell = () => new Label(); listView.columns["populated"].makeCell = () => new Toggle(); // For each column, set Column.bindCell to bind an initialized cell to a data item. listView.columns["name"].bindCell = (VisualElement element, int index) => (element as Label).text = planets[index].name; listView.columns["populated"].bindCell = (VisualElement element, int index) => (element as Toggle).value = planets[index].populated; } } In Unity, select
PlanetsMultiColumnListView.csin the Project window.Drag
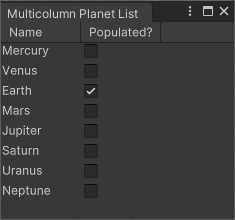
PlanetsMultiColumnListView.uxmlinto the Uxml field in the Inspector.From the menu, select Planets > Multicolumn List to see a two-column list. One column has a list of planets. The other column has toggles that indicate whether the planet is populated.

Create a tree view
To create a tree view in a custom Editor, first create a TreeView UI control in a UXML file. Then create a custom Editor window with the TreeView and define where to get data for the tree nodes a C# script. Finally reference the UXML file to the C# script.
In the
Editorfolder, create a UXML file namedPlanetsTreeView.uxml.-
Replace the contents of
PlanetsTreeView.uxmlwith the following:<ui:UXML xmlns:ui="UnityEngine.UIElements" xmlns:uie="UnityEditor.UIElements" xsi="http://www.w3.org/2001/XMLSchema-instance" engine="UnityEngine.UIElements" editor="UnityEditor.UIElements" noNamespaceSchemaLocation="../../../UIElementsSchema/UIElements.xsd" editor-extension-mode="False"> <ui:TreeView fixed-item-height="20" /> </ui:UXML> In the
Editorfolder, create a C# file namedPlanetsTreeView.cs.-
Replace the contents of
PlanetsTreeView.cswith the following:using UnityEditor; using UnityEngine.UIElements; public class PlanetsTreeView : PlanetsWindow { [MenuItem("Planets/Standard Tree")] static void Summon() { GetWindow<PlanetsTreeView>("Standard Planet Tree"); } void CreateGUI() { uxml.CloneTree(rootVisualElement); var treeView = rootVisualElement.Q<TreeView>(); // Call TreeView.SetRootItems() to populate the data in the tree. treeView.SetRootItems(treeRoots); // Set TreeView.makeItem to initialize each node in the tree. treeView.makeItem = () => new Label(); // Set TreeView.bindItem to bind an initialized node to a data item. treeView.bindItem = (VisualElement element, int index) => (element as Label).text = treeView.GetItemDataForIndex<IPlanetOrGroup>(index).name; } } In Unity, select
PlanetsTreeView.csin the Project window.Drag
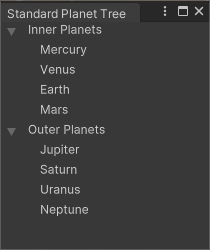
PlanetsTreeView.uxmlinto the Uxml field in the Inspector.From the menu, select Planets > Standard Tree to see two lists of planets grouped by nodes. Each node has an arrow next to it. If you select the arrow, the window shows the planets in the group.

Create a tree view with multiple columns
To create a tree view with multiple columns in a custom Editor, first create a MultiColumnTreeView UI control and define the columns in a UXML file. Then create a custom Editor window with the MultiColumnTreeView and define where to get data for each column in a C# script. Finally, reference the UXML file to the C# script.
In the
Editorfolder, create a UXML file namedPlanetsMultiColumnTreeView.uxml.-
Replace the contents of
PlanetsMultiColumnTreeView.uxmlwith the following:<ui:UXML xmlns:ui="UnityEngine.UIElements" xmlns:uie="UnityEditor.UIElements" xsi="http://www.w3.org/2001/XMLSchema-instance" engine="UnityEngine.UIElements" editor="UnityEditor.UIElements" noNamespaceSchemaLocation="../../../UIElementsSchema/UIElements.xsd" editor-extension-mode="False"> <ui:MultiColumnTreeView fixed-item-height="20"> <!-- Columns and Column aren't Visual Elements or controls; they are considered attributes of MultiColumnListView. --> <ui:Columns> <ui:Column name="name" title="Name" width="120" /> <ui:Column name="populated" title="Populated?" width="80" /> </ui:Columns> </ui:MultiColumnTreeView> </ui:UXML> In the
Editorfolder, create a C# file namedPlanetsMultiColumnTreeView.cs.-
Replace the contents of
PlanetsMultiColumnTreeView.cswith the following:using UnityEditor; using UnityEngine.UIElements; public class PlanetsMultiColumnTreeView : PlanetsWindow { [MenuItem("Planets/Multicolumn Tree")] static void Summon() { GetWindow<PlanetsMultiColumnTreeView>("Multicolumn Planet Tree"); } void CreateGUI() { uxml.CloneTree(rootVisualElement); var treeView = rootVisualElement.Q<MultiColumnTreeView>(); // Call MultiColumnTreeView.SetRootItems() to populate the data in the tree. treeView.SetRootItems(treeRoots); // For each column, set Column.makeCell to initialize each node in the tree. // You can index the columns array with names or numerical indices. treeView.columns["name"].makeCell = () => new Label(); treeView.columns["populated"].makeCell = () => new Toggle(); // For each column, set Column.bindCell to bind an initialized node to a data item. treeView.columns["name"].bindCell = (VisualElement element, int index) => (element as Label).text = treeView.GetItemDataForIndex<IPlanetOrGroup>(index).name; treeView.columns["populated"].bindCell = (VisualElement element, int index) => (element as Toggle).value = treeView.GetItemDataForIndex<IPlanetOrGroup>(index).populated; } } In Unity, select
PlanetsMultiColumnTreeView.csin the Project window.Drag
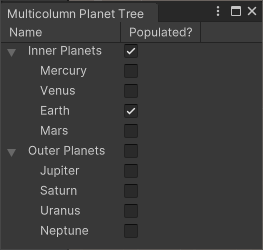
PlanetsMultiColumnTreeView.uxmlinto the Uxml field in the Inspector.Select Planets > Multicolumn Tree to see a list with two columns. The first column has two lists of planets grouped by nodes. Each node has an arrow next to it. If you select the arrow, the window shows a list of planets and toggles in that group.
