Configure graphics APIs
Unity uses a built-in set of graphics APIs or the graphics APIs that you select in the Unity Editor.
To use Unity’s default graphics APIs:
Open the Player settingsSettings that let you set various player-specific options for the final game built by Unity. More info
See in Glossary (menu: Edit > Project Settings > Player).-
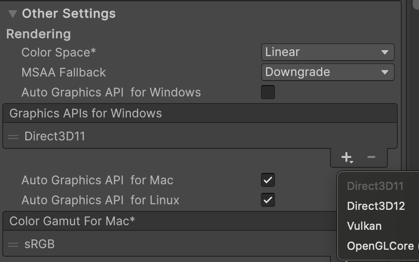
Navigate to Other Settings > Rendering section and enable Auto Graphics API for a platform (Windows/Mac/Linux).

Using the default graphics APIs
When you enable Auto Graphics API for a platform (Windows/Mac/Linux), the Player build includes a set of built-in graphics APIs and uses the appropriate one at runtime to produce a best case scenario.
Override default graphics APIs
You can override the default graphics APIs and use an alternate graphics API for the Editor and Player. Use the following steps:
-
In the Player settings > Other settings > Rendering section, disable the Auto Graphics API for a platform (Windows/Mac/Linux).
When Auto Graphics API for a platform (Windows/Mac/Linux) is disabled, the Unity Editor displays a list of supported graphics API for that platform and uses the first API in the list. The graphics API at the top of the Graphics API list is the default API. If the default API isn’t supported by a specific platform, Unity uses the next API in the Graphics API list.
-
Select the Add (+) button, then select the graphics API from the dropdown.
 .
.
You can reorder the graphics APIs in the list. For example, to check how your application runs on OpenGL Core in the Editor, move OpenGLCore to the top of the list and the Editor switches to use OpenGL Core rendering.
For information on how graphics rendering behaves between the platforms and ShaderA program that runs on the GPU. More info
See in Glossary language semantics, refer to Platform-specific rendering differences.