- Unity User Manual (2019.4 LTS)
- Working in Unity
- Unity's interface
Unity’s interface
This section provides a detailed tour of the most common editor windows, and how to make full use of them.

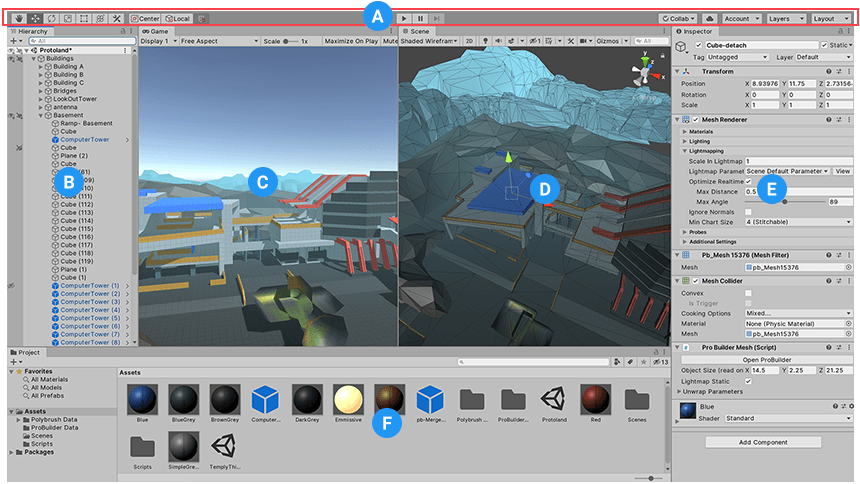
- (A) The Toolbar provides access to the most essential working features. On the left it contains the basic tools for manipulating the Scene view and the GameObjects within it. In the centre are the play, pause and step controls. The buttons to the right give you access to Unity Collaborate, Unity Cloud Services and your Unity Account, followed by a layer visibility menu, and finally the Editor layout menu (which provides some alternate layouts for the Editor windows, and allows you to save your own custom layouts).
- (B) The Hierarchy window is a hierarchical text representation of every GameObject in the Scene. Each item in the Scene has an entry in the hierarchy, so the two windows are inherently linked. The hierarchy reveals the structure of how GameObjects attach to each another.
- (C) The Game view simulates what your final rendered game will look like through your Scene Cameras. When you click the Play button, the simulation begins.
- (D) The Scene view allows you to visually navigate and edit your Scene. The Scene view can show a 3D or 2D perspective, depending on the type of Project you are working on.
- (E) The Inspector Window allows you to view and edit all the properties of the currently selected GameObject. Because different types of GameObjects have different sets of properties, the layout and contents of the Inspector window change each time you select a different GameObject.
- (F) The Project window displays your library of Assets that are available to use in your Project. When you import Assets into your Project, they appear here.
Copyright © 2020 Unity Technologies. Publication 2019.4