Enable 2D lighting with the Tilemap Renderer in URP
To enable 2D lighting in URP, set up the required settings to use the Tilemap Renderer component.
You can use the Tilemap Renderer with URP 2D to enable 2D lighting on tilesA simple class that allows a sprite to be rendered on a Tilemap. More info
See in Glossary and tilemapsA GameObject that allows you to quickly create 2D levels using tiles and a grid overlay. More info
See in Glossary, especially isometric tilemaps which simulate pseudo-depth. Doing so requires you to setup your project and adjust the Tilemap Renderer’s settings in the following ways.
When you select the 2D Renderer Data asset for your project’s Scriptable Render Pipeline, the Renderer Data asset assumes control of the Tilemap Renderer’s Transparency Sort Mode property settings and requires you to adjust the settings under the 2D Renderer Data asset’s property settings instead of in the Project SettingsA broad collection of settings which allow you to configure how Physics, Audio, Networking, Graphics, Input and many other areas of your project behave. More info
See in Glossary.
To optimize the rendering of the Tilemap Renderer component with the 2D lighting system, Unity can batch the rendering of the Tilemap Renderer component with the Scriptable Render Pipeline Batcher to improve the rendering performance of the Tilemap Renderer with other spriteA 2D graphic objects. If you are used to working in 3D, Sprites are essentially just standard textures but there are special techniques for combining and managing sprite textures for efficiency and convenience during development. More info
See in Glossary renderers with the same rendering characteristics.
Adjusting the Transparency Sort Mode settings in the 2D Renderer Data asset
When you create an isometric tilemap, one of the steps requires you to set the Transparency Sort Mode (Edit > Project Settings… > Graphics > Camera Settings) to Custom Axis and to set it to the required values to have Unity render the Tiles with the pseudo-depth of an isometric perspective.

If you want to use the 2D Renderer with the Tilemap Renderer in your Project, first create the URP Asset and its associated 2D Renderer Data asset by right-clicking the Asset window and go to Create > Rendering > URP Asset (with 2D Renderer). Then go to your Project’s Scriptable Render Pipeline Settings (menu: Edit > Project Settings… > Graphics) and select the Universal Render Pipeline (URP) 2D asset.
When you do so, the CameraA component which creates an image of a particular viewpoint in your scene. The output is either drawn to the screen or captured as a texture. More info
See in Glossary Settings (including the Transparency Sort Mode property) become hidden.

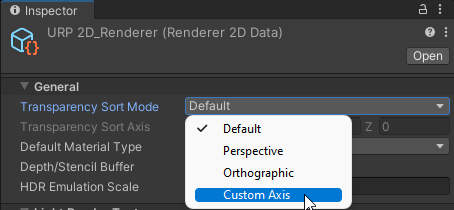
The 2D Renderer Data asset now controls the Transparency Sort Mode property settings, and the values set in the active Renderer 2D Data asset supersedes the values set in the Project Settings. Select the 2D Renderer Data asset go to its InspectorA Unity window that displays information about the currently selected GameObject, asset or project settings, allowing you to inspect and edit the values. More info
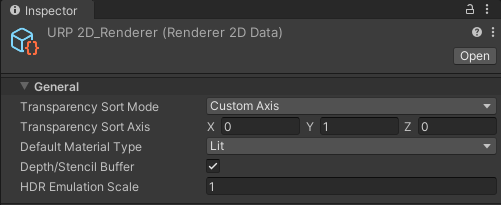
See in Glossary window. In the General section, set Transparency Sort Mode to Custom Axis.

The Transparency Sort Axis property settings then become available. Use the same values for the Transparency Sort Axis as those used to for the rendering of tiles on an isometric tilemap.

Enabling the Scriptable Render Pipeline Batcher
To prepare the Tilemap Renderer for SRP batching:
- Fulfill the requirements and steps for enabling the SRP Batcher in URP.
- Select the Tilemap Renderer component and go to its Mode property setting.
- Select either Individual or SRP Batch (only supported in the Universal Render Pipeline version 15 onwards). Note: Chunk mode is incompatible with the SRP batcher.