- Unity User Manual 2021.3 (LTS)
- 图形
- 着色器
- 编写着色器
- 编写表面着色器
- 表面着色器光照示例
表面着色器光照示例
本页提供了表面着色器中的自定义表面着色器光照模型的示例。要进一步了解常规表面着色器指南,请参阅表面着色器示例。
因为__延迟光照__与一些自定义的每材质光照模型不兼容,所以下面的大多数示例都使着色器仅编译到__前向渲染__。
渲染管线兼容性
| 功能名称 | 内置渲染管线 | 通用渲染管线 (URP) | 高清渲染管线 (HDRP) | 自定义 SRP |
|---|---|---|---|---|
| 表面着色器 | 是 | 否 有关在 URP 中创建 Shader 对象的简化方法,请参阅 Shader Graph。 |
否 有关在 HDRP 中创建 Shader 对象的简化方法,请参阅 Shader Graph。 |
否 |
Diffuse
以下是使用内置兰伯特光照模型的着色器示例:
  Shader "Example/Diffuse Texture" {
      Properties {
        _MainTex ("Texture", 2D) = "white" {}
      }
      SubShader {
        Tags { "RenderType" = "Opaque" }
        CGPROGRAM
        #pragma surface surf Lambert

        struct Input {
            float2 uv_MainTex;
        };

        sampler2D _MainTex;

        void surf (Input IN, inout SurfaceOutput o) {
            o.Albedo = tex2D (_MainTex, IN.uv_MainTex).rgb;
        }
        ENDCG
      }
      Fallback "Diffuse"
    }
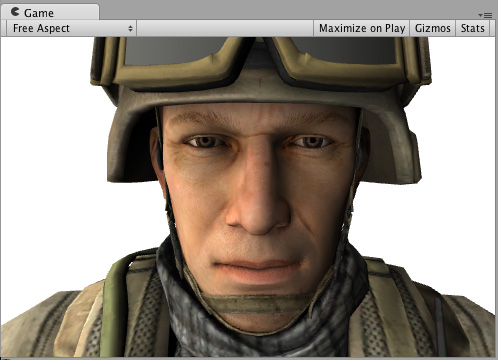
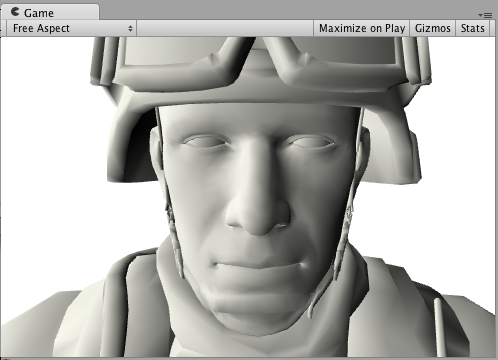
以下是有纹理和没有纹理的外观(在场景中使用一个方向光):


以下示例显示了如何通过编写自定义光照模型(而不是使用内置兰伯特模型)来实现相同的结果。
为此,您需要使用许多表面着色器光照模型函数。下面是一个简单的兰伯特光照模型。请注意,只有CGPROGRAM 部分发生变化;周围的着色器代码完全相同:
    Shader "Example/Diffuse Texture" {
            Properties {
                _MainTex ("Texture", 2D) = "white" {}
            }
            SubShader {
            Tags { "RenderType" = "Opaque" }
            CGPROGRAM
              #pragma surface surf SimpleLambert

              half4 LightingSimpleLambert (SurfaceOutput s, half3 lightDir, half atten) {
                  half NdotL = dot (s.Normal, lightDir);
                  half4 c;
                  c.rgb = s.Albedo * _LightColor0.rgb * (NdotL * atten);
                  c.a = s.Alpha;
                  return c;
              }

            struct Input {
                float2 uv_MainTex;
            };

            sampler2D _MainTex;

            void surf (Input IN, inout SurfaceOutput o) {
                o.Albedo = tex2D (_MainTex, IN.uv_MainTex).rgb;
            }
            ENDCG
            }
            Fallback "Diffuse"
        }
这个简单的漫射光照模型使用了 LightingSimpleLambert 函数。它通过以下方式计算光照:计算表面法线和光线方向之间的点积,然后应用光衰减和颜色。
漫射环绕
以下示例显示了__环绕漫射__,这是对__漫射__光照的修改,其中光照“环绕着”对象的边缘。它对于模拟次表面散射效果很有用。只有 CGPROGRAM 部分发生变化,这里同样省略了周围的着色器代码:
    ...ShaderLab code...
        CGPROGRAM
        #pragma surface surf WrapLambert

        half4 LightingWrapLambert (SurfaceOutput s, half3 lightDir, half atten) {
            half NdotL = dot (s.Normal, lightDir);
            half diff = NdotL * 0.5 + 0.5;
            half4 c;
            c.rgb = s.Albedo * _LightColor0.rgb * (diff * atten);
            c.a = s.Alpha;
            return c;
        }

        struct Input {
            float2 uv_MainTex;
        };

        sampler2D _MainTex;
            void surf (Input IN, inout SurfaceOutput o) {
            o.Albedo = tex2D (_MainTex, IN.uv_MainTex).rgb;
        }
        ENDCG
        ...ShaderLab code...
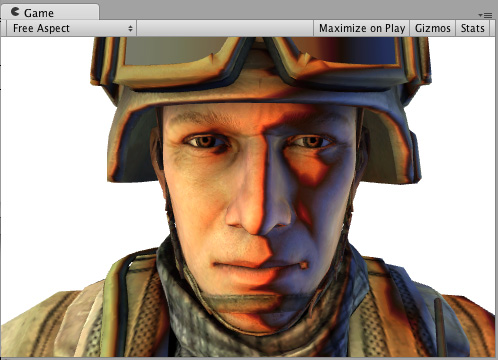
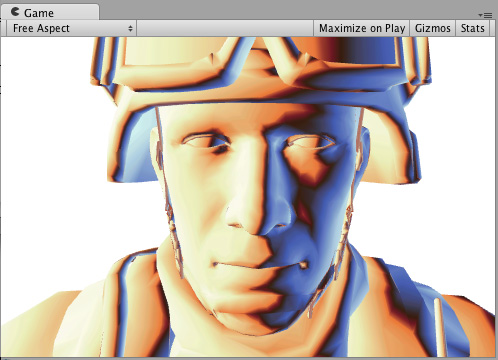
以下是有纹理和没有纹理的外观(在场景中使用一个方向光):


卡通渐变 (Toon Ramp)
以下示例显示了一个“渐变”光照模型,该模型使用纹理渐变来定义表面如何响应光源和法线之间的角度。这可以用于各种效果,并且在与__卡通__光照一起使用时尤其有效。
    ...ShaderLab code...
        CGPROGRAM
        #pragma surface surf Ramp

        sampler2D _Ramp;

        half4 LightingRamp (SurfaceOutput s, half3 lightDir, half atten) {
            half NdotL = dot (s.Normal, lightDir);
            half diff = NdotL * 0.5 + 0.5;
            half3 ramp = tex2D (_Ramp, float2(diff)).rgb;
            half4 c;
            c.rgb = s.Albedo * _LightColor0.rgb * ramp * atten;
            c.a = s.Alpha;
            return c;
        }

        struct Input {
            float2 uv_MainTex;
        };

        sampler2D _MainTex;

        void surf (Input IN, inout SurfaceOutput o) {
            o.Albedo = tex2D (_MainTex, IN.uv_MainTex).rgb;
        }
        ENDCG
        ...ShaderLab code...
以下是有纹理和没有纹理的外观(在场景中使用一个方向光):


简单镜面反射
以下示例显示了一个简单的镜面反射光照模型,类似于内置的 BlinnPhong 光照模型。
    ...ShaderLab code...
        CGPROGRAM
        #pragma surface surf SimpleSpecular

        half4 LightingSimpleSpecular (SurfaceOutput s, half3 lightDir, half3 viewDir, half atten) {
            half3 h = normalize (lightDir + viewDir);

            half diff = max (0, dot (s.Normal, lightDir));

            float nh = max (0, dot (s.Normal, h));
            float spec = pow (nh, 48.0);

            half4 c;
            c.rgb = (s.Albedo * _LightColor0.rgb * diff + _LightColor0.rgb * spec) * atten;
            c.a = s.Alpha;
            return c;
        }

        struct Input {
            float2 uv_MainTex;
        };

        sampler2D _MainTex;

        void surf (Input IN, inout SurfaceOutput o) {
            o.Albedo = tex2D (_MainTex, IN.uv_MainTex).rgb;
        }
        ENDCG
        ...ShaderLab code...
以下是有纹理和没有纹理的外观(在场景中使用一个方向光):


自定义 GI
我们将从一个模仿 Unity 内置 GI 的着色器开始:
    Shader "Example/CustomGI_ToneMapped" {
        Properties {
            _MainTex ("Albedo (RGB)", 2D) = "white" {}
        }
        SubShader {
            Tags { "RenderType"="Opaque" }

            CGPROGRAM
            #pragma surface surf StandardDefaultGI

            #include "UnityPBSLighting.cginc"

            sampler2D _MainTex;

            inline half4 LightingStandardDefaultGI(SurfaceOutputStandard s, half3 viewDir, UnityGI gi)
            {
                return LightingStandard(s, viewDir, gi);
            }

            inline void LightingStandardDefaultGI_GI(
                SurfaceOutputStandard s,
                UnityGIInput data,
                inout UnityGI gi)
            {
                LightingStandard_GI(s, data, gi);
            }

            struct Input {
                float2 uv_MainTex;
            };

                void surf (Input IN, inout SurfaceOutputStandard o) {
                    o.Albedo = tex2D(_MainTex, IN.uv_MainTex);
                }
                ENDCG
            }
            FallBack "Diffuse"
        }
现在,让我们在 GI 上添加一些色调映射:
    Shader "Example/CustomGI_ToneMapped" {
        Properties {
            _MainTex ("Albedo (RGB)", 2D) = "white" {}
            _Gain("Lightmap tone-mapping Gain", Float) = 1
            _Knee("Lightmap tone-mapping Knee", Float) = 0.5
            _Compress("Lightmap tone-mapping Compress", Float) = 0.33
        }
        SubShader {
            Tags { "RenderType"="Opaque" }

            CGPROGRAM
            #pragma surface surf StandardToneMappedGI

            #include "UnityPBSLighting.cginc"

            half _Gain;
            half _Knee;
            half _Compress;
            sampler2D _MainTex;

            inline half3 TonemapLight(half3 i) {
                i *= _Gain;
                return (i > _Knee) ?(((i - _Knee)*_Compress) + _Knee) : i;
            }

            inline half4 LightingStandardToneMappedGI(SurfaceOutputStandard s, half3 viewDir, UnityGI gi)
            {
                return LightingStandard(s, viewDir, gi);
            }

            inline void LightingStandardToneMappedGI_GI(
                SurfaceOutputStandard s,
                UnityGIInput data,
                inout UnityGI gi)
            {
                LightingStandard_GI(s, data, gi);

                gi.light.color = TonemapLight(gi.light.color);
                #ifdef DIRLIGHTMAP_SEPARATE
                    #ifdef LIGHTMAP_ON
                        gi.light2.color = TonemapLight(gi.light2.color);
                    #endif
                    #ifdef DYNAMICLIGHTMAP_ON
                        gi.light3.color = TonemapLight(gi.light3.color);
                    #endif
                #endif
                gi.indirect.diffuse = TonemapLight(gi.indirect.diffuse);
                gi.indirect.specular = TonemapLight(gi.indirect.specular);
            }

            struct Input {
                float2 uv_MainTex;
            };

                void surf (Input IN, inout SurfaceOutputStandard o) {
                    o.Albedo = tex2D(_MainTex, IN.uv_MainTex);
                }
                ENDCG
            }
            FallBack "Diffuse"
        }
Copyright © 2022 Unity Technologies. Publication 2021.3