- Unity User Manual 2023.2
- 图形
- 材质
- Material Variants
- Create, modify, and apply Material Variants
Create, modify, and apply Material Variants
These instructions explain how to work with Material Variants. Programmers should consult the Material and MaterialEditor API documentation for information about how to work with Material Variants in scripts.
Differences between Prefab Variants and Material Variants
The Material Variant workflow is mostly the same as the Prefab Variant workflow. There are two key differences:
- You can lock one or more Properties of a Material Variant so that no one can edit these Properties in its children
- It is possible to change the parent of a Material Variant
Create a Material Variant
There are two ways to create a Material Variant.
Right-click on a Material in the Project window
- Select a Material in the Project window.
- Right-click on that Material.
- Select Create > Material Variant.
Select in the Material Hierarchy
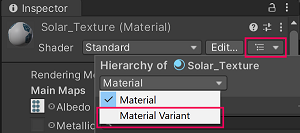
- Open the Material Hierarchy dialog.
- Select the material type dropdown.
- Select Material Variant.
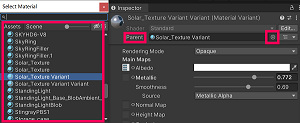
- Assign a material to the parent field

Identify the new Material Variant
When you create a new Material Variant, it has the name [Material Name] Variant (Material Variant) in the Material Inspector. When Unity begins to load a new Material Variant, the Material Variant has a striped icon in the Project window. After Unity finishes loading the new Material Variant, the normal Material preview replaces the striped icon in the Project window.
Add an Override on a Material Variant
- Select a Material Variant.
- Modify one of its Properties in the Material Inspector.

Revert one or more Overrides on a Material Variant
- Right-click on an Override.
- Select Revert to revert this specific Override, or select Revert all Overrides to revert every Override on this variant. If this Override originated from a child, reverting also applies to that child.
For a detailed explanation of how inheritance determines the effect of reverting changes, see Material Variant inheritance or Revert an Override applied upward.
Apply an Override upward in the hierarchy
You can apply an Override upward to any ancestor in the hierarchy.

Apply the Override to the parent
To apply an Override to a parent, right-click on an Override and select Apply to [name of parent] in the dropdown.
Apply the Override to an ancestor
To apply an Override to an ancestor, right-click on an Override and select Apply to [name of ancestor] in the dropdown.
Revert one or more Overrides applied upward
Once an Override is applied upward, you can no longer revert it on the child that originated it. Instead, you must revert it on the recipient parent or ancestor; see the instructions in Revert one or more Overrides on a Material Variant.
Delete a Material Variant
- Select the Material Variant in the Project window.
- Press the Delete key.
The next step depends on whether the Material Variant has children.
- If the Material Variant has no children, click Delete in the warning dialog to delete the variant.
- If the Material Variant has one or more children, a warning dialog appears that says One or more of these Material(s) has one or more children. Would you like you reparent all of these children to their closest remaining ancestor?
- The warning dialog provides three options:
- Delete and reparent children: This option causes Unity to automatically assign this parent’s children to their closest ancestor; this new parent can be either a Material Variant or a Material, or no parent if the Material to be deleted is the root of the hierarchy.
- Delete only Note: A Material with a missing parent is in an invalid state and will not load correctly at runtime.
- Cancel See Inheritance error messages for information about orphan Material Variants.
- The warning dialog provides three options:
Reparent a Material Variant
There are two ways to reparent a Material Variant.
In the Material Inspector
- Select the variant you want to reparent in the Project window.
- Select the bullseye next to the Parent Property and choose a new parent in the Select Material dialog.

In the Project window
Drag the new parent Material or Material Variant onto the target child.
Lock a Property
- Right-click on a Property.
- Select Lock in children in the dropdown.
- A padlock icon appears next to the locked Property.
To unlock the property, click Lock in children again.

Convert a Material Variant to a Material
There are two ways to convert a Material Variant to a Material.
From the Hierarchy View
- Select the Material Variant in the Project window.
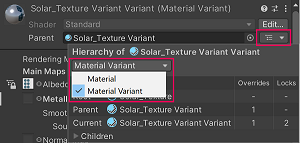
- Expand the Hierarchy dialog in the Material Inspector.
- Select Material in the Material type dropdown.

From the Settings dropdown
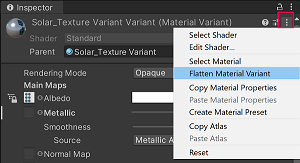
- Click the Settings dropdown in the Material Inspector.
- Select Flatten Material Variant in the dropdown.
