Blending clips
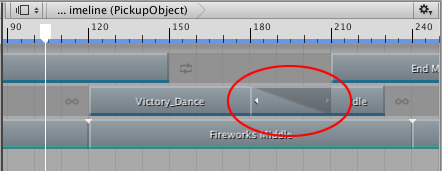
Blend two clips on the same track to create a smooth transition between two Animation clips, two Audio clips, or two Playable clips. To blend two clips, select the Mix Clip Edit mode and position or trim one clip until it overlaps an adjacent clip.
In a blend, the first clip is referred to as the outgoing clip and the second clip is referred to as the incoming clip. The area where the outgoing clip transitions to the incoming clip is referred to as the blend area. The blend area sets the duration of the transition.

Although the Clips view represents a blend area as a single linear curve, the transition between clips is actually comprised of two blend curves. The blend curve for the outgoing clip is referred to as the Blend Out curve. The blend curve for the incoming clip is referred to as the Blend In curve. By default, each blend curve is automatically set to an ease-in and ease-out curve.

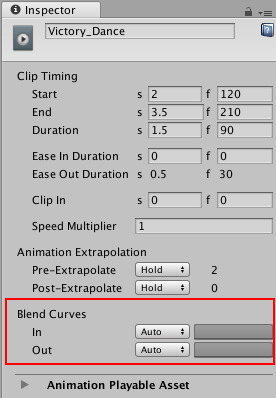
Use the Blend Curves in the Inspector window to change the shape for either the Blend In or Blend Out curve of the selected clip. However, the Inspector window only allows you to edit the properties of one clip at a time. You cannot simultaneously customize both blend curves from the same blend area.
To customize the Blend Curves for the transition between two clips:
Select the outgoing clip to customize its Blend Out curve (labelled Out).
Select the incoming clip to customize its Blend In curve (labelled In).
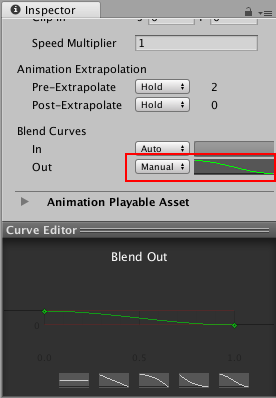
To customize either the Blend Out curve or Blend In curve, use the drop-down menu to switch from Auto to Manual. With Manual selected, the Inspector window shows a preview of the blend curve. Click the curve preview to open the Curve Editor below the Inspector window.

Use el Editor de curvas para personalizar la forma de la curva de mezcla. Por defecto, la curva de mezcla incluye una key al comienzo de la curva y una key al final de la curva. El Editor de curvas proporciona los siguientes métodos diferentes para modificar la curva de mezcla:
Select the key at the start or end of the blend curve and use the tangent handles to adjust the interpolation between keys.
Agregue keys adicionales para cambiar la forma de la curva de mezcla agregando más puntos de interpolación. Agregar keys en el Editor de Curvas es lo mismo que agregar claves en la vista de Curvas.
Right-click a key to delete or edit the key. Editing keys in the Curve Editor is the same as editing keys in the Curves view. Note that you cannot delete the first and last keys.
Seleccione una plantilla de forma desde la parte inferior del Editor de curvas.
El Editor de Curvas también incluye plantillas de formas basadas en si está modificando la Blend In curve o la Blend Out curve. Seleccione una plantilla de forma para cambiar la curva de mezcla a la plantilla de forma seleccionada.
- 2019–08–20 Page published with limited editorial review