- Unity User Manual 2020.2
- Platform development
- Windows
- Windows General
- Visual Studio project generation for Windows Standalone
Visual Studio project generation for Windows Standalone
The Create Visual Studio Solution build setting allows you to generate a Visual Studio solution instead of a built app. This option is only available when you are using the Windows build target.
To enable Create Visual Studio Solution, go to Edit > Build Settings > Target Platform, select the Windows build target,and enable the Create Visual Studio Solution build setting. Then select Build to generate the solution.
Generating a Visual Studio solution enables you to change your build process. For example, you can:
- Modify your application’s manifest.
- Add C++ code.
- Modify embedded resources.
- Launch your application with the debugger attached.
Warning: Make sure you save and back up any changes you make in Visual Studio before rebuilding your Unity project. If you do not back up your changes, Unity overwrites them during the build process.

Solution contents

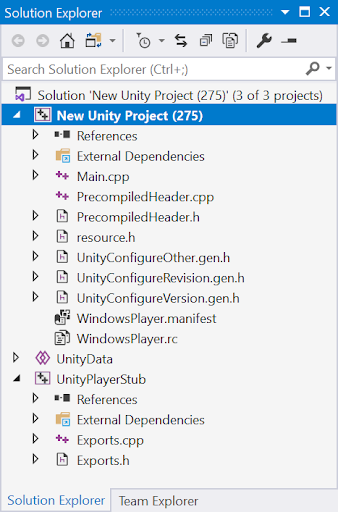
By default, Unity stores the Visual Studio solution you generate in the same directory as your built project. Your generated solution includes three projects when you use the Mono scripting backend, and four when you use the IL2CPP scripting backend.
To switch to a different scripting backend, go to Edit > Project Setting > Player > Settings for PC, Mac & Linux Standalone > Other Settings > Configuration, and choose your Scripting Backend.
Note: You can only build Windows IL2CPP on a Windows machine.
Below is a list of the projects Unity generates for your Visual Studio solution.
| Project | Descripción |
|---|---|
|
projectName (represents your project name) |
This is your main project. Visual Studio builds this project into the final application executable. You are most likely to make changes here. |
|
UnityData (stored inside the projectName project) |
This project contains all the Unity-specific files you need to build your project, such as assets. |
| UnityPlayerStub | This is a stub library for UnityPlayer.dll. Unity uses this to link your executable to the UnityPlayer.dll and expose the available UnityPlayer.dll API. |
|
Il2CppOutputProject (IL2CPP scripting backend only) |
This project contains: * The generated C++ code which Unity converts from managed assemblies. * The source code for IL2CPP runtime. *The IL2CPP garbage collector. You can debug this code from inside Visual Studio. |
Project retarget wizard
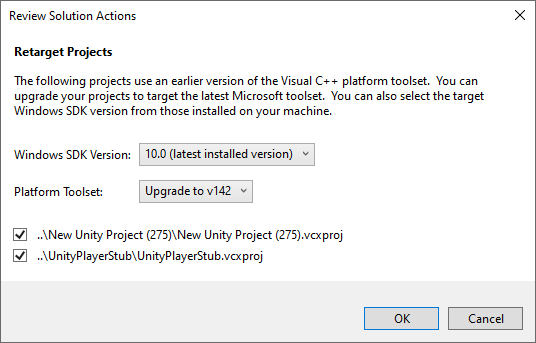
Unity generates a Visual Studio solution that targets Visual Studio 2015. If you are using a newer version of Visual Studio, you might see the Retarget Projects dialog box when you open your Visual Studio solution.
The Retarget Projects dialog prompts you to upgrade your Visual Studio solution to match the Visual Studio version you have installed. Select OK to accept this suggestion.

Build configuration options in Visual Studio
Visual Studio provides a variety of build configuration options. All optimization and debug references in this section refer to the Visual Studio solution only.
Types of build configurations
| Configuration | Use | Descripción |
|---|---|---|
| Debug | Use the Debug configuration when debugging C++ code. | * Disables all optimization. * Preserves all debugging information in the code. * Results in code that runs slowly. |
| Release | Use the Release configuration to profile your game. | * Enables code optimizations |
| Master | Use the Master configuration for game submission and final testing. | * Disables the profiler. * Results in the same build time as the Release configuration. |
|
MasterWithLTCG Only available with the IL2CPP scripting backend is enabled. |
If you are using the IL2CPP scripting backend, you can choose either Master or MasterWithLTCG for game submission and final testing. | * Enables link time code generation for generated C++ code, IL2CPP runtime and IL2CPP garbage collection. * Results in much longer build times compared to the Master configuration. * Resulting application executes faster. |