Network issues
Using the Diagnostics tool
Use the Unity Package Manager Diagnostics tool to diagnose common network-related issues associated with Unity Package Manager. The Diagnostics tool runs some basic network tests that the Unity support team needs in order to diagnose common network problems. After you run the tool, you can share the results with the Unity support team who can better guide you in resolving those issues.
You can run the Unity Package Manager Diagnostics either through the Unity Package Manager Error dialog or by manually running the launch script.
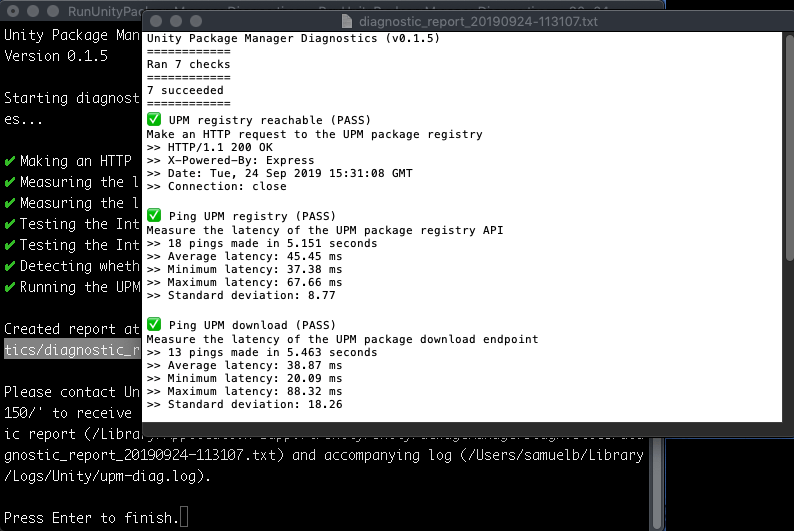
After the Diagnostics tool finishes, it displays the results of the tests in the shell window. It also writes a log file and a report file, which you can open from the shell window:

After running Unity Package Manager Diagnostics, you can:
- Ask for support in the Package Manager area of the Unity forums and attach the diagnostic report.
- Submit a bug and include the report.
Launch from the Unity Package Manager Error dialog
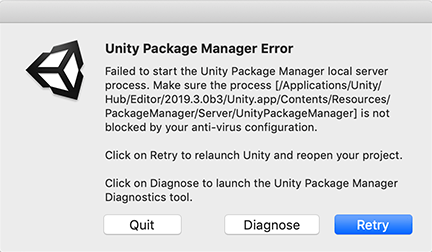
When Unity tries to launch, it starts the Package Manager process before it loads the project. If it encounters a critical error with Package Manager, Unity displays the following error message:

To run the Diagnose tool, click Diagnose. Unity closes and launches the Diagnostics tool in a new window.
Launch via script
Locate the script in the Diagnostics folder under the Unity installation folder:
| Operating system: | Path to Diagnostics command-line tool: |
|---|---|
| Windows |
<path-to-unity-installation-folder>\Unity\Data\Resources\PackageManager\Diagnostics\RunUnityPackageManagerDiagnostics.bat
|
| macOS Linux |
<path-to-unity-installation-folder>\Unity.app\Contents\Resources\PackageManager\Diagnostics\RunUnityPackageManagerDiagnostics
|
To launch the tool, either double-click the script file in your file browser or run it from the command line.
Configuring your firewall
Make sure the Unity Package Manager can access the following domain names using HTTPS:
- packages.unity.com
- download.packages.unity.com
- upm-cdn.unity.com (or upm-cdn-china.unitychina.cn for locations in China)
Add the above domain names to your firewall’s list of allowed domains.
Configuring your proxy server
When using a proxy server, configure the HTTP_PROXY and HTTPS_PROXY environment variables for the Unity Package Manager to use when performing requests against the Unity package registry.
You can set these variables globally (either system or user variables) according to your operating system. Alternatively, you can set them only for the Unity Hub when it launches.
For environments where you are behind a firewall, you can configure SSL certificate authorities for self-signed certificates.
Self-signed certificates
In some corporations and institutions, users are behind a firewall and can only access the internet through a proxy. Some proxies unpack the HTTPS content and repack it with its own self-signed certificate. Unity Package Manager’s underlying HTTPS layer rejects these self-signed certificates because it does not recognize them, and treats the connection as a possible man-in-the-middle attack. This means that you can’t use many features in Unity, including the Package Manager, unless you configure additional SSL certificate authorities to allow these certificates.
To configure additional SSL certificate authorities:
-
Create a text file with one or more custom certificate authorities. The file should consist of one or more trusted certificates in the Privacy-Enhanced Mail (PEM) format. For example:
-----BEGIN CERTIFICATE-----
MIIC+zCCAeOgAwIBAgIJAO0U6hVJnbvjMA0GCSqGSIb3DQEBBQUAMBQxEjAQBgNV
BAMMCWxvY2FsaG9zdDAeFw0xOTAzMTIwMTIxMzRaFw0yOTAzMDkwMTIxMzRaMBQx
EjAQBgNVBAMMCWxvY2FsaG9zdDCCASIwDQYJKoZIhvcNAQEBBQADggEPADCCAQoC
ggEBAKNh0EM7j57pXorGs5OHzlk9TYeUqITtXXdWfY1fbqRdj+a8qLNs4m/nDsDW
KgibHYG3FUqIidjPL61DLQuWUPY9Zo+uQaccIe0E5wb+To9mwMlLuhMD6iCPFRpe
jcDhNj4vG1RVARMO1jupeZqdb+xHBZqtmMJmtiDOBxt662Z4hvoH8mdqNEuSkozz
HqXmcdigrTO37DspGRBx08GJlHFHUs7C+hYOsOdNjME3dH/8uihjKYiqQb1E12dN
PNL7jYm3AZv+qUmDFM3BJE0hSmAP00GuTJxbe31Kh4e7N5/XSiLsnqwircOj/Hfi
eWjtsoXbCNDIiWUQtXBeLD/BdvkCAwEAAaNQME4wHQYDVR0OBBYEFDFw8VDkgMne
mDjgo+b1iaPfUkdVMB8GA1UdIwQYMBaAFDFw8VDkgMnemDjgo+b1iaPfUkdVMAwG
A1UdEwQFMAMBAf8wDQYJKoZIhvcNAQEFBQADggEBAFEjUWGz1r3xSsbwUJsRhbMc
M7Jjf9/r833H7eq31mbl/JbXPnpo8IctMuWyw42ccMtgq7i+coQeKwvWnHtI5rhe
vshEkIqNPAoCnpW5NLprYDDTG1PDEhv6FYpW8Alq65i03tptzaoHlH3sH+97E/h0
qSYI7yNHWMC5u0r1DB0BR+lZsj6RnwWPySMSuXx5sSiKIS/HkkMVwwmxKa4ZwuwS
LFwHSUdqk0lJK4b0mCwyTHNvYO1IDziE5EKwfuaKVgOa62iCHVahgIVa+een4EfS
hCCr3M3cq11Mi+mnRi1scxxrOno4OEEChWg2szZLlxBrkVJllrrq620XJ6RLB/8=
-----END CERTIFICATE-----
-----BEGIN CERTIFICATE-----
MIIDtzCCAp+gAwIBAgIQDOfg5RfYRv6P5WD8G/AwOTANBgkqhkiG9w0BAQUFADBl
MQswCQYDVQQGEwJVUzEVMBMGA1UEChMMRGlnaUNlcnQgSW5jMRkwFwYDVQQLExB3
d3cuZGlnaWNlcnQuY29tMSQwIgYDVQQDExtEaWdpQ2VydCBBc3N1cmVkIElEIFJv
b3QgQ0EwHhcNMDYxMTEwMDAwMDAwWhcNMzExMTEwMDAwMDAwWjBlMQswCQYDVQQG
EwJVUzEVMBMGA1UEChMMRGlnaUNlcnQgSW5jMRkwFwYDVQQLExB3d3cuZGlnaWNl
cnQuY29tMSQwIgYDVQQDExtEaWdpQ2VydCBBc3N1cmVkIElEIFJvb3QgQ0EwggEi
MA0GCSqGSIb3DQEBAQUAA4IBDwAwggEKAoIBAQCtDhXO5EOAXLGH87dg+XESpa7c
JpSIqvTO9SA5KFhgDPiA2qkVlTJhPLWxKISKityfCgyDF3qPkKyK53lTXDGEKvYP
mDI2dsze3Tyoou9q+yHyUmHfnyDXH+Kx2f4YZNISW1/5WBg1vEfNoTb5a3/UsDg+
wRvDjDPZ2C8Y/igPs6eD1sNuRMBhNZYW/lmci3Zt1/GiSw0r/wty2p5g0I6QNcZ4
VYcgoc/lbQrISXwxmDNsIumH0DJaoroTghHtORedmTpyoeb6pNnVFzF1roV9Iq4/
AUaG9ih5yLHa5FcXxH4cDrC0kqZWs72yl+2qp/C3xag/lRbQ/6GW6whfGHdPAgMB
AAGjYzBhMA4GA1UdDwEB/wQEAwIBhjAPBgNVHRMBAf8EBTADAQH/MB0GA1UdDgQW
BBRF66Kv9JLLgjEtUYunpyGd823IDzAfBgNVHSMEGDAWgBRF66Kv9JLLgjEtUYun
pyGd823IDzANBgkqhkiG9w0BAQUFAAOCAQEAog683+Lt8ONyc3pklL/3cmbYMuRC
dWKuh+vy1dneVrOfzM4UKLkNl2BcEkxY5NM9g0lFWJc1aRqoR+pWxnmrEthngYTf
fwk8lOa4JiwgvT2zKIn3X/8i4peEH+ll74fg38FnSbNd67IJKusm7Xi+fT8r87cm
NW1fiQG2SVufAQWbqz0lwcy2f8Lxb4bG+mRo64EtlOtCt/qMHt1i8b5QZ7dsvfPx
H2sMNgcWfzd8qVttevESRmCD1ycEvkvOl77DZypoEd+A5wwzZr8TDRRu838fYxAe
+o0bJW1sj6W3YQGx0qMmoRBxna3iw/nDmVG3KwcIzi7mULKn+gpFL6Lw8g==
-----END CERTIFICATE-----
Put this file in the same location as
upm-config.jsonif possible, although Unity supports any location on the file system.-
Create an empty JSON file named
upm-config.jsonin the system-level Unity configuration folder:- Windows:
%ALLUSERSPROFILE%Unity/config - macOS:
/Library/Application Support/Unity/config - Linux:
/usr/share/unity3d/config
- Windows:
-
In the
upm-config.jsonfile, add the caFile attribute set to the absolute file path for your PEM file. For example:{ "caFile": "C:\\ProgramData\\Unity\\config\\cert.pem" }
Setting environment variables for the Unity Hub
This section provides instructions for creating a command file you can run from a Windows command prompt or a macOS or Linux terminal. Alternatively, you can copy and paste the commands directly into the prompt or terminal window.
Note: Before you run the command file, shut down the Hub completely. If the Hub is already running, the script switches focus to the Hub without relaunching, so it does not apply the changed proxy settings.
Windows
These instructions create a command file on Windows.
The file launches the Hub with the environment variables set. You can either double-click the file, or invoke it from the command prompt. Unity passes these environment variables on to any Unity Editor process launched from the Hub.
Open a text editor such as Notepad.
-
Enter the following text, replacing proxy-url with the correct proxy server URL and adjusting the Hub install path if needed:
@echo off
set HTTP_PROXY=proxy-url
set HTTPS_PROXY=proxy-url
start "" "C:\Program Files\Unity Hub\Unity Hub.exe"
Note: If there are spaces in the path, you must use double quotes around the path to the program.
Save the file to a location where you can easily find it (such as the
Desktop), and make sure the file has the.cmd(for example,launchUnityHub.cmd).
macOS
These instructions create the launchUnityHub.command file on macOS.
The file launches the Hub with the environment variables set. You can either double-click the file, or invoke it from a Bash terminal. Unity passes these environment variables on to any Unity Editor process launched from the Hub.
Note: Double-clicking the command file opens a Terminal window or tab and leaves it open, even after the script finishes. You can change this behavior in the preferences for the Terminal.app.
Open a Terminal window.
-
Enter the following script, replacing proxy-url with the correct proxy server URL and adjusting the Hub install path if needed:
echo '#!/bin/bash
export HTTP_PROXY=proxy-url
export HTTPS_PROXY=proxy-url
nohup "/Applications/Unity Hub.app/Contents/MacOS/Unity Hub" &>/dev/null &' > launchUnityHub.command
chmod +x launchUnityHub.command
Note: If there are spaces in the path, you must use double quotes around the path to the program.
Move the
launchUnityHub.commandfile to a convenient location (for example, theDesktop), if you prefer.