- Unity User Manual (2020.1)
- スクリプト
- 重要なクラス
- 重要なクラス - Gizmos と Handles
重要なクラス - Gizmos と Handles
Gizmos と Handles クラスを使うと、シーンビューやゲームビューに線、図形、インタラクティブなハンドルやコントロールを描くことができます。この 2 つのクラスを組み合わせることで、これらのビューに表示される内容を拡張し、プロジェクトを自由に編集できるインタラクティブなツールを構築することができます。例えば、Inspector に数字を入力するのではなく、ゲーム内のノンプレイヤーキャラクターの周りにドラッグ可能な円の半径のギズモを作成して、プレイヤーの声や姿が聞こえる範囲を示すことができます。
このページでは、Gizmos クラスと Handles クラスの簡単な概要を説明します。Gizmos クラスと Handles クラスのすべてのメンバーをカバーするドキュメントとリファレンスは、Gizmos と Handles のスクリプトリファレンスページを参照してください。
Gizmos
Gizmos クラスは、線、球、立方体、アイコン、テクスチャ、メッシュなどをシーンビューに描き、プロジェクトの開発中にデバッグ、設定の補助、ツールとして使用することができます。
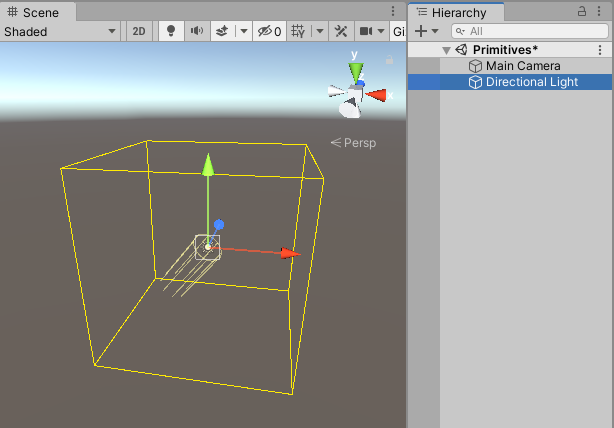
例えば、ゲームオブジェクトの周りに 10 ユニットの黄色い線による立方体を描くには、次のようなコードを使います。
using UnityEngine;
public class GizmosExample : MonoBehaviour
{
    void OnDrawGizmosSelected()
    {
        // Draw a yellow cube at the transform position
        Gizmos.color = Color.yellow;
        Gizmos.DrawWireCube(transform.position, new Vector3(10, 10, 10));
    }
}
このキューブをディレクショナルライトのゲームオブジェクトに配置すると、下の図のようになります。

Gizmos の使い方については、Gizmos スクリプトのリファレンスページ を参照してください。
Handles
Handles は、Gizmos に似ていますが、相互作用性や操作性の面でより多くの機能を提供します。3D コントロールは Unity 自体がシーンビューのアイテムを操作するために提供している機能で、Gizmos と Handles の組み合わせで構成されています。例えば、Transform コンポーネントを使ってオブジェクトの位置を決めたり、スケールしたり、回転させたりするお馴染みのツールなど、多くのビルトインのハンドル GUI があります。さらに、独自のハンドル GUI を定義して、カスタムコンポーネントエディターで使用することができます。このような GUI は、プロシージャルに生成されたシーンコンテンツ、“見えない” アイテム、ウェイポイントやロケーションマーカーのような一群の関連オブジェクトを編集するのに非常に便利です。
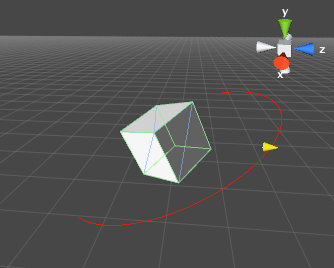
例えば、以下のように矢印ハンドルで円弧の領域を作成すると、シーンビューの “覆われた領域” を修正することができます。
using UnityEditor;
using UnityEngine;
using System.Collections;

//このクラスはプロジェクトのどこかに置く必要があります
public class WireArcExample : MonoBehaviour
{
    public float shieldArea;
}

// 円盤に ScaleValueHandle を接続して、線で描いた 180 度の円弧を作成します。
// これにより、WireArcExample の "shieldArea" 値を変更できます。
[CustomEditor(typeof(WireArcExample))]
public class DrawWireArc : Editor
{
    void OnSceneGUI()
    {
        Handles.color = Color.red;
        WireArcExample myObj = (WireArcExample)target;
        Handles.DrawWireArc(myObj.transform.position, myObj.transform.up, -myObj.transform.right, 180, myObj.shieldArea);
        myObj.shieldArea = (float)Handles.ScaleValueHandle(myObj.shieldArea, myObj.transform.position + myObj.transform.forward * myObj.shieldArea, myObj.transform.rotation, 1, Handles.ConeHandleCap, 1);
    }
}

Handles の使用方法については、Handles のスクリプトリファレンスページ を参照してください。