- Unity User Manual 2022.2
- Create user interfaces (UI)
- UI Toolkit
- エディター UI のサポート
- SerializedObject のデータバインディング
- バインディングの例
- ListView を使ってリストへバインドする
ListView を使ってリストへバインドする
バージョン: 2021.3 以降
ListView コントロールは、リストを作成する最も効率的な方法です。ListView でリストにバインドするには、ListView のバインディングパスをリストを含むプロパティの名前に設定します。
この例では、ListView を使用してリストにバインドする方法を紹介します。
例の概要
この例では、トグルのリストを作成し、そのリストを GameSwitch オブジェクトの基礎となるリストにバインドします。

この例で作成するすべてのファイルは、GitHub リポジトリ にあります。
要件
このガイドは、Unity エディター、UI Toolkit、および C# スクリプトに精通している開発者を対象としています。始める前に、以下をよく理解してください。
リストを使ってオブジェクトを作成する
GameSwitch オブジェクトと、 GameSwitch オブジェクトのリストをプロパティとして持つシリアル化されたオブジェクトを作成します。
任意のテンプレートで Unity プロジェクトを作成します。
Project ウィンドウに、
bind-to-listという名前のフォルダーを作成し、ファイルを保存します。-
GameSwitch.csという名前の C# スクリプトを作成し、そのコンテンツを以下のように置き換えます。using System; [Serializable] public struct GameSwitch { public string name; public bool enabled; } -
game_switch.uxmlという名前のUI ドキュメントを作成し、そのコンテンツを以下のように置き換えます。<UXML xmlns="UnityEngine.UIElements" xmlns:ue="UnityEditor.UIElements"> <Box style="flex-direction: row;"> <Toggle binding-path="enabled" /> <TextField binding-path="name" readonly="true" style="flex-grow: 1;"/> </Box> </UXML> -
GameSwitchListAsset.csという名の C# スクリプトを作成し、そのコンテンツを以下に置き換えます。using System.Collections.Generic; using UnityEngine; namespace UIToolkitExamples { [CreateAssetMenu(menuName = "UIToolkitExamples/GameSwitchList")] public class GameSwitchListAsset : ScriptableObject { public List<GameSwitch> switches; public void Reset() { switches = new() { new() { name = "Use Local Server", enabled = false }, new() { name = "Show Debug Menu", enabled = false }, new() { name = "Show FPS Counter", enabled = true }, }; } public bool IsSwitchEnabled(string switchName) => switches.Find(s => s.name == switchName).enabled; } }
カスタムエディターを作成しバインディングを設定する
トグルのリストを持つアセットを作成するカスタムエディターを作成します。UI ドキュメントの binding-path 属性を GameSwitch リストのプロパティ名 switches に設定することによって、トグルリストを GameSwitch リストにバインドします。
Editorという名前のフォルダーを作成します。-
Editor フォルダーに、
GameSwitchListEditor.csという名の C# スクリプトを作成し、そのコンテンツを以下に置き換えます。using UnityEditor; using UnityEngine; using UnityEngine.UIElements; namespace UIToolkitExamples { [CustomEditor(typeof(GameSwitchListAsset))] public class GameSwitchListEditor : Editor { [SerializeField] VisualTreeAsset m_ItemAsset; [SerializeField] VisualTreeAsset m_EditorAsset; public override VisualElement CreateInspectorGUI() { var root = m_EditorAsset.CloneTree(); var listView = root.Q<ListView>(); listView.makeItem = m_ItemAsset.CloneTree; return root; } } } -
game_switch_list_editor.uxmlという名の UI ドキュメントを作成し、そのコンテンツを以下に置き換えます。<UXML xmlns="UnityEngine.UIElements" xmlns:ue="UnityEditor.UIElements"> <ListView virtualization-method="DynamicHeight" reorder-mode="Animated" binding-path="switches" show-add-remove-footer="true" show-border="true" show-foldout-header="true" header-title="Switches" /> </UXML> Project ウィンドウで GameSwitchListEditor.cs を選択します。
Inspector の game_switch.uxml を Item Asset にドラッグします。
Inspector で game_switch_list_editor.uxml を Editor Asset にドラッグします。
バインディングのテスト
- メニューから、Assets > Create > UIToolkitExamples > GameSwitchList を選択してください。これで、New Game Switch List Asset という名前のアセットが作成されます。
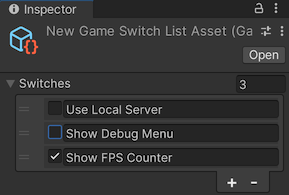
- Project ウィンドウで、 New Game Switch List Asset を選択します。これにより、トグルのリストが Inspector に表示されます。リストの順序変更、リストの折りたたみ、リストへのエントリの追加、リストからのエントリの削除、 リスト内のエントリ数の変更が可能です。Inspector UI で変更を加えると、
GameSwitchListAssetオブジェクトのswitchesプロパティが変更されます。