Navigation Areas and Costs
Navigation Areas は、ある特定のエリアを通るときの難かしさの度合いを定義します。コストの低いエリアは、経路探索の際に好まれて選択されます。また、各 NavMesh エージェントには、エージェントが移動するエリアを特定する Area Mask があります。

上の図で、エリアタイプが 2つの一般的な事例に使用されています。
- Water エリアは、より高いコストを割り当てることで、歩くのに負荷がかかるようにしてあります。これにより、浅瀬を歩くとき歩行が遅くなるというシナリオに対応しています。
- Door エリアは、特定のキャラクターだけしかアクセスできないようになっています。それによって、人間はドアを通り抜けることができますが、ゾンビにはそれができないというシナリオを実現しています。
The area type can be assigned to every object that is included in the NavMesh baking, in addition, each OffMesh Link has a property to specify the area type.
Pathfinding Cost
簡単に言えば、コストによって、経路を見つけるときにパスファインダーがどのエリアを好むかを制御することができます。例えば、エリアのコストを 3.0 に設定すると、そのエリアを移動するには他のルートの 3倍以上長くかかると考えられます。
コストの仕組みについて完全に理解するために、パスファインダーの仕組みを見てみましょう。

Unity は NavMesh の最短経路を計算するために、A* アルゴリズムを使用しています。A* アルゴリズムは、接続したノードをグラフ上で動かすことを考えます。このアルゴリズムでは、経路の開始点にもっとも近いノードから始め、目的地に到達するまで、つながったノードをたどります。
Unity のナビゲーションはポリゴンのメッシュで表示されているので、パスファインダーが行う最初の事は、各ポリゴンにノードの位置を示す点を配置することです。最短経路は、これらのノード間で計算されます。
上の図の黄色の点や線は、ノードとリンクがどのように NavMesh 上に配置されているかについて示しており、 A* アルゴリズムでは、ノードとリンクはその配置の順序で走査されます。
2つのノード間を移動するためのコストは、移動する距離とリンク下のポリゴンのエリアタイプに関連づけられたコスト、つまり、 distance * cost に依存します。実際には、エリアのコストが 2.0 であれば、このようなポリゴンを横切る距離は、実際の 2倍の長さであるようなものだということを意味します。A* アルゴリズムでは、すべてのコストが 1.0 よりも大きくなければなりません。
The effect of the costs on the resulting path can be hard to tune, especially for longer paths. The best way to approach costs is to treat them as hints. For example, if you want the agents to not to use OffMesh Links too often, you could increase their cost. But it can be challenging to tune a behavior where the agents to prefer to walk on sidewalks.
パスファインダーは必ずしも最短経路を選択するわけではないということが、あるレベルで発生するかもしれません。この理由は、ノードの配置にあります。大きい開放的なエリアが小さい障害物の隣にあり、結果として、大きなポリゴンと小さなポリゴンが含まれるナビゲーションメッシュになるシナリオで、このようなことが目立ちます。このような場合、大きなポリゴン上のノードは、大きなポリゴンのどこにでも配置することができるため、パスファインダーの視点からは、それが回り道のように見えることがあるためです。
エリアタイプ ごとの コスト は、Areas タブでグローバルに設定できます。または、スクリプトを使用して、エージェントごとにそれらをオーバーライドすることができます。
Area Types
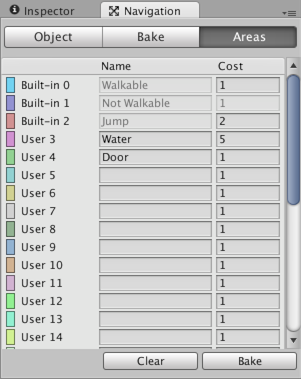
The area types are specified in the Navigation (Obsolete) window’s Areas tab. There are 29 custom types, and 3 built-in types: Walkable, Not Walkable, and Jump.
- Walkable - は一般的なエリアタイプで、歩くことができるエリアであることを指定します。
- Not Walkable is a generic area type which prevents navigation. It is useful for cases where you want to mark certain objects to be obstacles, but without getting a NavMesh on top of them.
- Jump is an area type that is assigned to all auto-generated OffMesh links.
異なるエリアタイプのいくつかのオブジェクトが重なる場合、結果として生じる NavMesh エリアタイプは、たいてい、最も高いインデックスのものになります。ただし、例外があり、Not Walkable に常に優先権があります。これは、エリアを遮断する必要がある場合に役に立ちます。
Area Mask

各エージェントには、ナビゲート可能なエリアを示す Area Mask を設定できます。エリアマスクは、エージェントのプロパティで設定することができます。または、ランタイムにスクリプトを使ってビットマスクを操作することもできます。
特定のタイプのキャラクターだけがあるエリアを歩くことができるようにしたい場合には、エリアマスクは役に立ちます。例えば、ゾンビを回避するゲームでは、各ドアの下のエリアを、Door エリアタイプに指定し、ゾンビキャラクターの Area Mask で、Door エリアのチェックをはずし、無効にします。
その他の参考資料
- ナビメッシュの作成 – NavMesh ベイクのワークフロー
- NavMeshAgent.areaMask - エージェントのエリアマスクを設定するスクリプティング API
- NavMeshAgent.SetAreaCost() - エージェントのエリアコストを設定するスクリプティング API