- Unity User Manual 2022.2
- Unity を使用する
- 分析
- プロファイラー概要
- アプリケーションのプロファイル
アプリケーションのプロファイル
Unity Profiler を使ってアプリケーションをプロファイルする場合、データを記録する方法は主に 3 つあります。
- ターゲットプラットフォームのプレイヤーでアプリケーションをプロファイルします。
- Unity エディターの再生モードでアプリケーションをプロファイルします。
- Unity エディターをプロファイルします。
アプリケーションの正確なタイミングを得るための最良の方法は、アプリケーションを公開する予定のエンドプラットフォームでプロファイルすることです。これにより、アプリケーションのパフォーマンスに影響を与えるものに関する、正確なタイミングを知ることができます。
ただし、アプリケーションのパフォーマンス要素を向上させたいと思うたびにアプリケーションをビルドすると時間がかかります。そこで、アプリケーションのパフォーマンスを素早く評価するために、エディターの再生モードで直接プロファイルすることができます。再生モードでのプロファイルは、実際のデバイス上でのアプリケーションのパフォーマンスを正確に反映するものではありませんが、最初にエンドプラットフォーム上でプロファイルした後に加えた変更によって、アプリケーションのパフォーマンスが改善されたかどうかを素早くチェックするのに便利なツールです。
Unity エディターは、再生モードで動作するときにアプリケーションと同じリソースを使用するため、アプリケーションのパフォーマンスに影響を与える可能性があります。そのため、エディターを個別にプロファイルして、使用するリソースを決定することもできます。これは、映画制作など、再生モードで使用するために設計されたアプリケーションの場合に特に有効です。
Profile your application on a target platform
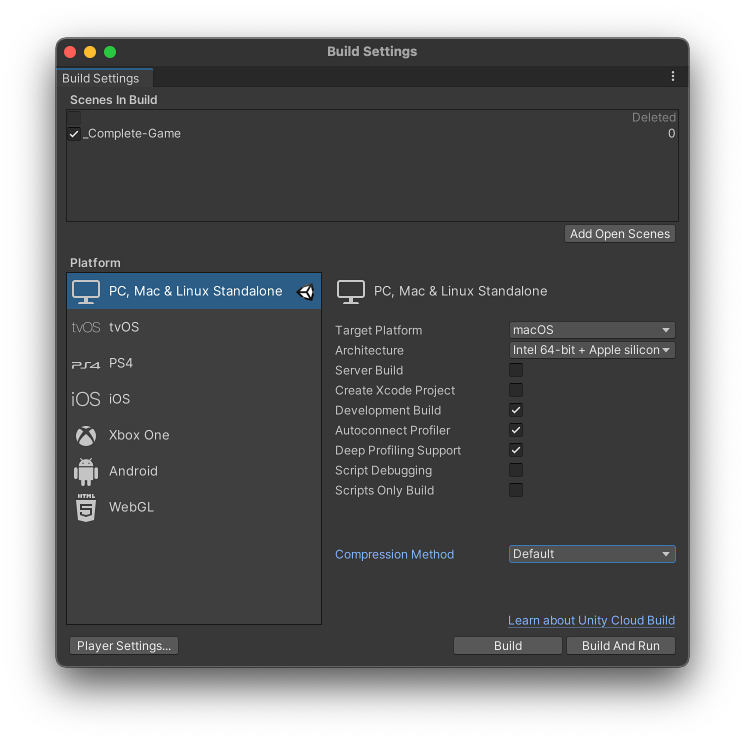
ターゲットのリリースプラットフォームでアプリケーションをプロファイルするには、ターゲットデバイスをネットワークに接続するか、ケーブルでコンピューターに直接接続します。また、IP アドレスを使ってデバイスに接続することもできます。アプリケーションは、Development Build としてのみのプロファイルできます。これを設定するには、Build Settings (メニュー: File > Build Settings) に移動し、アプリケーションのターゲットプラットフォームを選択し、Development Build の設定を有効にします。この設定を有効にすると、プロファイラーに関連する 2 つの設定 Autoconnect Profiler と Deep Profiling Support が利用可能になります。

Autoconnect Profiler 設定を有効にすると、Unity エディターはビルド処理中にビルドプレイヤーに IP アドレスをベイクします。プレイヤーを起動すると、ベイクした IP アドレスのエディターのプロファイラーに接続を試みます。
さらに、Deep Profiling Support 設定を有効にすると、ビルドされたプレイヤーの起動時に Unity が ディーププロファイリング を実行します。つまり、プロファイラーは、ProfilerMarker で明示的にラップされたコードのタイミングだけでなく、コードのすべての部分をプロファイルします。これは、アプリケーションの起動時間を詳細にプロファイルするのに便利です。ただし、これは、ビルドにわずかな負荷を加えます。
Profiler ウィンドウを使ってプレイヤーに接続
To use the Profiler to manually connect to a platform running your application, configure the settings in the Attach to Player drop-down. You can only do this if Autoconnect Profiler is disabled.
For a platform to appear in the Attach to Player drop-down it must meet the following requirements:
- The platform is visible on your local network or directly connected to your local machine by cable.
- The platform is running a player that you built with the Development Build option enabled. For instructions on how to enable this setting for a platform, see Profile your application on a target platform.
- The platform is running your Player.
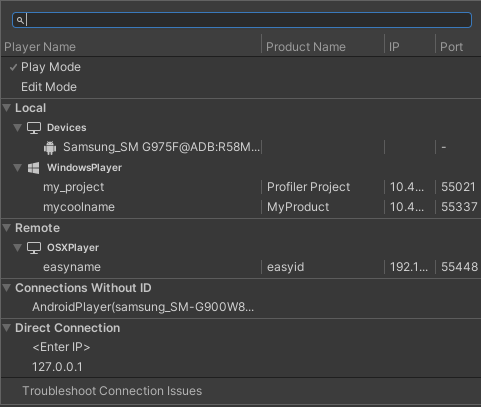
The Attach to Player drop-down displays all Unity Players that Unity detects through the network or by direct connection. You can identify these Players by Player Name and the Product Name that is running the Player (for example, “iPhonePlayer (My iPhone)”).
You can also connect to a Player directly via its IP address. To do this, select the Attach to Player menu, and then select <Enter IP> in the dropdown. In the dialog box that appears, type the IP address and (optionally) the port of the Player you want to connect to.
To collect profiling information on your application, select the Player from the dropdown menu, and then click Record.
To continuously collect data while your application runs, enable the Run In Background setting in Player Settings (menu: Edit > Project Settings > Player > Resolution and Presentation). When you enable this setting, the Profiler collects data even when you leave your application running in the background. If you disable it, the Profiler only collects data when the application is running in an active window.
Using the Attach to Player search bar
The Attach to Player drop down includes a search bar that you can use to find information about your Player. You can search by Player Name or device category, for example Remote. When you search by category, the result displays all devices in that category.
Select the name of a development Player to view it in the profiler.
Attach to Player properties

Each column provides the following information about when it is available:
| プロパティ | 説明 |
|---|---|
| Player Name | The name of the device that is running your application. To change this name, navigate to Edit > Preferences > Analysis > Profiler and enter your desired name in the Custom Connection ID field. You can also set a Player Name set when you launch a Player from the command line using the -connection-id argument.For more information about the categories in this property, see Player name device categories |
| Product Name | This is the value of the field that you set in Project > PlayerSettings. |
| IP | The IP address of the Player. |
| port | The port of the Player. |
Player name device categories
The Player Name category includes the following categories that display information about particular device types:
| プロパティ | 説明 |
|---|---|
| Play Mode | Select this property to profile your application in Play Mode. |
| Edit Mode | Select this property to profile the Unity Editor. |
| Local | This list contains any device that is running on the local machine, in the Unity Editor or in a standalone player. It also displays information for players that are physically connected to the host machine with a cable. |
| Remote | This section displays information for devices running on the local network. This section only appears when Unity finds a remote device running on the local network. |
| Connections without ID | This section only appears when Unity finds a device running a player older than Unity 2021.2. These players do not have Product Name, IP, or Port information. |
| Direct Connection | Use this option to connect to a specific IP and port combination. This category displays the most recent IP you connected to. |
プラットフォーム別のプロファイリングの手引き
プラットフォームを Unity Profiler に接続したときの動作は、プラットフォームごとに異なります。以下のセクションでは、各プラットフォームに共通する動作について説明します。
WebGL
WebGL でも Unity プロファイラーを使用できますが、エディターを使用して WebGL で構築されたプレイヤーにアタッチすることはできません。これは、WebGL は WebSockets を通信に使用しているため、ブラウザー側の受信を許可しないためです。実行中のプレイヤーにアタッチするには、Build Settings (File > Build Settings) の Autoconnect Profiler チェックボックスを有効にする必要があります。Unity は WebGL のドローコールをプロファイルできません。
モバイルデバイスでのプロファイリング
iOS デバイスと Android デバイスはどちらも、ネットワークを通じてリモートプロファイリングをサポートしています。ファイアウォールを使用している場合は、ファイアウォールの設定でポート番号 54998 から 55511 が開放されていることを確認します。これらは、Unity がリモートプロファイリングに使用するポートです。
リモートプロファイリングを設定すると、Unity エディターがデバイスに自動接続しない場合があります。これが発生した場合は、手動でプロファイラーの接続を開始できます。これを行うには、Profiler ウィンドウの Attach to Player ドロップダウンで適切なデバイスを選択します。
ターゲットデバイスを直接コンピューターに接続して、ネットワークや接続の問題を回避することもできます。
iOS リモートプロファイリング
iOS デバイスでリモートプロファイリングを有効にするには、以下の手順を実行します。
- iOS デバイスを Wi-Fi ネットワークに接続します。プロファイラーはローカル Wi-Fi ネットワークを使用して、デバイスから Unity エディターにプロファイリングデータを送信します。
- ケーブルでデバイスをコンピューターに接続します。Build Settings に移動し (File > Build Settings)、Development Build と Autoconnect Profiler を有効にしてから、Build & Run を選択します。
- アプリケーションがデバイスで起動したら、Unity エディターで Profiler ウィンドウを開きます (Window > Analysis > Profiler)。
Android リモートプロファイリング
Android デバイスは、Wi-Fi と Android Debug Bridge (adb) の 2 種類のリモートプロファイリング方法をサポートしています。
Wi-Fi プロファイリングは、以下の手順で行います。
- Android デバイスの モバイルデータを無効にします。
- Android デバイスを Wi-Fi ネットワークに接続します。プロファイラーはローカル Wi-Fi ネットワークを使用して、デバイスから Unity エディターにプロファイリングデータを送信します。
- ケーブルでデバイスをコンピューターに接続します。Build Settings に移動し (File > Build Settings)、Development Build と Autoconnect Profiler を有効にしてから、Build & Run を選択します。
- アプリケーションがデバイスで起動したら、Unity エディターで Profiler ウィンドウを開きます (Window > Analysis > Profiler)。
ノート: デバイスの検出が正常に機能するためには、Android デバイスとホストコンピューター (Unity エディターを実行中) は、両方とも同じサブネット上になければなりません。
Android Debug Bridge (adb) プロファイリングは、以下の手順で行います。
- デバイスが 開発モード であることを確認し、USB デバッグ の設定を有効にします。
- ケーブルでデバイスをコンピューターに接続し、adb devices リストに表示されていることを確認します。
- Build Settings に移動し (File > Build Settings)、Development Build を有効にしてから、Build & Run を選択します。
- アプリケーションがデバイスで起動したら、Unity エディターで Profiler ウィンドウを開きます (Window > Analysis > Profiler)。
- Attach to Player ドロップダウンから AndroidProfiler(ADB@127.0.0.1:34999) を選択します。ドロップダウンのエントリーは、選択したターゲットが Android の場合にのみ表示されます。
Build & Run を選択すると、Unity エディターはアプリケーションのために自動的に adb トンネルを作成します。別のアプリケーションをプロファイルしたい場合や adb サーバーを再起動した場合は、このトンネルを手動で設定する必要があります。これを行うためには、ターミナル/コマンドウィンドウを開き、以下のコマンドを入力します。
-
エディターからアンドロイドへ USB ケーブルで接続している場合
adb forward tcp:34999 localabstract:Unity-{insert bundle identifier here} -
Android からエディターへ USB ケーブルで接続している場合
adb reverse tcp:34998 tcp:34999
Android ビルドでディーププロファイリングを使用するには、Android Player Settings (Edit > Project Settings > Player > Android > Other Settings) で Mono Scripting Backend 設定を有効にし、以下を入力して adb コマンドでゲームを開始します。
~$ adb shell am start -n {ここにバンドルの識別子を入れる}/com.unity3d.player.UnityPlayerActivity -e 'unity' '-deepprofiling'
Android ChromeOS remote profiling
Unity can’t automatically discover ChromeOS devices. To initiate a connection, connect to the device through Android Debug Bridge (adb) by its IP address and then select <Enter IP> from the Attach to Player drop-down menu and enter the device’s IP address. Once you have connected, you can profile your application as usual.
Unity エディターのプロファイリング
When you use the Profiler window to run and profile your application in the Editor, the results are only an approximation of your application’s behavior when the target platform runs it. This is because Play mode runs in the same process as the Editor, so you can’t fully isolate your application’s CPU, GPU, and memory usage from the Unity Editor’s usage. This skews the resulting profiling data.
より適切なプロファイル結果を得るには、常にターゲットデバイス上でアプリケーションをプロファイルし、エディターでのプロファイリングは、すでにデバイス上で特定された問題を素早く繰り返す目的でのみ行ってください。
また、再生モードでプロファイルしたりエディターをプロファイルして、アプリケーションのパフォーマンスとは関係のない問題 (ロード時間が長くなったり、エディターが反応しなかったりしてイテレーション時間が遅くなっていないかなど、プレイモードでのアプリケーションのパフォーマンスが悪くなっていないかなど) を特定することができます。
Whenever you profile in the Editor, you should make sure that you open Play mode in maximized view, and reduce the amount of open Editor windows. This ensures that other Editor windows don’t use up time on the render thread and GPU, and therefore affect the performance data. When Play mode is in a maximized view it runs your application at a resolution closer to that of your target device, which directly affects performance issues such as those related to fill rate.
再生モードでのプロファイリング
プロファイラーのデフォルトのターゲットは再生モードで、エディターが再生モードを実行しているときのアクティビティを記録します。再生モードでのプロファイリングは、プレイヤーをリビルドすることなく迅速な変更をテストするのに便利ですが、アプリケーションのターゲットプラットフォームやデバイス上でのビルドを検証する代わりに使用すべきではありません。これは、再生モードがエディターと同じアプリケーションとメインスレッドで実行されているため、再生モードでプロファイルすると、UI、インスペクター、シーンビューレンダリング、アセット管理などのエディターのシステムが、アプリケーションのパフォーマンスとメモリーのプロファイリングの測定値に影響を与えるからです。
再生モードで効果的にプロファイリングを行うためには、定期的にアプリケーションのビルドを作成し、さまざまなターゲットデバイス (高スペックのデバイスと低スペックのデバイスの両方) にデプロイし、これらのデバイス上でアプリケーションのテストとプロファイリングを行う必要があります。これらのデバイスでアプリケーションのパフォーマンス問題が確認されたら、問題の領域を絞り込みます。
その後、再生モードでアプリケーションをプロファイルし、アプリケーションに変更を加えたら、素早くプロファイリングを繰り返します。ターゲットデバイス上のアプリケーションをプロファイルして得た情報を利用して、再生モードでプロファイルした後に同様の動作があるかどうかを確認できます。その後、アプリケーションに変更を加え、再生モードで再度プロファイルすれば、変更による効果をすぐに確認することができます。変更結果に満足したら、アプリケーションをビルドしてターゲットデバイスに再度デプロイし、変更内容を検証します。
PlayerLoop と EditorLoop のサンプル
再生モード中にエディターが作成するプロファイリングデータのノイズや誤解を招く測定値を減らすために、CPU と GPU のプロファイラーモジュールは、そのタイミングを PlayerLoop で発生するものと EditorLoop で発生するものに分けています。Unity は、これらのタイプのプロファイラーサンプルに PlayerLoop と EditorLoop のマーカー を割り当てます。
プロファイラーが再生モードをターゲットにする場合、PlayerLoop 内で発生したタイミングサンプルのみを収集します。
Unity は、CPU Profiler モジュールチャート で、EditorLoop のサンプルを Others として分類します。その結果、EditorLoop のサンプルがそのカテゴリ内で最大の割合を占めています。もし、この時間のエディターのアクションや、Others カテゴリの詳細な内訳を見たい場合は、代わりに Profiler のターゲットを Editor に変更してください。
Important: If you use Deep Profiling, and target Play mode, it has a performance impact on every function call that happens in both PlayerLoop and EditorLoop. This is because Deep Profiling hooks into the beginning and end of any scripting method call on domain reload and it doesn’t detect which parts are never called from the PlayerLoop. The method calls that happen in the EditorLoop don’t incur the full overhead of creating a sample, but they still check if they should emit one, which causes a smaller but still present overhead.
エディターのプロファイリング
Profiler のターゲットを Editor に変更すると、以前は EditorLoop マーカーの下に隠れていたすべてのサンプルが、それぞれのカテゴリに表示されます。これは、CPU Profiler モジュールの詳細ペインとチャートの情報が大きく変わることを意味します。
エディターの起動時間をプロファイルするには、コマンドラインオプション -profiler-enable でエディターを起動します。
Profiler ウィンドウがエディターのパフォーマンスに与える影響を軽減するために、Profiler ウィンドウを独自のプロセスで開く スタンドアロンプロファイラー を使用することができます。これは、プロファイリングの対象としてエディターを選択する場合や、アプリケーションのディーププロファイリング を行う場合に特に便利です。なぜなら、通常、Profiler ウィンドウ自体が、パフォーマンスデータを歪める可能性のあるリソースを使用しているからです。
アプリケーションをプロファイルするためのベストプラクティス
アプリケーションのプロファイルをする際、プロファイリングセッションの一貫性を確保し、Unity が使用するプロセスがプロファイリングデータに影響を与えないようにするために、いくつか気を付ける点があります。
- 調査したい領域に関連する Profiler モジュール だけを Profiler ウィンドウに追加します。Profiler にモジュールを追加/削除するには、Profiler ウィンドウの左上にあるドロップダウンを選択します。
- Deep Profiling を使用すると高いオーバーヘッドが発生するため、使用を避けてください。GC.Alloc や JobFence.Complete などのマーカーを持つサンプルの詳細を確認したい場合は、Profiler ウィンドウのツールバーに移動し、Call Stacks の設定 を有効にしてください。これにより、サンプルのフルコールスタックが提供され、Deep Profiling のオーバーヘッドを発生させることなく、必要な情報を得ることができます。
- Disable the Live setting if you don’t need to see the Hierarchy or Timeline view updating as the Profiler collects data. Stop recording to see the data update to the window.
- F9 のショートカットを使って、Profiler を有効/無効にできます。このショートカットを使用すると、Profiler ウィンドウを開くことなくパフォーマンスデータをキャプチャできます。スタンドアロンプロファイラーを開いている場合、このショートカットを使用すると、このウィンドウでレコーディングが開始されます。
- ディーププロファイリングのサポートは 2019.3 で追加NewIn20193