런타임용 탭 메뉴 생성
탭 메뉴는 비디오 게임과 애플리케이션 UI에서 흔히 볼 수 있습니다. UI 툴킷을 사용하여 커스텀 에디터 창 또는 런타임용 탭 메뉴를 만들 수 있습니다. 다음 예시는 샘플 씬에서 탭 메뉴를 만드는 방법을 보여줍니다.
개요 예시
이 예시에서는 샘플 씬에 메뉴를 추가합니다. 메뉴에는 세 개의 탭이 있습니다. 각 탭에는 특정 콘텐츠가 표시됩니다. 탭을 클릭하면 해당 탭과 연결된 콘텐츠만 표시됩니다.
탭 콘텐츠를 만들려면 메뉴 요소, 스타일, 로직을 정의해야 합니다.
이 예시에서 생성한 완성된 파일은 GitHub 저장소에서 확인할 수 있습니다.
선행 조건
이 가이드는 Unity, UI 툴킷, Flexbox, C# 스크립팅에 익숙한 개발자용입니다.
이 가이드는 다음 컨셉을 참조합니다.
탭 메뉴 요소 정의
UI 빌더를 사용하여 메뉴에 섹션 2개를 만듭니다. 하나는 탭용이고 다른 하나는 탭 콘텐츠용입니다. 이 섹션에 탭 요소 3개와 탭 콘텐츠 요소 3개를 만듭니다.
템플릿을 사용하여 Unity 에디터에서 프로젝트를 만듭니다.
GameObject > UI Toolkit > UI Document를 클릭하여 샘플 씬에 UI 문서를 추가합니다
Assets에TabbedMenu라는 폴더를 만들고 모든 파일을 저장합니다.TabbedMenu폴더에서TabbedMenu.uxml이라는 UI 문서를 만듭니다.SampleScene에서 UIDocument를 선택하고 인스펙터의 UI Document 섹션에 있는 Source Asset으로
TabbedMenu.uxml을 드래그하여 UI 문서에 UXML을 추가합니다.UI 빌더를 사용하여
TabbedMenu.uxml문서를 엽니다.루트 아래에
tabs및tabContent라는 두 개의 VisualElements를 추가합니다.-
tabs아래에 레이블 컨트롤 3개를 추가하고 레이블 텍스트를 다음과 같이 지정합니다.LondonParisOttawa
-
tabContent아래에 레이블 컨트롤 3개를 추가하고 레이블 텍스트를 다음과 같이 지정합니다.London is the capital city of EnglandParis is the capital of FranceOttawa is the capital of Canada
-
탭 콘텐츠를 탭과 연결하기 위해 이 예시에서는 레이블 이름의 접두사를 동일하게 사용하고 접미사를 다르게 사용합니다. 각 탭 이름에는
Tab접미사가 있고 각 탭 콘텐츠에는Content접미사가 있습니다. 탭 레이블 이름과 콘텐츠 레이블 이름을 다음과 같이 설정합니다.LondonTabParisTabOttawaTabLondonContentParisContentOttawaContent
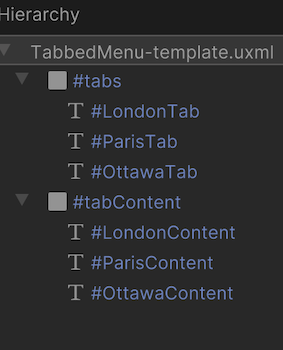
UI 빌더 계층 구조는 다음과 같아야 합니다.
탭 메뉴 스타일 정의
USS를 사용하여 탭과 탭 콘텐츠의 레이아웃을 정의합니다. 원하는 방식으로 탭과 탭 콘텐츠의 스타일을 지정할 수 있습니다. 이 예시에서는 탭을 탭 콘텐츠의 상단에 행으로 정렬합니다. 선택한 탭의 배경색을 추가하고 선택하지 않은 탭 콘텐츠를 숨깁니다.
TabbedMenu폴더에서TabbedMenu.uss라는 스타일시트를 만듭니다.-
TabbedMenu.uss를 열고 다음 스타일 규칙을 추가합니다./* Style for tabs */ #tabs { flex-basis: 10%; flex-direction: row; background-color: rgb(229, 223, 223); font-size: 12px; -unity-font-style: bold; font-size: 14px; } /* Sets each label in tabs to have the same size. */ .tab { flex-grow: 1; } /* Adds background color for the selected tab */ .currentlySelectedTab { background-color: rgb(173, 166, 166); } /* Style for tabContent */ #tabContent { flex-basis: 90%; background-color: rgb(255, 255, 255); font-size: 20px; } /* Hides the unselected tab content */ .unselectedContent { display: none; } UI 빌더에서
TabbedMenu.uxml을 엽니다.Add Existing USS를 클릭하고
TabbedMenu.uss를 선택합니다.-
UI 컨트롤에 스타일을 적용합니다.
-
tabs아래의 각 레이블에.tab을 적용합니다. -
LondonTab에.currentlySelectedTab을 적용합니다. -
ParisContent및OttawaContent에.unselectedContent를 적용합니다.
-
완성된 TabbedMenu.uxml은 다음과 같이 작성되어야 합니다.
<ui:UXML xmlns:ui="UnityEngine.UIElements" xmlns:uie="UnityEditor.UIElements" xsi="http://www.w3.org/2001/XMLSchema-instance" engine="UnityEngine.UIElements" editor="UnityEditor.UIElements" noNamespaceSchemaLocation="../../../UIElementsSchema/UIElements.xsd" editor-extension-mode="False">
   /* Your src might look different. If you save your UXML in UI Builder, USS file is referenced by the file location, fileID and guid. */
   <Style src="TabbedMenu-style.uss" />
   <ui:VisualElement name="tabs">
      <ui:Label name="LondonTab" text="London" class="tab currentlySelectedTab" />
      <ui:Label name="ParisTab" text="Paris" class="tab" />
      <ui:Label name="OttawaTab" text="Ottawa" class="tab" />
   </ui:VisualElement>
   <ui:VisualElement name="tabContent">
      <ui:Label text="London is the capital city of England" name="LondonContent" />
      <ui:Label text="Paris is the capital of France" name="ParisContent" class="unselectedContent" />
      <ui:Label text="Ottawa is the capital of Canada" name="OttawaContent" class="unselectedContent" />
   </ui:VisualElement>
</ui:UXML>
탭 메뉴 로직 정의
표시된 탭 콘텐츠를 변경하는 C# 스크립트를 만듭니다. 사용자가 탭을 클릭하면 탭의 콘텐츠가 표시되고 현재 콘텐츠는 숨겨집니다.
-
TabbedMenu폴더에서 다음 두 개의 C# 스크립트 파일을 만듭니다.-
TabbedMenu.cs: 탭 메뉴 로직을 게임에 연결합니다.. -
TabbedMenuController.cs: 탭 선택 로직을 정의합니다.
-
SampleScene에서 UIDocument를 선택하고 인스펙터의 Add Component 버튼에
TabbedMenu.cs를 드래그하여 UI 문서에 컴포넌트로TabbedMenu.cs를 추가합니다.-
TabbedMenu.cs를 열고 다음 코드로 대체합니다.using UnityEngine; using UnityEngine.UIElements; //Inherits from class `MonoBehaviour`. This makes it attachable to a game object as a component. public class TabbedMenu : MonoBehaviour { private TabbedMenuController controller; private void OnEnable() { UIDocument menu = GetComponent<UIDocument>(); VisualElement root = menu.rootVisualElement; controller = new(root); controller.RegisterTabCallbacks(); } } -
TabbedMenuController.cs를 열고 다음 코드로 대체합니다.using UnityEngine.UIElements; public class TabbedMenuController { /* Define member variables*/ private const string tabClassName = "tab"; private const string currentlySelectedTabClassName = "currentlySelectedTab"; private const string unselectedContentClassName = "unselectedContent"; // Tab and tab content have the same prefix but different suffix // Define the suffix of the tab name private const string tabNameSuffix = "Tab"; // Define the suffix of the tab content name private const string contentNameSuffix = "Content"; private readonly VisualElement root; public TabbedMenuController(VisualElement root) { this.root = root; } public void RegisterTabCallbacks() { UQueryBuilder<Label> tabs = GetAllTabs(); tabs.ForEach((Label tab) => { tab.RegisterCallback<ClickEvent>(TabOnClick); }); } /* Method for the tab on-click event: - If it is not selected, find other tabs that are selected, unselect them - Then select the tab that was clicked on */ private void TabOnClick(ClickEvent evt) { Label clickedTab = evt.currentTarget as Label; if (!TabIsCurrentlySelected(clickedTab)) { GetAllTabs().Where( (tab) => tab != clickedTab && TabIsCurrentlySelected(tab) ).ForEach(UnselectTab); SelectTab(clickedTab); } } //Method that returns a Boolean indicating whether a tab is currently selected private static bool TabIsCurrentlySelected(Label tab) { return tab.ClassListContains(currentlySelectedTabClassName); } private UQueryBuilder<Label> GetAllTabs() { return root.Query<Label>(className: tabClassName); } /* Method for the selected tab: - Takes a tab as a parameter and adds the currentlySelectedTab class - Then finds the tab content and removes the unselectedContent class */ private void SelectTab(Label tab) { tab.AddToClassList(currentlySelectedTabClassName); VisualElement content = FindContent(tab); content.RemoveFromClassList(unselectedContentClassName); } /* Method for the unselected tab: - Takes a tab as a parameter and removes the currentlySelectedTab class - Then finds the tab content and adds the unselectedContent class */ private void UnselectTab(Label tab) { tab.RemoveFromClassList(currentlySelectedTabClassName); VisualElement content = FindContent(tab); content.AddToClassList(unselectedContentClassName); } // Method to generate the associated tab content name by for the given tab name private static string GenerateContentName(Label tab) => tab.name.Replace(tabNameSuffix, contentNameSuffix); // Method that takes a tab as a parameter and returns the associated content element private VisualElement FindContent(Label tab) { return root.Q(GenerateContentName(tab)); } }
Unity로 돌아가서 플레이 모드로 들어갑니다. 새 탭을 클릭하면 콘텐츠가 변경되는 것을 볼 수 있습니다.
Unity 2021.2에서 탭 메뉴 예시 추가됨NewIn20212