- Unity User Manual 2022.2
- 사용자 인터페이스(UI) 생성
- UI 툴킷
- 에디터 UI 지원
- SerializedObject 데이터 바인딩
- 바인딩 예제
- ListView 없이 리스트에 바인딩
ListView 없이 리스트에 바인딩
버전:2021.3+
ListView 없이 리스트에 바인딩할 수 있습니다.이렇게 하려면 각 요소를 직렬화된 오브젝트의 배열에 있는 항목에 바인딩하고 배열 크기 값을 추적합니다.실행 취소 또는 재설정 작업과 같은 특정 상황에서는 배열 크기가 변경될 수 있습니다.
이 예는 ListView를 사용하지 않고 리스트에 바인딩하는 방법을 보여줍니다.
개요 예시
이 예제에서는 TexturePreviewElements 리스트를 생성하고 그 리스트를 Texture2D 오브젝트의 기본 리스트에 바인딩합니다.

이 예제에서 생성한 완성된 파일은 GitHub 저장소에 있습니다.
선행 조건
이 가이드는 Unity 에디터, UI 툴킷, C# 스크립팅에 익숙한 개발자용입니다.시작하기 전에 먼저 다음을 숙지하십시오.
리스트가 있는 오브젝트 만들기
리스트가 포함된 C# 클래스를 만듭니다.이 리스트가 바인딩 타겟입니다.
템플릿을 사용하여 Unity에서 프로젝트를 생성합니다.
프로젝트 창에서 모든 파일을 저장할 폴더를
bind-to-list-without-ListView라는 이름으로 만듭니다.-
TexturePackAsset.cs라는 이름의 C# 스크립트를 생성하고 해당 콘텐츠를 다음과 같이 바꿉니다.using System.Collections.Generic; using UnityEngine; namespace UIToolkitExamples { [CreateAssetMenu(menuName = "UIToolkitExamples/TexturePackAsset")] public class TexturePackAsset :ScriptableObject { public List<Texture2D> textures; public void Reset() { textures = new() { null, null, null, null }; } } }
커스텀 컨트롤 생성 및 스타일 지정
C#을 사용해 2D 텍스처 에셋에 대한 레퍼런스를 나타내는 커스텀 컨트롤을 생성하여 USS로 스타일을 지정합니다.
- 해당 폴더에
Editor라는 이름의 폴더를 만듭니다. -
Editor 폴더에
TexturePreviewElement.cs라는 이름의 C# 스크립트를 생성합니다. -
TexturePreviewElement.cs의 콘텐츠를 다음으로 바꿉니다.
using System;
using UnityEditor.UIElements;
using UnityEngine;
using UnityEngine.UIElements;
using Object = UnityEngine.Object;

namespace UIToolkitExamples
{
    public class TexturePreviewElement :BindableElement, INotifyValueChanged<Object>
    {
        public new class UxmlTraits :BindableElement.UxmlTraits { }
        public new class UxmlFactory :UxmlFactory<TexturePreviewElement, UxmlTraits> { }

        public static readonly string ussClassName = "texture-preview-element";

        Image m_Preview;
        ObjectField m_ObjectField;
        Texture2D m_Value;

        public TexturePreviewElement()
        {
            AddToClassList(ussClassName);

            // Create a preview image.
            m_Preview = new Image();
            Add(m_Preview);

            // Create an ObjectField, set its object type, and register a callback when its value changes.
            m_ObjectField = new ObjectField();
            m_ObjectField.objectType = typeof(Texture2D);
            m_ObjectField.RegisterValueChangedCallback(OnObjectFieldValueChanged);
            Add(m_ObjectField);

            styleSheets.Add(Resources.Load<StyleSheet>("texture_preview_element"));
        }

        void OnObjectFieldValueChanged(ChangeEvent<Object> evt)
        {
            value = evt.newValue;
        }

        public void SetValueWithoutNotify(Object newValue)
        {
            if (newValue == null || newValue is Texture2D)
            {
                // Update the preview Image and update the ObjectField.
                m_Value = newValue as Texture2D;
                m_Preview.image = m_Value;
                // Notice that this line calls the ObjectField's SetValueWithoutNotify() method instead of just setting
                // m_ObjectField.value.This is very important; you don't want m_ObjectField to send a ChangeEvent.
                m_ObjectField.SetValueWithoutNotify(m_Value);
            }
            else throw new ArgumentException($"Expected object of type {typeof(Texture2D)}");
        }

        public Object value
        {
            get => m_Value;
            // The setter is called when the user changes the value of the ObjectField, which calls
            // OnObjectFieldValueChanged(), which calls this.
            set
            {
                if (value == this.value)
                    return;

                var previous = this.value;
                SetValueWithoutNotify(value);

                using (var evt = ChangeEvent<Object>.GetPooled(previous, value))
                {
                    evt.target = this;
                    SendEvent(evt);
                }
            }
        }
    }
}
Editor 폴더에
Resources라는 이름의 폴더를 만듭니다.-
Resources 폴더에
texture_preview_element.uss라는 이름의 StyleSheet를 생성하고 콘텐츠를 다음으로 바꿉니다..texture-preview-element { width:200px; height:200px; } .texture-preview-element > .unity-image { flex-grow:1; }
커스텀 에디터를 만들고 바인딩 설정
에셋을 생성하는 C# 스크립트로 커스텀 에디터를 생성합니다.
UI의 TexturePreviewElements 수가 변경될 때 텍스처 리스트의 크기를 변경하려면 SetupList() 메서드를 호출하고 직렬화된 리스트의 항목 리스트를 살펴봅니다.
텍스처 리스트에 각 TexturePreviewElement를 바인딩하려면, 프로퍼티 이름을 TexturePackAsset.textures로 지정하여 BindProperty()를 호출합니다.
-
Editor 폴더에서
TexturePackEditor.cs라는 이름의 C# 스크립트를 생성하고 해당 콘텐츠를 다음과 같이 바꿉니다.using UnityEditor; using UnityEditor.UIElements; using UnityEngine; using UnityEngine.UIElements; namespace UIToolkitExamples { [CustomEditor(typeof(TexturePackAsset))] public class TexturePackEditor :Editor { [SerializeField] VisualTreeAsset m_VisualTreeAsset; public override VisualElement CreateInspectorGUI() { var editor = m_VisualTreeAsset.CloneTree(); var container = editor.Q(className:"preview-container"); SetupList(container); // Watch the array size to handle the list being changed var propertyForSize = serializedObject.FindProperty(nameof(TexturePackAsset.textures) + ".Array"); propertyForSize.Next(true); // Expand to obtain array size editor.TrackPropertyValue(propertyForSize, prop => SetupList(container)); editor.Q<Button>("add-button").RegisterCallback<ClickEvent>(OnClick); return editor; } void SetupList(VisualElement container) { var property = serializedObject.FindProperty(nameof(TexturePackAsset.textures) + ".Array"); var endProperty = property.GetEndProperty(); property.NextVisible(true); // Expand the first child. var childIndex = 0; // Iterate each property under the array, and populate the container with preview elements do { // Stop if you reach the end of the array if (SerializedProperty.EqualContents(property, endProperty)) break; // Skip the array size property if (property.propertyType == SerializedPropertyType.ArraySize) continue; TexturePreviewElement element; // Find an existing element or create one if (childIndex < container.childCount) { element = (TexturePreviewElement)container[childIndex]; } else { element = new TexturePreviewElement(); container.Add(element); } element.BindProperty(property); ++childIndex; } while (property.NextVisible(false)); // Never expand children. // Remove excess elements if the array is now smaller while (childIndex < container.childCount) { container.RemoveAt(container.childCount - 1); } } void OnClick(ClickEvent evt) { var property = serializedObject.FindProperty(nameof(TexturePackAsset.textures)); property.arraySize += 1; serializedObject.ApplyModifiedProperties(); } } } -
texture_pack_editor.uxml이라는 UI 문서를 생성하고 해당 콘텐츠를 다음과 같이 바꿉니다.<ui:UXML xmlns:ui="UnityEngine.UIElements" xmlns:uie="UnityEditor.UIElements" xmlns="UnityEngine.UIElements" example="UIToolkitExamples" editor-extension-mode="True"> <ui:ScrollView> <ui:VisualElement class="preview-container" style="flex-wrap: wrap; flex-direction: row; justify-content: space-around;" /> </ui:ScrollView> <ui:Button name="add-button" text="Add" /> </ui:UXML> 프로젝트 창에서 TexturePackEditor.cs를 선택합니다.
texture_pack_editor.uxml을 인스펙터의 Visual Tree Asset으로 드래그합니다.
바인딩 테스트
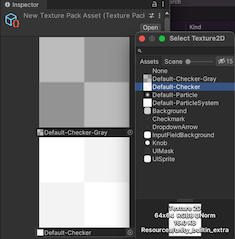
- 메뉴에서 Assets > Create > UIToolkitExamples > TexturePackAsset을 선택합니다.그러면 New Texture Pack Asset이라는 에셋이 생성됩니다.
- 프로젝트 창에서 New Texture Pack Asset을 선택합니다.그러면 인스펙터에 4개의 TexturePreviewElement 요소가 표시됩니다.
- 이러한 요소에 2D 이미지 에셋을 할당하거나 Add 버튼을 사용하여 새 요소를 추가합니다.인스펙터 UI에서 변경을 수행하면
TexturePackAsset.textures오브젝트의 프로퍼티가 변경됩니다.
팁:텍스처를 임포트해서 리스트의 다른 항목에 할당하려면 무료 Playground 에셋 스토어 플러그인을 사용해 보십시오.