- Unity 사용자 매뉴얼 2022.3(LTS)
- 사용자 인터페이스(UI) 생성
- UI 툴킷
- 이벤트로 동작 컨트롤
- 이벤트 예시
- 커스텀 에디터 창에서 전환 만들기
커스텀 에디터 창에서 전환 만들기
버전:2022.1+
이 예시는 UI 빌더와 C# 스크립트를 사용하여 간단한 전환을 만드는 방법을 보여줍니다.
개요 예시
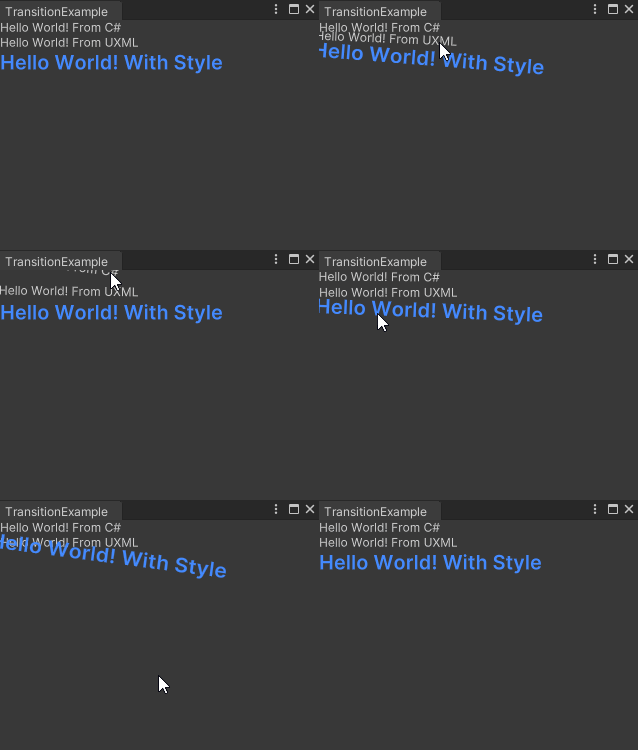
이 예시에서는 레이블 위에 마우스를 가져가면 회전 및 확대/축소가 가능한 세 개의 레이블이 있는 커스텀 에디터 창을 만듭니다.전환은 3초간 계속됩니다.

이 예시에서 생성한 완성된 파일은 이 GitHub 저장소에서 찾을 수 있습니다.
선행 조건
이 가이드는 Unity 에디터, UI 툴킷, C# 스크립팅에 익숙한 개발자용입니다.시작하기 전에 먼저 다음을 숙지하십시오.
에디터 창 파일 만들기
메뉴를 사용하여 에디터 창 파일을 자동으로 만듭니다.
임의의 템플릿을 사용하여 Unity 프로젝트를 생성합니다.
이 예시의 파일을 저장할 ’create-a-transition’이라는 폴더를 만듭니다.
폴더 안에서 프로젝트(Project) 창을 오른쪽 클릭하고 Create > UI Toolkit > Editor Window를 선택합니다.
-
C# 상자에
TransitionExample을 입력합니다.그러면 다음 파일이 생성됩니다.TransitionExample.csTransitionExample.ussTransitionExample.uxml
UI 빌더에서 전환 만들기
UI 빌더에서 두 번째 및 세 번째 레이블에 대한 전환을 만듭니다.사용자가 레이블을 가리키면 레이블의 크기를 조정하고 회전하도록 전환을 설정하고 전환이 3초 동안 지속되도록 설정합니다.
UI 빌더에서
TransitionExample.uxml을 엽니다.StyleSheets 창에서 Add new selector를 클릭하고
Label:hover를 입력하여 레이블에 호버 스타일을 추가합니다.Enter 키를 누르고 USS 선택자 리스트에서 Label:hover를 선택합니다.
- 인스펙터의 Transform 섹션에서 다음을 수행하여 레이블의 크기를 조정하고 회전합니다.
-
Scale 행에서 X 값을
1.1로 변경합니다. -
Rotate 행에
10을 입력합니다.
-
Scale 행에서 X 값을
StyleSheets 창에서 Add new selector를 클릭하고
Label을 입력하여 레이블에 스타일을 추가합니다.Enter 키를 누르고 USS 선택자 리스트에서 Label을 선택합니다.
Transition Animations 섹션의 Duration 행에 ’3’을 입력합니다. 참고:Unity는 호버가 아닌 레이블에 전환을 설정할 것을 권장합니다.
-
UI 빌더를 저장하고 닫습니다.
TransitionExample.uss파일은 다음과 같습니다..custom-label { font-size:20px; -unity-font-style: bold; color: rgb(68, 138, 255); } Label:hover { scale:1.1 1; rotate:10deg; } Label { transition-duration:3s; } Unity에서 Window > UI Toolkit > Transition Example을 선택합니다.
두 번째 및 세 번째 레이블 위로 마우스를 가져갑니다.레이블이 3초 동안 회전하며 크기가 커집니다.
C#에서 전환 만들기
C#에서 첫 번째 레이블에 대해 이전 섹션에서 수행한 것과 동일한 전환을 만듭니다.
텍스트 에디터에서
TransitionExample.cs를 엽니다.-
TransitionExample.cs의 콘텐츠를 다음과 같이 바꿉니다.using UnityEditor; using UnityEngine; using UnityEngine.UIElements; using System.Collections.Generic; public class TransitionExample :EditorWindow { [SerializeField] VisualTreeAsset m_VisualTreeAsset; [MenuItem("Window/UI Toolkit/TransitionExample")] public static void ShowExample() { TransitionExample wnd = GetWindow<TransitionExample>(); wnd.titleContent = new GUIContent("Transition Example"); } public void CreateGUI() { // Each editor window contains a root VisualElement object. VisualElement root = rootVisualElement; // VisualElements objects can contain other VisualElement following a tree hierarchy. cSharpLabel = new Label("Hello World!From C#"); root.Add(cSharpLabel); // Create transition on the new Label. cSharpLabel.style.transitionDuration = new List<TimeValue>{ new TimeValue(3) }; // Record default rotate and scale values. defaultRotate = cSharpLabel.resolvedStyle.rotate; defaultScale = cSharpLabel.resolvedStyle.scale; // Set up event handlers to simulate the use of the :hover pseudo-class. cSharpLabel.RegisterCallback<PointerOverEvent>(OnPointerOver); cSharpLabel.RegisterCallback<PointerOutEvent>(OnPointerOut); // Instantiate UXML VisualElement labelFromUXML = m_VisualTreeAsset.Instantiate(); root.Add(labelFromUXML); } // The Label created with C#. VisualElement cSharpLabel; // The default rotate and scale values for the new Label. Rotate defaultRotate; Scale defaultScale; void OnPointerOver(PointerOverEvent evt) { SetHover(evt.currentTarget as VisualElement, true); } void OnPointerOut(PointerOutEvent evt) { SetHover(evt.currentTarget as VisualElement, false); } // When the user enters or exits the Label, set the rotate and scale. void SetHover(VisualElement label, bool hover) { label.style.rotate = hover ? new(Angle.Degrees(10)) : defaultRotate; label.style.scale = hover ? new Vector2(1.1f, 1) : defaultScale; } // Unregister all event callbacks. void OnDisable() { cSharpLabel.UnregisterCallback<PointerOverEvent>(OnPointerOver); cSharpLabel.UnregisterCallback<PointerOutEvent>(OnPointerOut); } } Unity에서 Window > UI Toolkit > Transition Example을 선택합니다.
첫 번째 레이블 위로 마우스를 가져갑니다.레이블이 3초 동안 회전하며 크기가 커집니다.