- Unity User Manual 2023.1
- UI(사용자 인터페이스)
- UI 툴킷
- UI 구조화
- UI 구조화 예시
- 커스텀 컨트롤에 대한 커스텀 스타일 생성
커스텀 컨트롤에 대한 커스텀 스타일 생성
버전:2021.2+
이 예시는 커스텀 컨트롤에서 커스텀 USS 변수를 사용하는 방법을 보여줍니다.
개요 예시
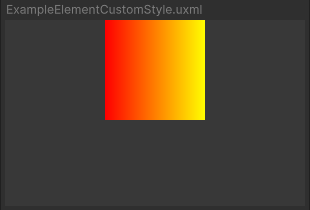
이 예시에서는 USS에서 두 가지 컬러를 읽고 텍스처를 생성하는 데 사용하는 커스텀 컨트롤을 생성합니다.

이 예시에서 생성한 완성된 파일은 GitHub 저장소에서 확인할 수 있습니다.
선행 조건
이 가이드는 Unity 에디터, UI 툴킷, C# 스크립팅에 익숙한 개발자용입니다.시작하기 전에 먼저 다음을 숙지하십시오.
커스텀 컨트롤과 커스텀 스타일 생성
커스텀 컨트롤을 정의하는 C# 스크립트와 커스텀 스타일을 정의하는 USS 파일을 생성합니다.
임의의 템플릿을 사용하여 Unity 프로젝트를 생성합니다.
Create-custom-style-custom-control이라는 이름의 폴더를 만들어 파일을 저장합니다.-
ExampleElementCustomStyle폴더에ExampleElementCustomStyle.cs라는 이름의 C# 스크립트를 생성하고 콘텐츠를 다음으로 바꿉니다.using UnityEngine; using UnityEngine.UIElements; namespace UIToolkitExamples { public class ExampleElementCustomStyle :VisualElement { // Factory class, required to expose this custom control to UXML public new class UxmlFactory :UxmlFactory<ExampleElementCustomStyle, UxmlTraits> { } // Traits class public new class UxmlTraits :VisualElement.UxmlTraits { } // Use CustomStyleProperty<T> to fetch custom style properties from USS static readonly CustomStyleProperty<Color> S_GradientFrom = new CustomStyleProperty<Color>("--gradient-from"); static readonly CustomStyleProperty<Color> S_GradientTo = new CustomStyleProperty<Color>("--gradient-to"); // Image child element and its texture Texture2D m_Texture2D; Image m_Image; public ExampleElementCustomStyle() { // Create an Image and a texture for it.Attach Image to self. m_Texture2D = new Texture2D(100, 100); m_Image = new Image(); m_Image.image = m_Texture2D; Add(m_Image); RegisterCallback<CustomStyleResolvedEvent>(OnStylesResolved); } // When custom styles are known for this control, make a gradient from the colors. void OnStylesResolved(CustomStyleResolvedEvent evt) { Color from, to; if (evt.customStyle.TryGetValue(S_GradientFrom, out from) && evt.customStyle.TryGetValue(S_GradientTo, out to)) { GenerateGradient(from, to); } } public void GenerateGradient(Color from, Color to) { for (int i = 0; i < m_Texture2D.width; ++i) { Color color = Color.Lerp(from, to, i / (float)m_Texture2D.width); for (int j = 0; j < m_Texture2D.height; ++j) { m_Texture2D.SetPixel(i, j, color); } } m_Texture2D.Apply(); m_Image.MarkDirtyRepaint(); } } } -
ExampleElementCustomStyle.uss라는 이름의 USS 파일을 생성하고 콘텐츠를 다음으로 바꿉니다.ExampleElementCustomStyle { --gradient-from: red; --gradient-to: yellow; }
UI 문서에서 커스텀 컨트롤 사용
커스텀 컨트롤을 사용할 UI 문서를 만들고 커스텀 스타일을 커스텀 컨트롤에 적용합니다.
-
ExampleElementCustomStyle폴더에ExampleElementCustomStyle.uxml이라는 이름의 UI 문서를 생성합니다. -
ExampleElementCustomStyle.uxml을 더블 클릭하여 UI 빌더에서 엽니다. - Library > Project > UIToolkitExamples를 선택하고, ExampleElementCustomStyle을 계층 (Hierarchy) 창에 드래그합니다.Viewport 창에 회색 사각형이 표시됩니다.
-
ExampleElementCustomStyle.uss파일을 기존 USS로 추가합니다.이렇게 하면 커스텀 USS 변수가 사각형에 적용됩니다.