- Unity 사용자 매뉴얼 2022.3(LTS)
- 사용자 인터페이스(UI) 생성
- UI 툴킷
- UI 렌더러
- 벡터 API를 사용하여 방사형 진행 표시기 만들기
벡터 API를 사용하여 방사형 진행 표시기 만들기
버전:2022.1+
이 예시에서는 커스텀 컨트롤을 만들고 벡터 API를 사용하여 시각적 요소에 시각적 콘텐츠를 그리는 방법을 보여 줍니다.
개요 예시
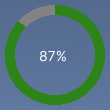
이 예시에서는 로딩 막대 대신 진행률을 표시하는 커스텀 컨트롤을 만듭니다.진행 표시줄은 백분율을 표시하는 레이블 주위의 부분적으로 채워진 링에 진행률 값을 표시합니다.0에서 100 사이의 값을 지원하며, 이 값은 링이 채워지는 양을 결정합니다.

이 예시에서 생성한 완성된 파일은 이 GitHub 저장소에서 찾을 수 있습니다.
선행 조건
이 가이드는 Unity 에디터, UI 툴킷, C# 스크립팅에 익숙한 개발자용입니다.시작하기 전에 먼저 다음을 숙지하십시오.
방사형 진행 컨트롤과 커스텀 메시 만들기
RadialProgress 시각적 요소를 정의하는 C# 스크립트와 커스텀 메시를 정의하는 C# 스크립트를 만듭니다.USS 파일로 시각적 요소에 스타일을 지정합니다.
임의의 템플릿을 사용하여 Unity 프로젝트를 생성합니다.
radial-progress라는 폴더를 만들어 파일을 저장합니다.-
radial-progress폴더에 다음 콘텐츠가 포함된RadialProgress.cs라는 이름의 C# 스크립트를 만듭니다.using Unity.Collections; using UnityEngine; using UnityEngine.UIElements; namespace MyUILibrary { // An element that displays progress inside a partially filled circle public class RadialProgress :VisualElement { public new class UxmlTraits :VisualElement.UxmlTraits { // The progress property is exposed to UXML. UxmlFloatAttributeDescription m_ProgressAttribute = new UxmlFloatAttributeDescription() { name = "progress" }; // Use the Init method to assign the value of the progress UXML attribute to the C# progress property. public override void Init(VisualElement ve, IUxmlAttributes bag, CreationContext cc) { base.Init(ve, bag, cc); (ve as RadialProgress).progress = m_ProgressAttribute.GetValueFromBag(bag, cc); } } // Define a factory class to expose this control to UXML. public new class UxmlFactory :UxmlFactory<RadialProgress, UxmlTraits> { } // These are USS class names for the control overall and the label. public static readonly string ussClassName = "radial-progress"; public static readonly string ussLabelClassName = "radial-progress__label"; // These objects allow C# code to access custom USS properties. static CustomStyleProperty<Color> s_TrackColor = new CustomStyleProperty<Color>("--track-color"); static CustomStyleProperty<Color> s_ProgressColor = new CustomStyleProperty<Color>("--progress-color"); Color m_TrackColor = Color.gray; Color m_ProgressColor = Color.red; // This is the label that displays the percentage. Label m_Label; // This is the number that the Label displays as a percentage. float m_Progress; // A value between 0 and 100 public float progress { // The progress property is exposed in C#. get => m_Progress; set { // Whenever the progress property changes, MarkDirtyRepaint() is named.This causes a call to the // generateVisualContents callback. m_Progress = value; m_Label.text = Mathf.Clamp(Mathf.Round(value), 0, 100) + "%"; MarkDirtyRepaint(); } } // This default constructor is RadialProgress's only constructor. public RadialProgress() { // Create a Label, add a USS class name, and add it to this visual tree. m_Label = new Label(); m_Label.AddToClassList(ussLabelClassName); Add(m_Label); // Add the USS class name for the overall control. AddToClassList(ussClassName); // Register a callback after custom style resolution. RegisterCallback<CustomStyleResolvedEvent>(evt => CustomStylesResolved(evt)); // Register a callback to generate the visual content of the control. generateVisualContent += GenerateVisualContent; progress = 0.0f; } static void CustomStylesResolved(CustomStyleResolvedEvent evt) { RadialProgress element = (RadialProgress)evt.currentTarget; element.UpdateCustomStyles(); } // After the custom colors are resolved, this method uses them to color the meshes and (if necessary) repaint // the control. void UpdateCustomStyles() { bool repaint = false; if (customStyle.TryGetValue(s_ProgressColor, out m_ProgressColor)) repaint = true; if (customStyle.TryGetValue(s_TrackColor, out m_TrackColor)) repaint = true; if (repaint) MarkDirtyRepaint(); } void GenerateVisualContent(MeshGenerationContext context) { float width = contentRect.width; float height = contentRect.height; var painter = context.painter2D; painter.lineWidth = 10.0f; painter.lineCap = LineCap.Butt; // Draw the track painter.strokeColor = m_TrackColor; painter.BeginPath(); painter.Arc(new Vector2(width * 0.5f, height * 0.5f), width * 0.5f, 0.0f, 360.0f); painter.Stroke(); // Draw the progress painter.strokeColor = m_ProgressColor; painter.BeginPath(); painter.Arc(new Vector2(width * 0.5f, height * 0.5f), width * 0.5f, -90.0f, 360.0f * (progress / 100.0f) - 90.0f); painter.Stroke(); } } }
UI 문서에서 커스텀 컨트롤 사용 및 테스트
USS 파일을 생성하여 라디안 진행 표시기 커스텀 컨트롤의 스타일을 지정할 수 있습니다.UI 빌더를 사용하여 컨트롤을 추가하고 USS 스타일시트를 적용할 수 있습니다.다른 Progress 값을 사용하여 컨트롤을 테스트하십시오.
-
다음 콘텐츠가 포함된
RadialProgress.uss라는 이름의 USS 파일을 생성합니다..radial-progress { min-width:26px; min-height:20px; --track-color: rgb(130, 130, 130); --progress-color: rgb(46, 132, 24); --percentage-color: white; margin-left:5px; margin-right:5px; margin-top:5px; margin-bottom:5px; flex-direction: row; justify-content: center; width:100px; height:100px; } .radial-progress__label { -unity-text-align: middle-left; color: var(--percentage-color); } RadialProgressExample.uxml이라는 이름의 UI 문서를 생성합니다.RadialProgressExample.uxml을 더블 클릭하여 UI 빌더에서 엽니다.Library 창에서 Project > Custom Controls > MyUILibrary를 선택합니다.
RadialProgress를 계층(Hierarchy) 창으로 드래그합니다.
UI 빌더의 StyleSheets 섹션에서
RadialProgress.uss를 기존 USS로 추가합니다.계층 창에서 RadialProgress를 선택합니다.
인스펙터(Inspector) 창에서 Name 박스에
radial-progress를 입력합니다.인스펙터 창에서 Progress 박스에 다른 값을 입력합니다.뷰포트의 백분율이 변경되고 녹색 진행 표시 링의 크기가 조절됩니다.
런타임에서 진행 표시기 사용
씬에서 UI 문서를 사용하고 데모용으로 컨트롤의 Progress 프로퍼티를 동적 값으로 업데이트하는 C# MonoBehaviour 스크립트를 생성합니다.
-
radial-progress폴더에 다음 콘텐츠가 포함된RadialProgressComponent.cs라는 이름의 C# 스크립트를 생성합니다.using System.Collections; using System.Collections.Generic; using UnityEngine; using UnityEngine.UIElements; using MyUILibrary; [RequireComponent(typeof(UIDocument))] public class RadialProgressComponent :MonoBehaviour { RadialProgress m_RadialProgress; void Start() { var root = GetComponent<UIDocument>().rootVisualElement; m_RadialProgress = new RadialProgress() { style = { position = Position.Absolute, left = 20, top = 20, width = 200, height = 200 } }; root.Add(m_RadialProgress); } void Update() { // For demo purpose, give the progress property dynamic values. m_RadialProgress.progress = ((Mathf.Sin(Time.time) + 1.0f) / 2.0f) * 60.0f + 10.0f; } } Unity에서 GameObject > UI Toolkit > UI Document를 선택합니다.
계층 창에서 UIDocument를 선택합니다.
RadialProgressComponent.cs를 UIDocument 게임 오브젝트의 컴포넌트로 추가합니다.
플레이 모드를 시작합니다.진행 표시기가 씬에 표시되고 진행 표시 링과 값이 동적으로 변경됩니다.