- Unity User Manual 2020.2
- Анимация
- Анимационные клипы
- Руководство по Animation Window
- Creating a new Animation Clip
Creating a new Animation Clip
To create a new Animation Clip, select a GameObject in your Scene, and open the Animation Window (top menu:) Window > Animation > Animation.
If the GameObject does not yet have any Animation Clips assigned, the “Create” button appears in the centre of the Animation Window timeline area (see Fig 1: Create a new Animation Clip).
Click the Create button. Unity prompts you to save your new empty Animation Clip in your Assets folder.

When you save this new empty Animation Clip, Unity does the following:
- Creates a new Animator Controller Asset
- Adds the new clip into the Animator Controller as the default state
- Adds an Animator Component to the GameObject that you are applying animation to
- Assigns the new Animator Controller to the Animator Component
All the required elements of the animation system are now set up, and you can begin animating the GameObject.
Adding another Animation Clip
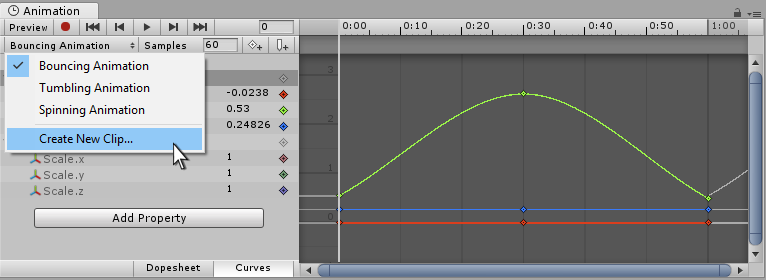
If the GameObject already has one or more Animation Clips assigned, the “Create” button is not visible. Instead, one of the existing clips is visible in the Animation window. To switch between Animation Clips, use the menu in the top-left of the Animation window, under the playback controls (see Fig 2: Adding more Animation Clips).
To create a new Animation Clip on a GameObject that has existing animations, select Create New Clip from this menu. Again, Unity prompts you to save your new empty Animation Clip before you can work on it.

How it fits together
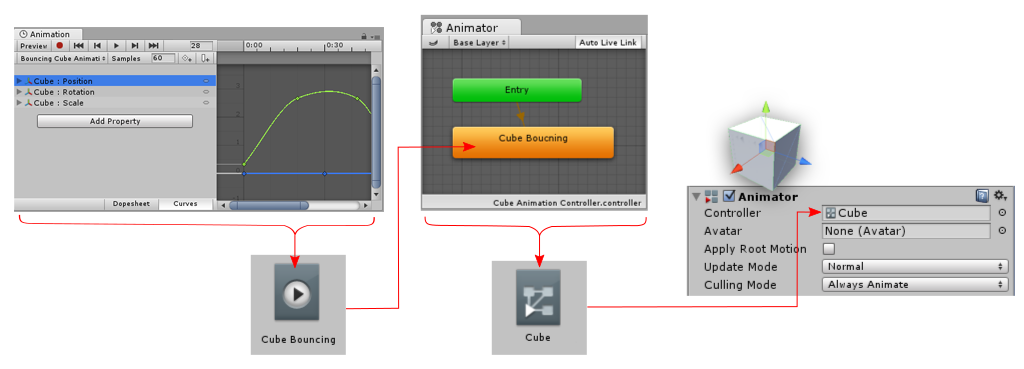
The above steps automatically set up the relevant components and references. However, it is useful to understand how the pieces connect.
- A GameObject must have an Animator component
- The Animator component must have an Animator Controller Asset assigned
- The Animator Controller asset must have one or more Animation Clips assigned
The diagram below shows how Unity assigns these pieces, starting from the new Animation Clip in the Animation Window (see Fig 3: Animation Clip Diagram).

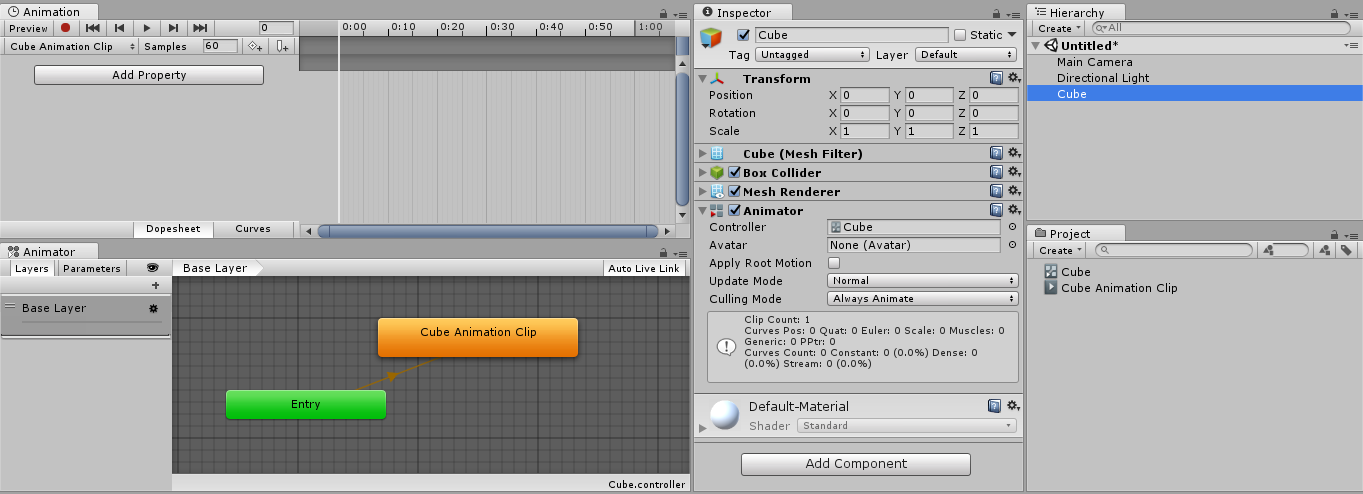
After you create a new Animation Clip, you can now see:
- The Animation Window (top left) shows a timeline with a white playback head line, ready to record new keyframes. The clip’s name is visible in the clip menu, just below the playback controls.
- The Inspector (center) shows that the “Cube” GameObject has an Animator Component, and the Controller field of the component shows that an Animator Controller Asset called Cube is assigned to it.
- The Project Window (bottom right) shows that two new Assets have been created: an Animator Controller asset called Cube and an Animation Clip Asset called Cube Animation Clip.
- The Animator Window (bottom left) shows the contents of the Animator Controller: there is a Cube Animation Clip on the controller, and that it is in the default state (as indicated by the orange color). Subsequent clips you add to the controller have a grey color, indicating they are not the default state (see Fig 4: New Animation Clip in the Project Window).

- 2017–09–05 Page amended