- Unity User Manual 2021.1 (beta)
- Platform development
- iOS
- Первые шаги в iOS разработке
- Structure of a Unity Xcode Project
Structure of a Unity Xcode Project
When you build a Unity Project for the iOS platform, Unity creates a folder that contains an Xcode project. You need this project to compile and sign your app before you deploy it on a device. You also need to use it to prepare and bundle your game for distribution on the App Store. The Xcode project structure has changed as of Unity 2019.3 to support Unity integration into native iOS applications via Unity as a Library.
Before you build your Project for iOS, make sure that you set the Bundle Identifier in the iOS Player Settings** (menu: Edit > Project Settings > Player Settings). You can also choose whether your app targets the simulator or an actual device. To do this, change the SDK version** field.
Project Targets
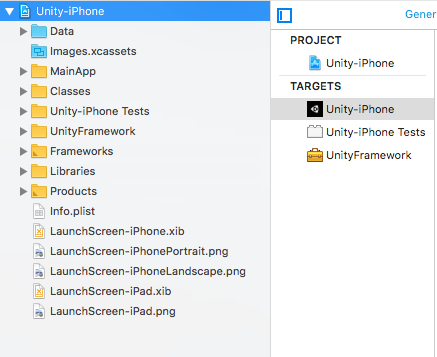
Every generated Unity iOS Xcode project has the following structure and targets:

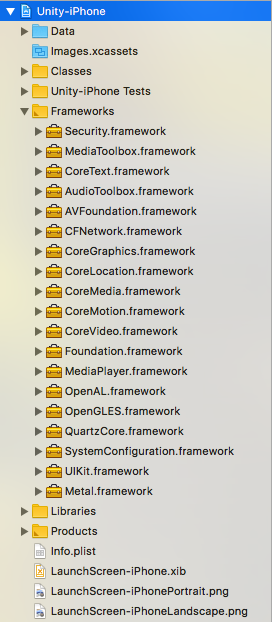
- UnityFramework: A library part in the UnityFramework target. It includes the Classes, UnityFramework, and Libraries folders, as well as dependent frameworks, andXcode uses it to build the UnityFramework.framework file.
- Unity-iPhone: A thin launcher part in the Unity-iPhone target. It includes the MainApp folder and app representation data such as Launch Screens, .xib files, icons, data, and /Info.plist files, and it runs the library. The Unity-iPhone target has a single dependency on the UnityFramework target.
Classes folder
The Classes folder contains code that integrates the Unity Runtime and Objective-C. Unity stores the entry points of the application in the main.mm and UnityAppController.mm/h files inside this folder. You can create your own AppDelegate derived from UnityAppController, or, if any of your plug-ins include AppController.h, you can include UnityAppController.h instead. If your Plugins/iOS folder includes_ AppController.mm/h_, you can merge and rename them.
The InternalProfiler.h file also defines a compiler conditional to enable the Internal Profiler. The code in this folder doesn’t change often, and you can place custom classes here. If you select the Append mode, Xcode preserves changes to this folder between builds. However, this function doesn’t support multiple build targets and requires a fixed structure of the Libraries folder.
Unity’s internal Profiler is fast and unobtrusive, and feeds basic information about:
- Which subsystem is taking most of the frame time.
- The .NET heap size.
- GC event count and duration.
For more information, see documentation about the built-in Profiler.
Data folder
This folder contains your application’s serialized assets, as well as .NET assemblies (.dll or .dat files) as either full code or metadata, depending on code stripping settings. The machine.config file sets up various .NET services such as security and WebRequest. Xcode refreshes the contents of this folder with every build. You shouldn’t make any changes to it.
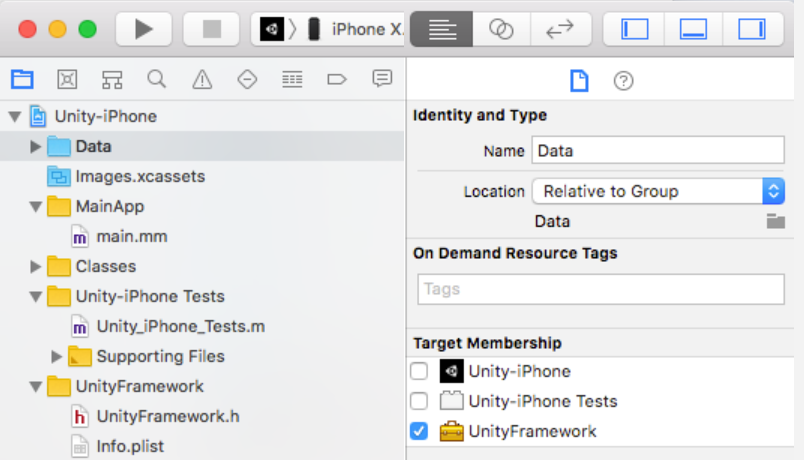
By default, the Data folder’s Target Membership is the Unity-iPhone target, and Unity Runtime searches for it in the mainBundle. To change the default bundle where Unity Runtime looks for the Data folder, call setDataBundleId: "com.my.product" on the UnityFramework instance before you call one of the run functions. For example, if you want to have Data together with the UnityFramework call, use setDataBundleId: "com.unity3d.framework" and set the Target Membership to UnityFramework.

Note: On-Demand Resources are only supported when the Data folder is a part of the Application target and not a part of the UnityFramework target.
Libraries folder
The Libraries folder contains libil2cpp.a for IL2CPP. The libiPhone-lib.a file is the Unity Runtime static library, and RegisterMonoModules.cpp binds Unity native code with .NET. Xcode and refreshes the contents of this folder with every build. You shouldn’t make any changes to it.
Custom folders
You can place your custom files here.
Graphic files
Icons and splash screens (.png files) are located in asset catalogs in the Unity-iPhone folder. Unity automatically manages these files. Launch Screens, their XML Interface Builders (.xib files), and Storyboard files are stored in the Project’s root folder. To set them up in Unity use the Player Settings window (menu: Edit > Project Settings > Player Settings). When you create custom launch images, make sure they adhere to Apple’s Human Interface Guidelines.
Property List (.plist) file
You can manage the /Info.plist file within the Unity-iPhone target (accessed via mainBundle) from Unity’s Player Settings (menu: Edit > Project Settings > Player Settings, then select the Other section and scroll down to the Identification section; for more details, see documentation on iOS Player settings - Identification). When Unity builds the Player, it updates this file rather than replacing it. Don’t make changes to it unless you have to.
The /UnityFramework/Info.plist file (accessed via bundleWithIdentifier:@"com.unity3d.framework") is a part of UnityFramework. You can keep values here instead of mainBundle’s /Info.plist file to make sure that you can still get these values if UnityFramework is moved into another application.
Other files
These include the Xcode project file (.xcodeproj file), and framework links that only appear in the Project Navigator.

Building an Xcode project with xcodebuild
When you use command line arguments to specify build settings, these affect all Xcode project targets. To prevent this, some build settings have suffixed versions which you can use to specify which target your build settings affect. This is implemented through User-Defined Settings (*APP suffix used for application target and *FRAMEWORK suffix for framework target).
When building with xcodebuild, use suffixed versions for:
PRODUCT_NAME -> PRODUCT_NAME_APP
PROVISIONING_PROFILE -> PROVISIONING_PROFILE_APP
PROVISIONING_PROFILE_SPECIFIER -> PROVISIONING_PROFILE_SPECIFIER_APP
OTHER_LDFLAGS -> OTHER_LDFLAGS_FRAMEWORK
Based on your custom build pipeline, you can extend the list to cover other settings.
Modifying an Xcode project
To modify a generated Xcode project, use Xcode.PBXProject.
Project Targets
As of Unity 2019.3, PBXProject.GetUnityTargetName and pbxProject->TargetGuidByName("Unity-iPhone") are obsolete. Instead, you can use either pbxProject->GetUnityFrameworkTargetGuid(), or pbxProject->GetUnityMainTargetGuid():
// Obsolete
string targetGuid = proj.TargetGuidByName("Unity-iPhone");
string targetGuid = proj.TargetGuidByName(PBXProject.GetUnityTargetName());

// Instead call one of these
string targetGuid = proj.GetUnityFrameworkTargetGuid();
string targetGuid = proj.GetUnityMainTargetGuid();
If you need to support both old and new code paths in your package or custom build postprocessor, follow these steps:
- Rely on plugin importer capabilities whenever possible (for example, to specify additional frameworks).
- Use reflection:
string mainTargetGuid;
string unityFrameworkTargetGuid;

var unityMainTargetGuidMethod = proj.GetType().GetMethod("GetUnityMainTargetGuid");
var unityFrameworkTargetGuidMethod = proj.GetType().GetMethod("GetUnityFrameworkTargetGuid");

if (unityMainTargetGuidMethod != null && unityFrameworkTargetGuidMethod != null)
{
    mainTargetGuid = (string)unityMainTargetGuidMethod.Invoke(proj, null);
    unityFrameworkTargetGuid = (string)unityFrameworkTargetGuidMethod.Invoke(proj, null);
}
else
{
    mainTargetGuid = proj.TargetGuidByName ("Unity-iPhone");
    unityFrameworkTargetGuid = mainTargetGuid;
}
- Unity as a Library for iOS added in 2019.3.NewIn20193