- Unity User Manual (5.6)
- Анимация
- Animator Controllers (контроллеры аниматоров)
- Конечные автоматы в анимации
- Инверсная кинематика (только для Pro версий)
Инверсная кинематика (только для Pro версий)
В основном, анимация создается изменением углов в соединениях в скелете на заранее определенные величины. Позиция дочернего соединения изменяется согласно повороту родителя, поэтому конечная точка цепочки соединений может быть определена углами и относительными позициями каждого конкретного узла в цепи. Этот метод изменения позы скелета известен как прямая кинематика(forward kinematics).
Однако, часто полезным является взгляд на задачу позиционирования соединений с другой стороны - со стороны выбранной позиции в пространстве. Работая в обратном направлении, найдите допустимый способ расположения соединений такой, чтобы конечная точка совпала с заданной ранее позицией Это может быть полезно, когда вы хотите, чтобы персонаж коснулся объекта в точке, заданной пользователем, или корректно позиционировал свои ступни на неровной поверхности. Этот подход называется инверсной кинематикой(Inverse Kinematics) (IK) и поддерживается Mecanim для любого персонажа гуманоида с правильно настроенным аватаром

To set up IK for a character, you typically have objects around the scene that a character interacts with, and then set up the IK thru script, in particular, Animator functions like SetIKPositionWeight, SetIKRotationWeight, SetIKPosition, SetIKRotation, SetLookAtPosition, bodyPosition, bodyRotation
На иллюстрации выше мы показываем персонажа, поднимающего цилиндрический объект. Как мы сделали это?
We start out with a character that has a valid Avatar.
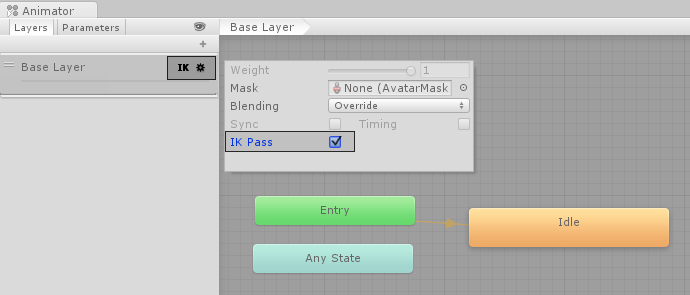
Next create an Animator Controller with containing at least one animation for the character. Then in the Layers pane of the Animator window, click the cog settings icon of the Layer and and check the IK Pass checkbox in the menu which pops up.

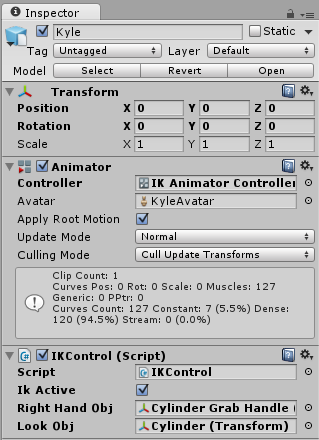
Make sure the Animator Controller is assigned to the character’s Animator Component:

Next, attach to it a script that actually takes care of the IK, let’s call it IKControl. This script sets the IK target for the character’s right hand, and its look position to make it look at the object it is holding:
using UnityEngine;
using System;
using System.Collections;

[RequireComponent(typeof(Animator))]

public class IKControl : MonoBehaviour {

    protected Animator animator;

    public bool ikActive = false;
    public Transform rightHandObj = null;
    public Transform lookObj = null;

    void Start ()
    {
        animator = GetComponent<Animator>();
    }

    //a callback for calculating IK
    void OnAnimatorIK()
    {
        if(animator) {

            //if the IK is active, set the position and rotation directly to the goal.
            if(ikActive) {

                // Set the look target position, if one has been assigned
                if(lookObj != null) {
                    animator.SetLookAtWeight(1);
                    animator.SetLookAtPosition(lookObj.position);
                }

                // Set the right hand target position and rotation, if one has been assigned
                if(rightHandObj != null) {
                    animator.SetIKPositionWeight(AvatarIKGoal.RightHand,1);
                    animator.SetIKRotationWeight(AvatarIKGoal.RightHand,1);
                    animator.SetIKPosition(AvatarIKGoal.RightHand,rightHandObj.position);
                    animator.SetIKRotation(AvatarIKGoal.RightHand,rightHandObj.rotation);
                }

            }

            //if the IK is not active, set the position and rotation of the hand and head back to the original position
            else {
                animator.SetIKPositionWeight(AvatarIKGoal.RightHand,0);
                animator.SetIKRotationWeight(AvatarIKGoal.RightHand,0);
                animator.SetLookAtWeight(0);
            }
        }
    }
}
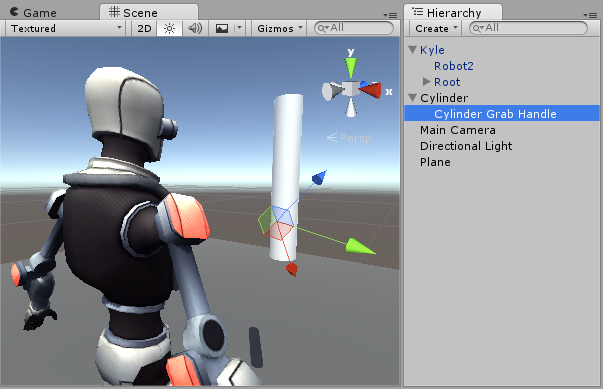
Поскольку мы не хотим, чтобы персонаж захватывал весь объект своей рукой, мы располагаем сферу в месте, в котором рука должна держать цилиндр и, соответственно, поворачиваем его.

Эта сфера должна быть присвоена свойству “Right Hand Obj” скрипта IKCtrl
In this example, we have the look target set to the cylinder itself, so the character looks directly towards the centre of the object even through the handle is near the bottom.

Наблюдайте за тем, как персонаж захватывает объект, когда вы щелкаете по чекбоксу IKActive