VR 概述
Unity VR lets you target virtual reality devices directly from Unity, without any external plug-ins in projects. It provides a base API and feature set with compatibility for multiple devices. It has been designed to provide forward compatibility for future devices and software. The VR API surface is minimal by design, but will expand as VR continues to grow.
通过使用 Unity 中的原生 VR 支持,您将获得:
- 每个 VR 设备的稳定版本
- 用于与不同 VR 设备进行交互的单个 API 接口
- 一个纯净的项目文件夹,无需每个设备的外部插件
- 在应用程序中包含和切换多个设备的能力
- Increased performance (Lower-level Unity engine optimizations are possible for native devices)
启用 Unity VR 支持
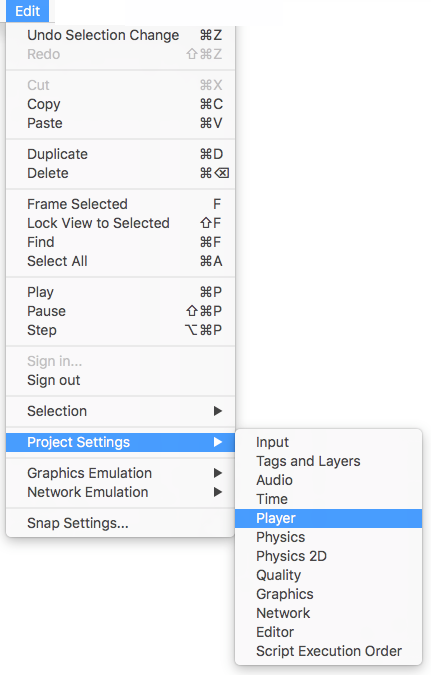
To enable native VR support for your game builds and the Editor, open the Player Settings (menu: Edit > Project Settings > Player). Select Other Settings and check the Virtual Reality Supported checkbox. Set this for each build target. Enabling virtual reality support in a standalone build does not also enable the support for Android (and vice-versa).

使用该复选框下方显示的 Virtual Reality SDKs 列表为每个构建目标添加和删除 VR 设备。列表的顺序是 Unity 尝试在运行时启用 VR 设备的顺序。第一个正确初始化的设备便是启用的设备。此列表顺序在构建的播放器中是相同的。

构建的应用程序:选择启动设备
Your built application initializes and enables devices in the same order as the Virtual Reality SDKs list in Other Settings (see Enabling VR Support, above). Devices not present in the list at build time are not available in the final build. Device None is equivalent to a non-VR application (that is, a normal Unity application) and can be switched to during runtime without including it in the list; the exception to this is None.
Including None as a device in the list allows you to default to a non-VR application before attempting a VR device’s initialization. If you place None at the top of the list, the application starts with VR disabled. Then, you can then enable and disable VR devices that are present in your list through script using VRSettings.LoadDeviceByName.
If initialization of the device you attempt to switch to fails, Unity disables VR with that device still set as the active VR device. When you switch devices (VRSettings.LoadDeviceByName) or enable VR (VR.VRSettings-enabled), the built application attempts to initialize again.
用于启动特定设备的命令行参数为:
-vrmode DEVICETYPE
where DEVICETYPE is one of the names from the supported VR devices list.
示例:MyGame.exe -vrmode oculus
启用 VR 后时发生什么
在 Unity 中启用 VR 时,会自动执行以下操作:
自动渲染到头戴式显示器
场景中的所有摄像机都可以直接渲染到头戴式显示器 (HMD)。视图和投影矩阵会自动调整来适应头部跟踪、位置跟踪和视野。
可使用摄像机 (Camera) 组件的 stereoTargetEye 属性禁止渲染到 HMD。或者,也可使用 Target Texture 属性将摄像机设置为渲染到渲染纹理。
- 使用 stereoTargetEye 属性可将摄像机设置为仅将特定眼睛渲染到 HMD。这种设置对于呈现狙击镜或立体视频等特殊效果非常有用。要实现此目的,请在场景中添加两个摄像机:一个瞄准左眼,另一个瞄准右眼。通过设置层遮罩来配置发送到每只眼睛的内容。
自动头部跟踪输入
如果采用的是头戴式设备,则会自动将头部跟踪和相应的视野 (FOV) 应用于摄像机。可以手动将 FOV 设置为特定值,但不能直接设置摄像机的变换值。请参阅下面的了解摄像机部分以获取更多信息。
头部跟踪和位置跟踪将自动应用,确保在渲染帧之前,位置和方向最接近用户的位置和方向。这样可以提供良好的 VR 体验,防止用户出现恶心感。
了解摄像机
摄像机变换由头部跟踪姿势进行覆盖。要移动或旋转摄像机,请将其附加为另一个游戏对象的子项。这样一来,所有对摄像机父项进行的变换更改都会影响摄像机本身。使用脚本移动或旋转摄像机也是如此。

可以将摄像机的位置和方向想象为用户在中立位置观察的位置。
坐姿和房间规模 VR 体验之间存在差异:
- 如果设备支持房间规模体验,则摄像机的起始位置是用户游戏空间的中心位置。
- Using the seated experience, you can reset Cameras to the neutral position using VR.InputTracking.Recenter().
渲染到设备的每个摄像机会自动使用用户在每个 VR SDK 的软件设置中输入的 FOV 替换摄像机的 FOV。用户无法在运行时更改视野,因为目前已知此行为会导致晕动症。
Editor 模式
如果 VR 设备支持 Unity Editor 模式,请在 Editor 中按 Play 直接在设备上进行测试。
如果已将 stereoTargetEye 设置为左眼或双眼,则左眼将渲染到 Game 视图窗口。如果已将 stereoTargetEye 设置为右眼,则将渲染右眼。
没有左眼和右眼的自动并排视图。要在 Game 视图中查看并排视图,请创建两个摄像机,将一个摄像机设置为左眼,另一个设置为右眼,并设置视口来并排显示它们。
请注意,在 Editor 中运行会产生开销,因为 Unity 集成开发环境 (IDE) 需要渲染每个窗口,因此可能会遇到延迟或抖动。要减少 Editor 渲染开销,请打开 Game 视图并启用 Maximize on Play。
Unity Profiler 是一个有用的工具,可用于了解在 Editor 外运行时的性能。但是,性能分析器 (Profiler) 本身也有开销。检查游戏性能的最佳方法是在目标平台上进行构建并直接运行。运行非开发版本时可以看到最佳性能,但开发版本允许连接 Unity Profiler 来进行更好的性能分析。
在 Unity 中进行 VR 开发的硬件和软件建议
硬件
实现与目标 HMD 类似的帧率对于获得良好的 VR 体验至关重要。此帧率必须与 HMD 中使用的显示器的刷新率相匹配。如果帧率低于 HMD 的刷新率,则会特别明显,并通常导致玩家恶心。
Refresh rates for VR devices:
| VR 设备 | 刷新率 |
|---|---|
| Gear VR | 60hz |
| Oculus CV1 | 90hz |
| Vive | 90hz |
软件
Windows:Windows 7、8、8.1 和 Windows 10 全都兼容。
Android:Android OS Lollipop 5.1 或更高版本。
OS X:OSX 10.9+ 以及 Oculus 0.5.0.1 运行时。但是,Oculus 暂停了 OS X 的相关开发,因此在 Unity 中使用 Windows 提供原生 VR 功能。
显卡驱动程序:确保驱动程序是最新的。每种设备都在不断推出最新的驱动程序,因此可能不支持旧驱动程序。
设备运行时要求
每个 VR 设备都要求在计算机上安装适当的运行时。例如,要在 Unity 中开发和运行 Oculus,必须在计算机上安装 Oculus 运行时(也称为 Oculus Home)。对于 Vive,则需要安装 Steam 和 SteamVR。
根据所使用的 Unity 版本,Unity 支持的每个特定设备的运行时版本可能会有所不同。您可以在 Unity 每个主要和次要版本的发行说明中找到运行时版本。
在推出某些版本更新时,不再支持以前的运行时版本。这意味着原生 Unity VR 支持不再适用于早期的运行时版本,但继续适用于新的运行时版本。
Unity native VR support does not read plug-ins from within your project’s folder, so including earlier versions of the plug-in with native support will fail if you have VR support enabled. If you wish to use an earlier version with a release of Unity that no longer supports that version, disable Native VR Support (go to Other Settings and uncheck Virtual Reality Supported). You can then access the plug-in like any other 3rd party plugin. See the section above on Enabling Unity VR Support for more details.