Android 用の環境設定
Android 用にビルドして実行するには、Unity Android Build Support プラットフォームモジュールをインストールする必要があります。Android デバイスで コードをビルドして実行するには、 Android Software Development Kit (SDK) と Native Development Kit (NDK) もインストールする必要があります。デフォルトで、Unity は OpenJDK に基づく Java Development Kit をインストールします。
ノート: Unity は Android 4.4 “KitKat” 以降をサポートしています。詳細は AndroidSdkVersions を参照してください。
Install Android Build Support and the Android SDK & NDK tools
Use the Unity Hub to install Android Build Support and the required dependencies: Android SDK & NDK tools, and OpenJDK.
You can install Android Build Support, the Android SDK & NDK tools, and OpenJDK when you install the Unity Editor, or add them at a later time.
For information on how to add the Android modules:
- インストール時に加えるには Unity Hub のインストール を参照してください。
- 既存のインストールに追加する方法は、Unity エディターへのモジュールの追加を参照してください。
Enable USB debugging on your device
To enable USB debugging, you must enable Developer options on your device. To do this, see Android’s Configure developer options documentation.
Use a USB cable to connect your device to your computer. If you are developing on a Windows computer, you might need to install a device-specific USB driver. See the manufacturer website for your device for additional information.
The setup process differs for Windows and macOS. For more information on connecting your Android device to the SDK, refer to the Run Your App section of the Android Developer documentation.
Chrome OS デバイスの ADB デバッグ
Chrome OS デバイスの開発環境を設定し、ADB デバッグを有効にする方法については、Google のドキュメントChrome OS Developer Environments を参照してください。
Chrome OS デバイスへの接続
デバイスに展開する前に、デバイスの IP アドレスを通して ADB に手動で接続する必要があります。
まず、IP アドレスが必要です。 Settings を開き、サイドバーで Network を選択します。次に、アクティブなネットワークインターフェースをクリックします。
インターフェースがワイヤレスの場合は、次に接続する SSID を選択します。詳細画面には、IP アドレスが表示されます。それをメモしてください。
有線接続を利用している場合は、最初の詳細ページに IP アドレスが表示されます。
これで接続の準備が整いました。この例では、デバイスの IP を 192.168.0.100 とします。シェルやターミナルで次のコマンドを実行します。
adb connect 192.168.0.100
If the connection was successful you will see a message such as connected to 192.168.0.65:5555. And adb devices should verify that the device is connected.
List of devices attached
192.168.0.65:5555       device
今後は、USB接続の場合と同様に、ADBコマンドを実行してデバイスをターゲットにすることができます。
ノート: デバイスやホストマシンがスリープ状態になったり、ネットワーク接続が失われた場合、再接続が必要な場合ががあります。
Android SDK & NDK ツールと OpenJDK インストールのカスタマイズ
You should use the Unity Hub to install Android SDK & NDK tools, to ensure that you receive the correct versions and configuration. Unity installs Android SDK & NDK Tools and OpenJDK respectively in the SDK, NDK and folders under /Unity/Hub/Editor/[EditorVersion]/Editor/Data/PlaybackEngines/AndroidPlayer/.
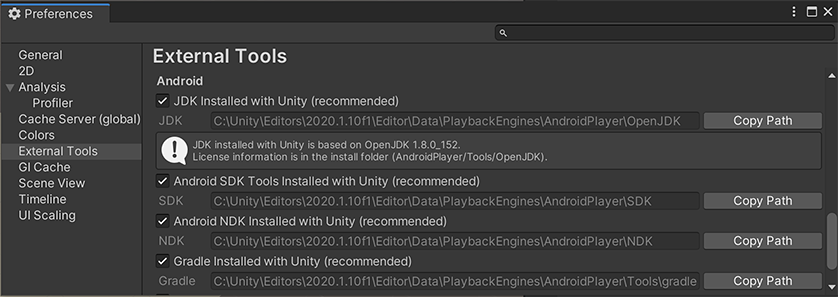
If you have multiple versions of Unity with the same required dependencies (check System requirements for the latest) and you want to avoid duplicating the installation of Android SDK & NDK Tools and OpenJDK, you can specify a shared location in the Unity Preferences window. To do this, go to Preferences > External tools and enter the directory paths in the SDK and NDK fields:
注意: Unity は、提供している OpenJDK、SDK、NDK 以外のバージョンを公式にサポートしていません。
Unity が Android アプリのビルドに使用する OpenJDK、SDK や NDK ツールを変更するには、以下の手順を行います。
Open your Unity project.
Open the Preferences window (Windows and Linux: Edit > Preferences; macOS: Unity > Preferences).
In the left navigation column, select External Tools.
- Change the OpenJDK path:
- Disable the JDK Installed with Unity (recommended) setting.
- In the JDK field, enter the path to the JDK installation folder, or use the Browse button to locate it.
- Change the Android SDK Tools path:
- Disable the Android SDK Tools Installed with Unity (recommended) setting.
- In the SDK field, enter the path to the SDK installation folder, or use the Browse button to locate it.
Note: Unity works with the most recent version of the Android SDK available at the time of the Unity version release.
- Change the Android NDK path:
- Android NDK Installed with Unity (recommended) のチェックを外します。
- In the NDK field, enter the path to the NDK installation folder, or use the Browse button to locate it.
Each version of Unity requires a specific version of the Android NDK:
| Unity バージョン | NDK バージョン |
|---|---|
| 2018.4 LTS | r16b |
| 2019.4 LTS | r19 |
| 2020.3 LTS | r19 |
| 2021.1 | r21d |
要件の完全なリストは、システム要件 のページを参照してください。
Android SDK Target API のアップデート
Unity Hub は、Google Play が要求する Android SDK Target API の最新版をインストールします。
より新しいバージョンを使用する必要がある場合は、Player Settings ウィンドウの Target API Level フィールドから Target API を変更することができます (メニュー: Edit > Project Settings > Player に移動し、Android プラットフォームを選択)。Target API Level オプションは、Other Settings > Identification セクションにあります。
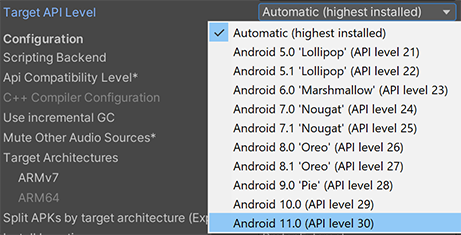
デフォルト以外のオプションを選択すると、Unity は Android SDK API をアップデートするかどうかを尋ねてきます。以下のいずれかを選択できます。
- Android SDK をアップデートする
- インストールされている最も高いバージョンの Android SDK を引き続き使用する
If you select an older version of the Target API, the Unity Android SDK Updater won’t be able to perform the update and gives an error message.
In this case, to update the Android SDK Target API, you must use the Android sdkmanager from either Android Studio or the command line tool. Regardless of the method you choose, make sure to select the correct Android SDK folder for Unity in the Edit > Preferences > External Tools window.
Important: On Windows, if you installed the Unity Editor in the default folder (/Program Files/), you must run the sdkmanager with elevated privilege (Run as Administrator) to perform the update.