Relative and absolute positioning C# example
This example demonstrates the difference between relative and absolute positioning.
例の概要
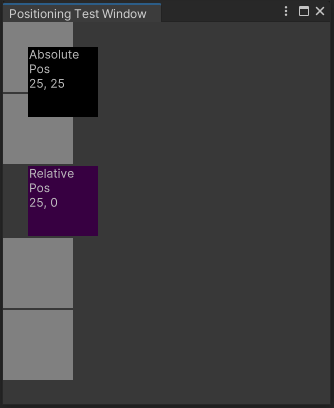
The example uses the automatic layout system to add boxes to a window and calculate their positions. One box demonstrates a relative offset of 25 px, while another box demonstrates the absolute position of 25 px, 25 px.
この例で作成された全てのファイルは、こちらの GitHub リポジトリ にあります。
要件
このガイドは、Unity エディター、UI Toolkit、および C# スクリプトに精通している開発者を対象としています。始める前に、以下をよく理解してください。
Create the example with a C# script
Create a custom Editor window and add all the boxes with a C# script: four boxes with gray backgrounds for comparison purposes; one box with black background with the absolute position; one box with purple background with the relative position.
任意のテンプレートで Unity プロジェクトを作成します。
Project ウィンドウ内を右クリックし、Create > UI Toolkit > Editor Window を選択します。
UI Toolkit Editor Window Creator ウィンドウの C# ボックスに
PositioningTestWindowと入力します。UXML および USS チェックボックスをオフにします。
Confirm を選択します。これにより、
PositioningTestWindow.csという C# ファイルが作成されます。-
PositioningTestWindow.csを以下の内容に置き換えます。using UnityEditor; using UnityEngine; using UnityEngine.UIElements; public class PositioningTestWindow : EditorWindow { [MenuItem("Window/UI Toolkit/Positioning Test Window")] public static void ShowExample() { var wnd = GetWindow<PositioningTestWindow>(); wnd.titleContent = new GUIContent("Positioning Test Window"); } public void CreateGUI() { for (int i = 0; i < 4; i++) { var temp = new VisualElement(); temp.style.width = 70; temp.style.height = 70; temp.style.marginBottom = 2; temp.style.backgroundColor = Color.gray; rootVisualElement.Add(temp); } // Relative positioning var relative = new Label("Relative\nPos\n25, 0"); relative.style.width = 70; relative.style.height = 70; relative.style.left = 25; relative.style.marginBottom = 2; relative.style.backgroundColor = new Color(0.2165094f, 0, 0.254717f); rootVisualElement.Add(relative); // Absolute positioning var absolutePositionElement = new Label("Absolute\nPos\n25, 25"); absolutePositionElement.style.position = Position.Absolute; absolutePositionElement.style.top = 25; absolutePositionElement.style.left = 25; absolutePositionElement.style.width = 70; absolutePositionElement.style.height = 70; absolutePositionElement.style.backgroundColor = Color.black; rootVisualElement.Add(absolutePositionElement); } } 例を参照するには、メニューから Window > UI Toolkit > Positioning Test Window と選択してください。