ネスト状のプロパティにバインドする
バージョン: 2021.3 以降
この例は UXML の BindableElement の binding-path 属性を使用して、フィールドをSerializedObject のネスト上のプロパティにバインドする方法を紹介します。
例の概要
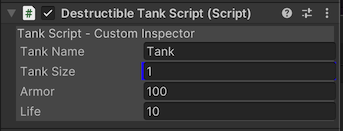
この例では、以下のようなカスタム Inspector UI を作成します。
- ゲームオブジェクトの名前と USS トランスフォームのスケールにバインドする 2 つのフィールド
- SerializedObject のネスト状のプロパティにバインドする 2 つのフィールド

この例で作成するすべてのファイルは、GitHub リポジトリ にあります。
要件
このガイドは、Unity エディター、UI Toolkit、および C# スクリプトに精通している開発者を対象としています。始める前に、以下をよく理解してください。
破壊可能なタンクオブジェクトを作成する
C# スクリプトを作成し、health (ヘルス) 値を持つ戦車のクラスを定義し、戦車を破壊可能にします。
Unity で任意のテンプレートでプロジェクトを作成します。
Project ウィンドウに
bind-nested-propertiesという名前のフォルダーを作成し、すべてのファイルを保存します。-
DestructibleTankScript.csという名の C# スクリプトを作成し、そのコンテンツを以下のものに置き換えます。using System; using UnityEngine; using UnityEngine.Serialization; [Serializable] public struct Health { public int armor; public int life; } [ExecuteInEditMode] public class DestructibleTankScript : MonoBehaviour { public string tankName = "Tank"; public float tankSize = 1; public Health health; private void Update() { gameObject.name = tankName; gameObject.transform.localScale = new Vector3(tankSize, tankSize, tankSize); } public void Reset() { health.armor = 100; health.life = 10; } }
UXML と Inspector の UI を作成する
BindableElement を含む UXML ファイルを作成します。BindableElement の binding-path を health プロパティに設定し、BindableElement の各子要素の binding-path を health の armor プロパティと life プロパティに設定してください。
bind-nested-properties フォルダーに、
Editorという名前のフォルダーを作成します。-
Editor フォルダー内に
tank_inspector_styles.ussという名前の USS ファイルを作成し、そのコンテンツを以下のように置き換えます。.container { background-color: rgb(80, 80, 80); flex-direction: column; } Label { background-color: rgb(80, 80, 80); } TextField:hover { background-color: rgb(255, 255, 0); } FloatField { background-color: rgb(0, 0, 255); } -
destructible_tank_editor.uxmlという名の UI ドキュメントを作成し、そのコンテンツを以下に置き換えます。<UXML xmlns="UnityEngine.UIElements" xmlns:ue="UnityEditor.UIElements"> <Style src="tank_inspector_styles.uss"/> <VisualElement name="row" class="container"> <Label text="Tank Script - Custom Inspector" /> <ue:PropertyField binding-path="tankName" name="tank-name-field" /> <ue:PropertyField binding-path="tankSize" name="tank-size-field" /> <BindableElement binding-path="health"> <ue:PropertyField binding-path="armor"/> <ue:PropertyField binding-path="life"/> </BindableElement> </VisualElement> </UXML>
カスタムエディターの作成
DestructibleTankScript のカスタムエディターを登録する C# スクリプトを作成します。
-
DestructibleTankEditor.csという名の C# スクリプトを作成し、そのコンテンツを以下のものに置き換えます。using UnityEditor; using UnityEngine; using UnityEngine.UIElements; [CustomEditor(typeof(DestructibleTankScript))] public class DestructibleTankEditor : Editor { [SerializeField] VisualTreeAsset visualTreeAsset; public override VisualElement CreateInspectorGUI() { return visualTreeAsset.CloneTree(); } } Project ウィンドウで
DestructibleTankEditor.csを選択します。Inspector で
destructible_tank_editor.uxmlを ビジュアルツリーアセット にドラッグします。
バインディングのテスト
- Unity で、空のゲームオブジェクトをシーンに加えます。
- ゲームオブジェクトを選択します
- Inspector に Destructible Tank Script コンポーネントを加えます。Armor と Life フィールドは、
health.armorとhealth.lifeプロパティにバインドされます。Inspector でその値を変更すると、元となるプロパティの値も変更されます。