- Unity User Manual (2019.1)
- Unity サービス
- IAP Promo
- IAP Promo Product Catalogs
IAP Promo Product Catalogs
Unity IAP provides quick and easy tools to create and export Product Catalogs. Use the Unity Editor’s IAP Catalog window to populate Product metadata, then export the catalog to the Developer Dashboard to configure each Product’s creative assets. Note that you can also manually add Products to your catalog in the dashboard, as detailed below.
Product Catalog の作成
Product を IAP Catalog ウィンドウに追加する
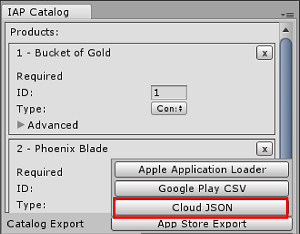
In the Editor, select Window > UnityIAP > IAP Catalog to open the IAP Catalog window. This GUI lists all of your previously configured Products, and allows you to define the following attributes for each:
- Name
- Product ID
- Type (IAP Promo now supports both Consumable and Non-consumable Product types)
- Price (Unity recommends specifying price points for Google and Apple stores independently if your app supports both)
Note: A Product Catalog must have at least one Product configured to export. For a complete walkthrough on setting up Products, see documentation on Codeless IAP.
You may already use a builder script to populate your Product Catalog for Unity IAP. For example:
var builder = ConfigurationBuilder.Instance(StandardPurchasingModule.Instance());
builder.AddProduct(product_coins, ProductType.Consumable);
builder.AddProduct(product_hat, ProductType.NonConsumable);
builder.AddProduct(product_elite, ProductType.Subscription);
IAP Promo はエディタの IAP Catalog GUI からエクスポートされた JSON ファイルのみをサポートしています。したがって、以下のように手順を変更することをお勧めします:
- Products を IAP Catalog ウィンドウにコピーアンドペーストします。
- 購入スクリプトの既存の
builder.AddProduct()コードを削除またはコメントアウトします。 - IAP を初期化する前に IAP Catalog の GUI から Product のリストを取得するために次のコードを追加します:
StandardPurchasingModule module = StandardPurchasingModule.Instance();
ProductCatalog catalog = ProductCatalog.LoadDefaultCatalog();
ConfigurationBuilder builder = ConfigurationBuilder.Instance(module);
IAPConfigurationHelper.PopulateConfigurationBuilder(ref builder, catalog);

UnityPurchasing.Initialize(this, builder);
Product Catalog のエクスポート
In the IAP Catalog window, select App Store Export > Cloud JSON to export a local copy of the Product Catalog.

Developer Dashboard でクリエイティブアセットを設定
Manage your Product Catalog on the Operate page of the Developer Dashboard. Your active Project appears in the top-left corner. To manage Products, select Monetization > In-App Purchases from the left navigation bar.
手動で Product を取得したり、JSON ファイルをインポートすることによってまとめて複数を取得することもできます。
Product Catalog の作成
From the Product configuration menu of the dashboard (Monetization > In-App Purchases), click the ADD NEW PRODUCT button in the top-right corner, then enter the following details:
- Product ID(IAP コードで参照のため)
- Name
- Type (Consumable or Non-Consumable)
- Apple App Store Price (USD)
- Google Play Store Price (USD)

SAVE ボタンをクリックして、カタログに Product を保存します。
Product Catalog をインポート
Product Catalog を設定またはカタログに登録済みの Products を更新するには:
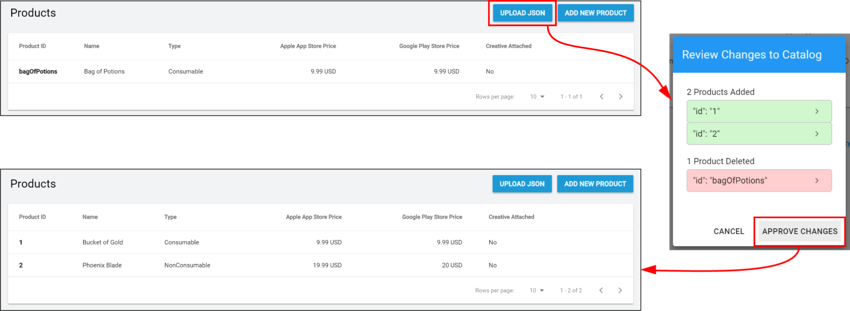
- UPLOAD JSON を選択します。
- Select the JSON file you exported from the Unity Editor. A diff log then prompts you to approve changes. Check the contents of the file, then select APPROVE CHANGES.

インポートされた Products は Product Catalog のリストに表示されます。しかしながら、Promotions として適格となるためには、それぞれの Product が対応するクリエイティブアセットを持つ必要があります。(これをやらないと表示する Placement がないということになります)
クリエイティブアセットのアサイン
クリエイティブアセットを加えるには、次の手順を行います。
Select a Product from the Product Catalog list, then scroll down to the Creative Uploads section.
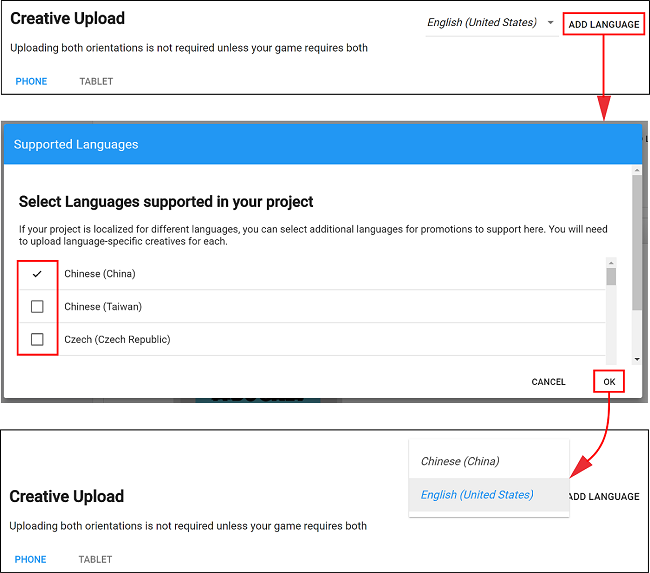
Note: While each Product’s Product ID, Name, Price, and Type appear in the dashboard, you can only edit these attributes from the Editor’s IAP Catalog window.To specify unique creative assets for different regions, select ADD LANGUAGE, then check the languages to include.

Note: The drop-down indicates the current language you are editing. If an included language has no creative assets, it defaults to using its English (United States) creative assets.
- 次のガイドラインにしたがって、スマートフォンやタブレット端末向けの Portrait または Landscape のクリエイティブアセットをアップロードします:
- ファイルフォーマットが PNG または JPG であること
- それぞれの Product は Promotions として適格であるために、少なくとも1つの構成のクリエイティブアセットを必要とします。コンシューマエクスペリエンスを向上させるために、各デバイスとデバイスの向きに対して最適化されたクリエイティブアセットを提供します。
- Phone クリエイティブアセットのサイズは、縦向き(ポートレート)の場合は 580×1035 ピクセル、横向き(ランドスケープ)の場合は 1035×580 ピクセルです。
- Tablet クリエイティブアセットのサイズは、縦向き(ポートレート)の場合は 900×1200 ピクセル、横向き(ランドスケープ)の場合は 1200×900 ピクセルです。
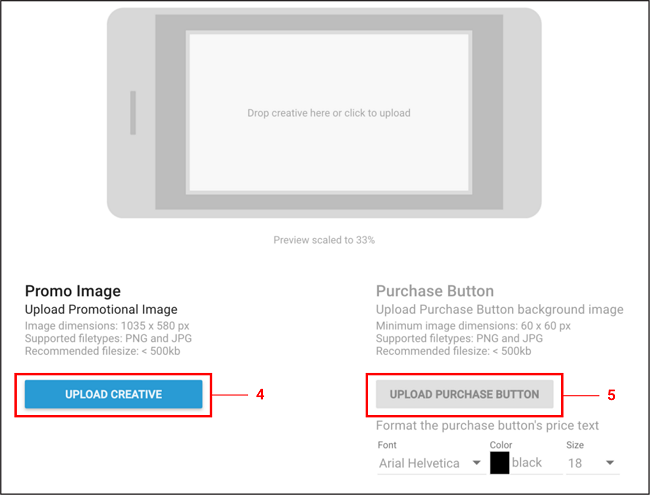
UPLOAD CREATIVE を選択し、クリエイティブアセットをアップロードします。プレビューは左側で確認できます。
-
UPLOAD PURCHASE BUTTON を選択してクリエイティブアセットにインタラクティブボタンを配置します。次のガイドラインを参照してください:
- 購入ボタンをアップロードする必要があります。
- ボタンアセットに最低限必要なサイズは 60×60 ピクセルです。
- プレビューウィンドウ内で購入ボタンをドラッグして配置できます。
- ボタンテキストのフォント、色、サイズを設定します。

Select SAVE to proceed. Upon returning to the Product Catalog page, your Product is now Promotion-eligible__, as indicated by the Creative Attached column.

Note: You must also submit your Product Catalog to the appropriate Google Play or iTunes store for the purchase flow to work. Please see the Export section in the documentation on Codeless IAP.
- 2019–04–11 編集レビュー を行って修正されたページ