- Unity ユーザーマニュアル 2021.3 (LTS)
- Create user interfaces (UI)
- UI Toolkit
- UI Builder
- Styling UI
- Positioning elements
Positioning elements
Relative position and flexbox
UI Toolkit uses a modified version of Yoga, an implementation of the Flexbox layout engine. Flexbox is a common CSS layout engine. Some main style properties are:
-
Flex > Direction (
flex-directionin USS): Set the layout direction of which elements, or the main-axis. The default iscolumnand that means that, without any other overrides, the child element under a parent element with this style property will appear above the second child element in a column. -
Flex > Grow (
flex-growin USS): This property defines how an element should grow in the main-axis. It’s a ratio that’s shared with all other siblings of the same parent. This property is useful when trying make an element stretch to take up the entire size of its parents (minus any siblings). To do this, set the Flex > Grow value to1. If you have two siblings withflex-growset to1, they will each take 50% of the parent’s available size along the main-axis. -
Align > Align Items (
align-itemsin USS): This property defines the alignment of elements in the cross-axis, or the perpendicular axis to the main-axis. For example, if you have two Buttons in aVisualElementthat hasflex-direction: columnandalign-items: flex-endset, the two Buttons will squish against the container’s right edge. The options foralign-itemshave names likeflex-startandflex-endbecause they depend on the value offlex-direction. -
Align > Justify Content (
justify-contentin USS): This property defines the alignment of elements in the main-axis. For example, if you have two Buttons in aVisualElementthat hasflex-direction: columnandalign-items: flex-endset, the two Buttons squish against the container’s bottom edge. The options forjustify-contentare named likeflex-startandflex-endbecause they depend on the value offlex-direction.
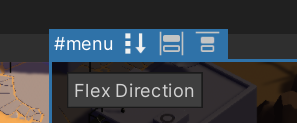
If the selected element has child elements, you can toggle flex-related style properties in the Viewport using toggles in the header. The image below shows the options available for the #menu element:

It’s recommended to learn how Flexbox works. See the Flexbox guide for more information.
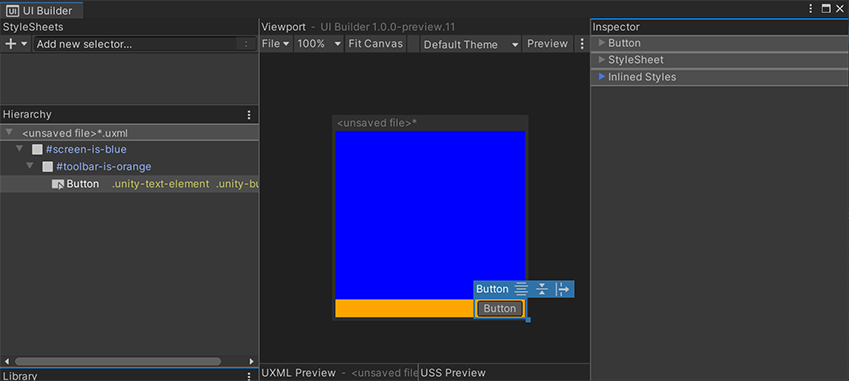
You can create complex dynamic layouts by using a combination of the above Flexbox style properties and a hierarchy of VisualElements. Here’s an example of a layout that anchors a Button on the bottom-right edge of the screen:

このレイアウトの UXML は、各コンテナ VisualElement に設定されたインラインスタイルを示しており、以下のようになります。
<ui:UXML xmlns:ui="UnityEngine.UIElements" xmlns:uie="UnityEditor.UIElements">
    <ui:VisualElement name="screen-is-blue" style="flex-grow: 1; justify-content: flex-end; background-color: blue;">
        <ui:VisualElement name="toolbar-is-orange" style="align-items: flex-end; background-color: orange;">
            <ui:Button text="Button" display-tooltip-when-elided="true" />
        </ui:VisualElement>
    </ui:VisualElement>
</ui:UXML>
コンテナは、その形状がわかるように色付けされています。ネストされた VisualElement コンテナを使用すると、各要素の位置とサイズを明示的に設定することなく、任意の動的なレイアウトを実現することができます。これにより、レイアウトが動的に保たれ、画面のサイズ変更など、より大きなコンテナのサイズ変更に自動的に調整されます。
絶対位置
UI Builder also exposes Position style properties. To use the Position style properties you must set the Position > Position type to Absolute. This Absolute mode makes an element invisible to the default Flexbox-based layout engine. It’s as if it no longer takes any space. Absolute position elements will appear on top of any siblings that are still using Relative position.
It’s discouraged to use Absolute position mode, as it bypasses the built-in layout engine in UI Toolkit. It might also lead to high-maintenance UI where changing the overall layout would require manually updating individual elements.
While using Absolute position, you can use the Position > Left, Top, Right, Bottom style properties to offset and size the element from the respective edges of its parent. This doesn’t sett absolute coordinates on the screen but sets offsets relative to the parent element. You can still use Relative mode to position the parent element. If you set both a Left offset and a Right offset, the Width style property of the element is ignored and the computed width will now come from the following formula:
element-computed-width = parent-width - left-offset - right-offset
Left, Top, Right, Bottom can also be interpreted as anchors. For example, you can anchor a Button on the bottom-right of the screen:

下の UXML はインラインスタイルを表示しています。
<ui:UXML xmlns:ui="UnityEngine.UIElements" xmlns:uie="UnityEditor.UIElements">
    <ui:Button text="Button" style="position: absolute; right: 0; bottom: 0;" />
</ui:UXML>
位置を決める際に、Left を 0 に設定するのと未設定にするのとでは、違いがあります。
-
Left を 0 に設定オフセット 0 を設定することを意味します。 -
Left を設定しないとオフセットを設定せず、他のスタイルプロパティで要素の幅や高さを定義します。
これらのオフセットスタイルプロパティは、要素の青い選択境界線の各エッジとコーナーにある追加のサイズ変更ハンドルを介して、 Canvas で直接変更することも可能です。設定されているものと設定されていないものを区別することが重要です。そのため、Canvas には、要素の各辺にオレンジ色の四角形で “アンカー” トグルが表示されています。Canvas のハンドルは、どの “アンカー” が設定されているかによって、要素のサイズを視覚的に変更するときにどのスタイルプロパティを設定するかを調整します。例えば、Canvas の要素をその右枠のハンドルでサイズ変更しているとします。
- Left と Right の両方のプロパティを設定する場合、ハンドルは Right プロパティを更新します。
- Left を設定し Right を設定しない場合、ハンドルは Width プロパティを更新します。
Using both Relative and Absolute
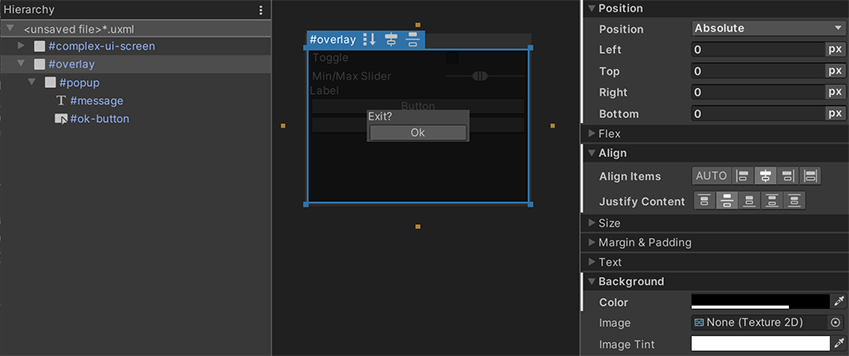
One of the legitimate use cases for Absolute position mode is for overlays. It’s useful to overlay some complex UI on top of other complex UI, such as a popup or a dropdown. You can use Absolute position only for the overlay container itself, while continuing to use Relative mode inside the overlay. Here’s an example of a simple centered popup:
 そして、参考までに UXML を以下に示します。
<ui:UXML xmlns:ui="UnityEngine.UIElements" xmlns:uie="UnityEditor.UIElements">
    <ui:VisualElement name="complex-ui-screen">
        <ui:Toggle label="Toggle" />
        <ui:MinMaxSlider picking-mode="Ignore" label="Min/Max Slider" min-value="10" max-value="12" low-limit="-10" high-limit="40" />
        <ui:Label text="Label" />
        <ui:Button text="Button" />
        <ui:Button text="Button" />
    </ui:VisualElement>
    <ui:VisualElement name="overlay" style="position: absolute; left: 0; top: 0; right: 0; bottom: 0; background-color: rgba(0, 0, 0, 0.71); align-items: center; justify-content: center;">
        <ui:VisualElement name="popup" style="background-color: rgba(70, 70, 70, 255);">
            <ui:Label text="Exit?" name="message" />
            <ui:Button text="Ok" name="ok-button" style="width: 108.3333px;" />
        </ui:VisualElement>
    </ui:VisualElement>
</ui:UXML>
上の例では、Absolute 位置の使い方を強調しています。すべての Position > Left、Top、Right、Bottom を 0 に設定します。つまり、画面の端から 0 ピクセル離れた位置になります。これにより、#overlay 要素は、#complex-ui-screen コンテナ要素に重なるようになります。また、#overlay 要素に半透明の背景を設定すると、他の UI が暗く表示されるようになります。#overlay を使用して、Relative 位置を設定し、#popup コンテナ VisualElement を中央に配置します。