- Unity User Manual 2023.2
- ユーザーインターフェース (UI)
- UI Toolkit
- UI の構築
- UI 構築の例
- 2 つの属性を持つカスタムコントロールの作成
2 つの属性を持つカスタムコントロールの作成
Version: 2023.2+
この例では、2 つの属性を持つ単純なカスタムコントロールの作成方法を説明します。
例の概要
This example creates a custom control called MyElement with two attributes and exposes it to UXML and UI Builder. This example also shows how to add a custom control to a UI in the UI Builder.
You can find the completed files that this example creates in this GitHub repository.
要件
このガイドは、Unity、UI Toolkit、および C# スクリプトに精通している開発者向けです。始める前に、以下を理解しておいてください。
例の作成
To create a new custom control class in C#, inherit it from the VisualElement class. This allows you to create and use this element in C#, but won’t automatically expose it in UXML and UI Builder. To expose it, add the UxmlElement attribute. To expose the attributes, add the UxmlAttribute attribute to each property that you want to be visible in UXML and the UI Builder.
- 任意のテンプレートで Unity プロジェクトを作成します。
-
Assetsフォルダーに、以下の内容の C# スクリプトを作成しMyElement.csと命名します。
Create a UXML to see the attribute
- 任意の名前で UXML ファイルを作成します。
- UXML ファイルをダブルクリックして、UI Builder で開きます。
- UI Builder の Library セクションで、Project > Custom Controls (C#) > MyElement を選択します。
- MyElement を Hierarchy ウィンドウにドラッグします。
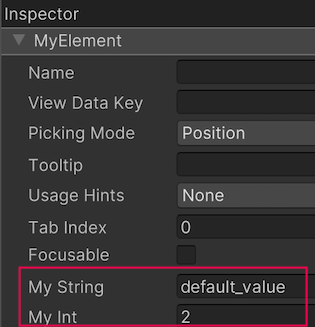
- To see the custom attributes for MyElement, go to the Inspector tab of MyElement:
