- Unity User Manual 2023.2
- プラットフォーム特有の情報
- ユニバーサル Windows プラットフォーム
- ユニバーサル Windows プラットフォーム用の開発を始める
- ユニバーサル Windows プラットフォーム Player 設定
ユニバーサル Windows プラットフォーム Player 設定
ユニバーサル Windows プラットフォーム (UWP) の Player 設定にアクセスするには、Unityのメインメニューから Edit > Preferences > Project Settings > Player の順に移動します。Player 設定を使用して、Unity が最終的なアプリケーションをどのようにビルドして表示するかを決定します。一般的な Player 設定の説明については、Player Settings を参照してください。
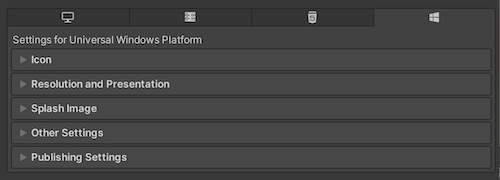
プロパティのドキュメントは、Player UI のそれぞれのセクションに応じてグループ化されています。
- Icon (アイコン)
- Resolution and Presentation (解像度と表示)
- Splash Image (スプラッシュ画像)
- Other Settings (その他の設定)
- Publishing Settings (公開設定)
Icon
Icon (アイコン) 設定を使用して、Microsoft Store でアプリケーションのブランド化をカスタマイズします。
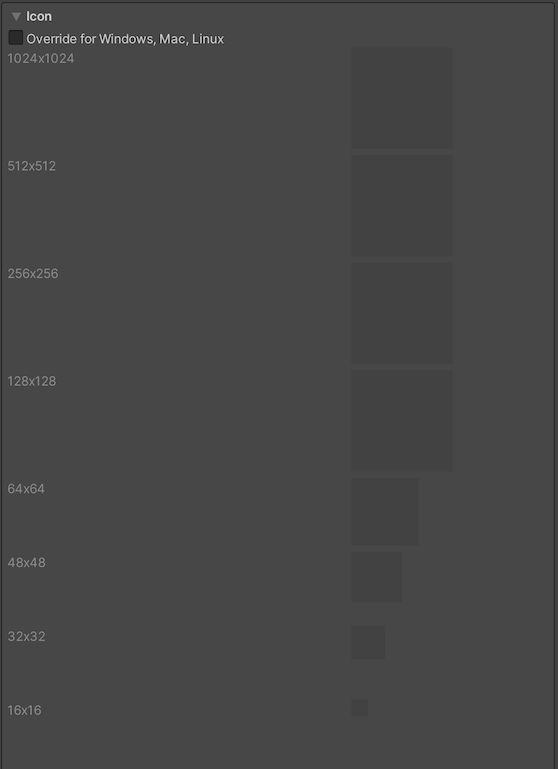
Icon セクションには、証明書に必要なのに割り当てられていない画像に関する警告が表示されます。UWP アプリを Microsoft Store に送信する前に、パッケージの一部としてアイコンとロゴの画像を指定する必要があります。
ノート: API 内で画像タイプとそのサイズを選択することもできます。詳しくは、PlayerSettings.WSAImageType と PlayerSettings.WSAImageScale を参照してください。
Store Logo を展開し、アプリケーションのストア説明ページに表示される画像を指定します。最多で 8 種類の解像度を加えることができます。
Tile
これらの設定で Microsoft Store のタイルの一般的な外観をカスタマイズします。
| プロパティ | 説明 | |
|---|---|---|
| Short name | アプリケーションの省略名を設定します。 | |
| Show name on | 名前を表示したいアイコン画像を以下から選択します。 Medium Tile、Large Tile、Wide Tile | |
| Foreground text | アプリケーションのタイルに Light または Dark テキストのどちらを使用するかを選択します。 | |
| Background color | 背景に使用する色を指定します。 | |
| Default Size | タイルのデフォルトサイズとして使用するサイズを選択します。 | |
| Not Set | デフォルトサイズを設定しません。 | |
| Medium | 中程度のサイズを使用します。 | |
| Wide | ワイドサイズを使用します。 | |
Unity はこれらのオプションを直接 Package.appxmanifest ファイルにコピーします。
Tiles and Logos
以下の設定で、タイルが Microsoft Store に表示する画像を指定します。
| プロパティ | 説明 |
|---|---|
| Square 44x44 Logo | アプリケーションのタイルに使用する 44x44 のロゴ画像を設定します。最多で 10 の解像度を設定できます。 |
| Square 71x71 Logo | アプリケーションのタイルに使用する 71x71 のロゴ画像を設定します。最多で 5 の解像度を設定できます。 |
| Square 150x150 Logo | アプリケーションのタイルに使用する 150x150 のロゴ画像を設定します。最多で 5 の解像度を設定できます。 |
| Square 310x310 Logo | アプリケーションのタイルに使用する 310x310 のロゴ画像を設定します。最多で 5 の解像度を設定できます。 |
| Wide 310x150 Logo | アプリケーションのタイルに使用する 310x150 のロゴ画像を設定します。最多で 5 の解像度を設定できます。 |
Resolution and Presentation
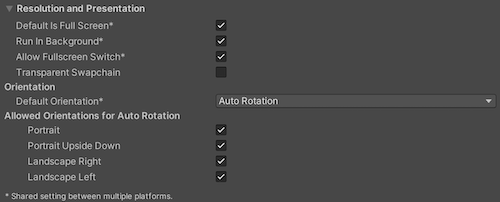
Resolution and Presentation (解像度と表示) セクションを使用して、画面の表示をカスタム化します。
| プロパティ | 説明 |
|---|---|
| Default is Full Screen | アプリケーション画面をディスプレイの全画面表示のネイティブのディスプレイ解像度に設定します。このモードは、ボーダーレス全画面とも呼ばれます。Unity は、スクリプトで設定された解像度、または設定されていない場合はネイティブのディスプレイ解像度でアプリケーションのコンテンツをレンダリングし、ウィンドウを満たすようにスケールします。スケール時に、Unity はレンダリングされた出力に黒いバー (帯) を追加してディスプレイのアスペクト比に合わせ、コンテンツが引き伸ばされるのを防ぎます。このプロセスは レターボックス と呼ばれます。 |
| Run In Background | アプリケーションがフォーカスを失った場合に、ゲームを (一時停止せずに) 実行し続けることができます。 |
| Allow FullScreen Switch | デフォルトの全画面キーを押して全画面のモードと Windowed モードを切り替えできるかを示します。 |
| Transparent Swapchain | スワップチェーンの AlphaMode を DXGI_ALPHA_MODE_PREMULTIPLIED に設定するかどうかを示します。 この設定は、XAML ビルドタイプを使用する UWP プロジェクトでのみ使用されます。この設定を有効にすると、アプリケーション内でUnityコンテンツを他のXAMLコンテンツと合成できます。 詳細は、PlayerSettings.WSA.transparentSwapchain を参照してください。 |
Orientation
| Property | Description | |
|---|---|---|
| Default Orientation | Specify the orientation of the application window within the device’s screen. Note: Unity shares the value you set for this setting between Android, iOS, and UWP. |
|
| Portrait | Portrait orientation where the bottom of the application aligns with the bottom of the screen. | |
| Portrait Upside Down | Portrait orientation where the bottom of the application aligns with the top of the screen. | |
| Landscape Right | Landscape orientation where the right side of the application aligns with the top of the screen. | |
| Landscape Left | Landscape orientation where the left side of the application aligns with the top of the screen. | |
| Auto Rotation | The screen can rotate to any of the orientations you specify in the Allowed Orientations for Auto Rotation section. | |
Allowed Orientations for Auto Rotation
Use the Allowed Orientations for Auto Rotation section to specify which orientations the application supports when you set Default Orientation to Auto Rotation. This is useful, for example, to lock the application to landscape orientation but allow the user to change between landscape left and landscape right.
Note: This section is visible only when you set Default Orientation in the Orientation section to Auto Rotation.
| Property | Description | |
|---|---|---|
| Portrait | Allow portrait orientation with the bottom of the application aligned with the bottom of the screen. | |
| Portrait Upside Down | Allow portrait orientation with the bottom of the application aligned with the top of the screen. | |
| Landscape Right | Allow landscape orientation with the right side of the application aligned with the top of the screen. | |
| Landscape Left | Allow landscape orientation with the left side of the application aligned with the top of the screen. | |
Splash Image
共通の Splash Screen 設定の上方で、Player 設定 では UWP 用の スプラッシュ画像を指定できます。

Virtual Reality Splash Image プロパティを使用して、Virtual Reality ディスプレイに表示するカスタムのスプラッシュ画像を選択します。
Splash Screen セクションの一般的な設定の下に、さらにいくつかのセクションがあります。
Windows
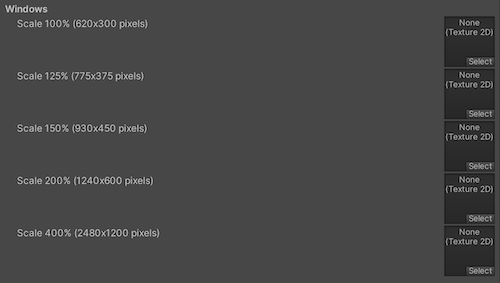
アプリケーションのスプラッシュスクリーンで使用したい前面の画像を設定します。最多で 7 種類の解像度を加えられます。
Windows Holographic
これらの設定を使用して、混合現実 (MR) アプリケーション用のホログラフィックスプラッシュ画像をカスタマイズします。

スタートアップ時に Holographic Splash Image を表示するように設定します。この画像は 5 秒間 (または、アプリケーションがロードを終了するまで) 表示されます。
Tracking Loss
MR ヘッドセットは、環境から ワールドに固定された座標系 を構築し、ホログラムを所定の位置に固定する必要があります。トラッキングロスは、ヘッドセットがワールドのどこにあるかの追跡が途絶える (自分自身を見つけることができない) ときに発生します。これは、空間システム (空間マッピング、空間アンカー、空間ステージ) の崩壊につながります。
この問題が発生すると、Unity はホログラムのレンダリングをやめ、ゲームを一時停止し、通知を表示します。 On Tracking Loss Pause and Show Image プロパティを有効にすると、表示される通知画像をカスタマイズできます。その後、Tracking Loss Image プロパティでその画像を選択すると表示できます。
詳細については、Unity の推奨設定 を参照してください。
Overwrite background color
アプリケーションが初期化される間、UWP は Made with Unity のスプラッシュスクリーンの前に表示されるスプラッシュスクリーンを表示します。UWP のスプラッシュスクリーンの背景をスプラッシュスクリーンの画像に合わせるのがもっとも効率的な方法です。デフォルトの色は黒です。
UWP 固有のスプラッシュスクリーンの背景色を上書きするには、以下を行います。
- Player Settings > Splash Screen の順に移動し、Overwrite Background Color を有効にします。
- Background Color セレクターから色を選択します。
デフォルトの背景色を上書きする場合、Unity はアプリケーションマニフェストの色値を変更します。XAML アプリケーションタイプを使用している場合、Unity は最初の XAML ページでも色の値を設定します。

Other Settings
このセクションでは、以下のグループに分類されたさまざまなオプションをカスタマイズできます。
- Rendering (レンダリング)
- Configuration (設定)
- Optimization (最適化)
- Stack Trace (スタックトレース)
- Legacy (古い機能)
Rendering
これらの設定を使用して、UWP プラットフォーム向けにゲームをレンダリングする方法をカスタマイズします。
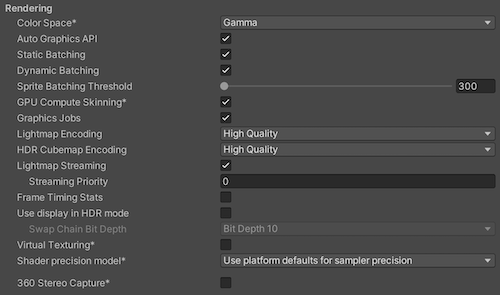
| Property | Description | |
|---|---|---|
| Color Space | Choose which color space to use for rendering. For more information, refer to Linear rendering overview. | |
| Gamma | Gamma color space is typically used for calculating lighting on older hardware restricted to 8 bits per channel for the framebuffer format. Even though monitors today are digital, they might still take a gamma-encoded signal as input. | |
| Linear | Linear color space rendering gives more precise results. When you select to work in linear color space, the Editor defaults to using sRGB sampling. If your Textures are in linear color space, you need to work in linear color space and deactivate sRGB sampling for each Texture. | |
| Auto Graphics API | Indicates whether to manually pick and reorder the graphics APIs. By default this option is enabled, and Unity uses Direct3D11. | |
| Static Batching | Enable this option to use static batching. | |
| Dynamic Batching | Enable this option to use dynamic batching (enabled by default). Note: Dynamic batching has no effect when a Scriptable Render Pipeline is active, so this setting is only visible if the Scriptable Render Pipeline Asset Graphics setting is blank. |
|
| Sprite Batching Threshold | Controls the maximum vertex threshold used when batching. | |
| GPU Compute Skinning | Indicates whether to use DX11/DX12/ES3 GPU skinning. | |
| Graphics Jobs | Offloads graphics tasks (render loops) to worker threads running on other CPU cores. This option reduces the time spent in Camera.Render on the main thread, which can be a bottleneck. |
|
| Lightmap Encoding | Defines the encoding scheme and compression format of the lightmaps. You can choose from Low Quality, Normal Quality, or High Quality |
|
| HDR Cubemap Encoding | Defines the encoding scheme and compression format of the HDR Cubemaps. You can choose from Low Quality, Normal Quality, or High Quality. For more information, refer to Lightmaps: Technical information. |
|
| Lightmap Streaming | Enable this option to use Mipmap Streaming for lightmaps. Unity applies this setting to all lightmaps when it generates them. Note: To use this setting, you must enable the Texture Streaming Quality setting. |
|
| Streaming Priority | Sets the priority for all lightmaps in the Mipmap Streaming system. Unity applies this setting to all lightmaps when it generates them. Positive numbers give higher priority. Valid values range from –128 to 127. |
|
| Enable Frame Timing Stats | Allows Unity to gather CPU/GPU frame timing statistics. Use this option with the Dynamic Resolution camera setting to determine if your application is CPU or GPU bound. | |
| Use Display In HDR Mode (Windows Only) | Allows the game to automatically switch to HDR mode output when it runs. This option works only on displays that support this feature. If the display doesn’t support HDR mode, the game runs in standard mode. | |
| Swap Chain Bit Depth | Selects the number of bits in each color channel for swap chain buffers. You can select Bit Depth 10 or Bit Depth 16. The option to choose bit depth only becomes available when you enable HDR Mode. For more information on bit depth, refer to the Scripting API page for D3DHDRDisplayBitDepth. |
|
| Virtual Texturing | Enable this option to reduce GPU memory usage and texture loading times if your Scene has many high resolution textures. For more information, refer to Virtual Texturing. Note: The Unity Editor requires a restart for this setting to take effect. |
|
| Shader precision model | Controls the default precision of samplers used in shaders. For more information, refer to Shader data types and precision. | |
| 360 Stereo Capture | Allows Unity to capture stereoscopic 360 images and videos. When enabled, Unity compiles additional shader variants to support 360 capture (only on Windows). When enabled, the enable_360_capture keyword is added during the Stereo RenderCubemap call. This keyword isn’t triggered outside the Stereo RenderCubemap function. For more information, refer to Stereo 360 Image and Video Capture. |
|
Configuration

| Property | Description | |
|---|---|---|
| Scripting Backend | The scripting backend determines how Unity compiles and executes C# code in your Project. This setting defaults to IL2CPP for Universal Windows Platform and can’t be changed. | |
| API Compatibility Level | Choose which .NET APIs you can use in your project. This setting can affect compatibility with third-party libraries. However, it has no effect on Editor-specific code (code in an Editor directory, or within an Editor-specific Assembly Definition). Tip: If you are having problems with a third-party assembly, you can try the suggestion in the API Compatibility Level section below. |
|
| .Net Framework | Compatible with the .NET Framework 4 (which includes everything in the .NET Standard 2.0 profile plus additional APIs). Choose this option when using libraries that access APIs not included in .NET Standard 2.0. Produces larger builds and any additional APIs available aren’t necessarily supported on all platforms. For more information, refer to Referencing additional class library assemblies. | |
| .Net Standard 2.1 | Produces smaller builds and has full cross-platform support. | |
| IL2CPP Code Generation | Defines how Unity manages IL2CPP code generation. | |
| Faster runtime | Generates code optimized for runtime performance. This setting is enabled by default. | |
| Faster (smaller) builds | Generates code optimized for build size and iteration. This setting generates less code and produces a smaller build, but may reduce runtime performance, especially for generic code. Use this option when faster build times are important, such as when iterating on changes. | |
| C++ Compiler Configuration | Chooses the C++ compiler configuration used when compiling IL2CPP generated code. Note: This property is disabled for the Universal Windows Platform because it’s chosen in the generated Visual Studio project. |
|
| Use incremental GC | インクリメンタルガベージコレクターを使用します。これは、ガベージコレクションを数フレームにわたって分散させ、フレーム中におけるガベージコレクション関連のスパイクを減らします。詳細は 自動メモリ管理 を参照してください。 | |
| Assembly Version Validation | Indicates whether Mono validates types from a strongly-named assembly. | |
| Allow downloads over HTTP | HTTP によるコンテンツのダウンロードを許可するかどうか指定します。デフォルトのオプションは Not allowed です。これは、推奨されるプロトコルが、より安全な HTTPS であるためです。 | |
| Not Allowed | HTTP によるダウンロードを一切許可しません。 | |
| Allowed in Development Builds | HTTP によるダウンロードを、開発ビルドの場合にのみ許可します。 | |
| Always Allowed | 開発ビルドとリリースビルドの両方で、HTTP によるダウンロードを許可します。 | |
| Accelerometer Frequency | Defines how often to sample the accelerometer. If you choose Disabled, then no samples are taken. Otherwise, you can choose from 15Hz, 30Hz, 60Hz and 100Hz frequencies. | |
| Active Input Handling | Choose how to handle input from users. | |
| Input Manager (Old) | Uses the traditional Input settings. | |
| Input System Package (New) | Uses the Input system. This option requires you to install the InputSystem package. | |
| Both | Use both systems. | |
API Compatibility Level
全てのターゲットに関して Mono の API 互換性レベルを選択できます。サードパーティ製 .NET ライブラリは、.NET 互換性レベル外の機能を使用することもあります。そのような場合に、何が起きているかを理解し、最善の修正方法を把握するためには、以下を試みてください。
- Windows 用 ILSpy をインストールします。
- API 互換性レベルに問題が疑われる .NET アセンブリを ILSpy にドラッグします。これらは
Data/MonoBleedingEdge/lib/mono/YOURSUBSET/にあります。 - サードパーティ製アセンブリをドラッグします。
- サードパーティのアセンブリを右クリックし、Analyze を選択します。
- 分析レポートの中で、Depends on セクションを調べます。サードパーティ製品依存でありながら、選択した .NET 互換性レベルで対応しないものはすべてここで赤字でハイライトされます。
Script Compilation
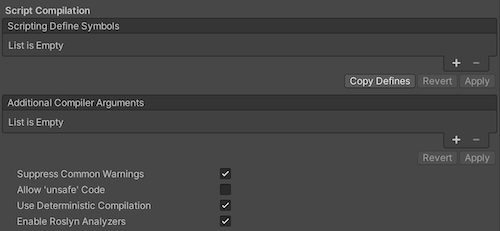
| プロパティ | 説明 |
|---|---|
| Scripting Define Symbols | カスタムコンパイルフラグを設定します。 詳細は 条件付きコンパイル を参照してください。 |
| Additional Compiler Arguments | 追加的な引数を Roslyn コンパイラーに渡すために、このリストにエントリーを追加します。追加の引数それぞれに対して新しいエントリーを 1 つ使用します。 新しいエントリーを作成するには、Add (+) をクリックしてください。エントリーを削除するには Remove (-) をクリックしてください。 全ての引数を追加し終えたら、Apply をクリックして追加的な引数を未来のコンパイルに含めます。Revert をクリックすると、このリストが最後に適用された状態にリセットされます。 |
| Suppress Common Warnings | C# の警告 CS0169 および CS0649 を表示するかどうかを示します。 |
| Allow ‘unsafe’ Code | 事前に定義されたアセンブリ (例えば Assembly-CSharp.dll) の ‘unsafe’ C# コード をコンパイルするサポートを有効にします。アセンブリ定義ファイル ( .asmdef) の場合、.asmdef ファイルの 1 つをクリックし、表示されたインスペクターウィンドウでオプションを有効にします。 |
| Use Deterministic Compilation | Indicates whether to prevent compilation with the -deterministic C# flag. With this setting enabled, compiled assemblies are byte-for-byte the same each time they’re compiled. For more information, refer to C# Compiler Options that control code generation. |
Optimization
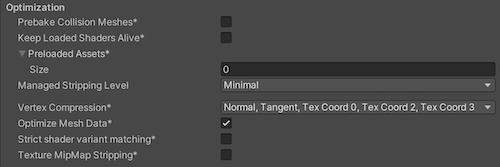
| Property | Description | |
|---|---|---|
| Prebake Collision Meshes | Adds collision data to Meshes at build time. | |
| Keep Loaded Shaders Alive | Indicates whether to prevent shaders from being unloaded. For more information, see Shader Loading. |
|
| Preloaded Assets | Sets an array of Assets for the player to load on startup. To add new Assets, increase the value of the Size property and then set a reference to the Asset to load in the new Element box that appears. |
|
| Managed Stripping Level | Chooses how aggressively Unity strips unused managed (C#) code. When Unity builds your app, the Unity Linker process can strip unused code from the managed DLLs your Project uses. Stripping code can make the resulting executable smaller, but can sometimes remove code that’s in use. For more information about these options and bytecode stripping with IL2CPP, refer to ManagedStrippingLevel. |
|
| Minimal | Use this to strip class libraries, UnityEngine, Windows Runtime assemblies, and copy all other assemblies. | |
| Low | Remove unreachable managed code to reduce build size and Mono/IL2CPP build times. | |
| Medium | Run UnityLinker to reduce code size beyond what Low can achieve. You might need to support a custom link.xml file, and some reflection code paths might not behave the same. | |
| High | UnityLinker will strip as much code as possible. This will further reduce code size beyond what Medium can achieve but managed code debugging of some methods might no longer work. You might need to support a custom link.xml file, and some reflection code paths might not behave the same. | |
| Vertex Compression | Sets vertex compression per channel. This affects all the meshes in your project. Typically, Vertex Compression is used to reduce the size of mesh data in memory, reduce file size, and improve GPU performance. For more information on how to configure vertex compression and limitations of this setting, refer to Compressing mesh data. |
|
| Optimize Mesh Data | Enable this option to strip unused vertex attributes from the mesh used in a build. This option reduces the amount of data in the mesh, which can help reduce build size, loading times, and runtime memory usage. Warning: If you have this setting enabled, don’t change material or shader settings at runtime. For more information, refer to PlayerSettings.stripUnusedMeshComponents. |
|
| Strict shader variant matching | If a shader variant is missing, the editor uses the bright pink error shader whilst displaying an error message in the Console. | |
| Texture MipMap Stripping | Enables mipmap stripping for all platforms. It strips unused mipmaps from Textures at build time. Unity determines unused mipmaps by comparing the value of the mipmap against the quality settings for the current platform. If a mipmap value is excluded from every quality setting for the current platform, then Unity strips those mipmaps from the build at build time. If QualitySettings.masterTextureLimit is set to a mipmap value that has been stripped, Unity will set the value to the closest mipmap value that hasn’t been stripped. |
|
Stack Trace
特定のコンテキストで許可するスタックトレースのログタイプを選択します。

- 必要なロギングのタイプに基づいて各ログタイプ (Error、Assert、Warning、Log、Exception) に対応するオプションを有効にして、好みのスタックトレース方法を設定します。
-
ScriptOnly: スクリプト実行時にのみログを記録します。
-
Full: 常にログを記録します。
-
None: ログは記録されません。
-
ScriptOnly: スクリプト実行時にのみログを記録します。
詳しくは、スタックトレースロギング を参照してください。
Legacy
Clamp BlendShapes (Deprecated) を有効にすると、SkinnedMeshRenderers でブレンドシェイプのウェイトの範囲を固定できます。

Publishing Settings
これらの設定を使用して、ユニバーサル Windows アプリケーションのビルドをカスタマイズします。オプションは、以下のセクションに分かれています。
- Packaging (パッケージ)
- Certificate (証明書)
- Streaming Install (ストリーミングインストール)
- Application UI
- File and Protocol Associations (ファイルとプロトコル関連付け)
- Misc (その他)
- Capabilities (機能)
- Supported Device Families (サポートするデバイスファミリー)
初めて Visual Studio ソリューションを作成する場合、これらの設定は Package.appxmanifest ファイルに保存されます。
ノート: 既存のプロジェクトの上にプロジェクトを構築する際、Package.appxmanifest ファイルが既に存在している場合は上書きされません。つまり、Player 設定で何かを変更した場合は、必ず Package.appxmanifest を確認してください。Package.appxmanifest を再作成したい場合は、それを削除して Unity でプロジェクトを再ビルドしてください。
詳細は、アプリケーションパッケージマニフェスト に関する Microsoft のドキュメントを参照してください。
Player 設定の Allowed Orientation for Auto Rotation (画面の自動回転を許可する向き) もマニフェスト (Visual Studio ソリューションの Package.appxmanifest ファイル) に読み込まれます。UWP アプリの場合、マニフェストで指定した画面の方向に関係なく、Player 設定で指定した方向に画面の向きをリセットします。これは、Windows 自体がデスクトップコンピューターとタブレットコンピューターのこれらの設定を無視するためです。
ヒント Unity スクリプティング API を使用して、サポートされている向きをいつでも変更できます。
Packaging

| プロパティ | 説明 |
|---|---|
| パッケージ名 | システム上のパッケージを識別するための名前を入力します。名前は一意である必要があります。 |
| Package display name | Player 設定の一番上 で設定した Product Name の値がここに表示されます。これは、Microsoft Store に表示されるアプリケーションの名前です。 |
| Version | クアッド表記の文字列 Major.Minor.Build.Revision を使用して、パッケージのバージョンを入力します。 |
| Publisher display name | Player 設定の一番上 で設定した Company Name の値がここに表示されます。これは、パブリッシャーのユーザー向けの名前です。 |
| Streaming Install | これを有効にすると、シーンのストリーミング可能なアセットを含む AppxContentGroupMap.xml マニフェストファイルが作成されます。シーンのアセットをデフォルトで加えるには、Last required scene index の設定を使用します。Last required scene index 以上のシーンインデックスを持つシーンのアセットは、マニフェストファイルでストリーミング可能として特定されます。 |
| Last required scene index |
Build Settings ウィンドウ の Scenes In Build リストからインデックス番号を入力します。これは、ゲームのビルドに含まれなければならないリスト内の最後のシーンに対応します。アプリケーションを開始するには、指定されたインデックスと同じ、またはそれより小さいシーンインデックスが必要です。リスト内のすべてのファイルを必要とするには、リスト内の最後のシーンのインデックスを使用します。 シーンインデックスが大きいシーンには、インデックスの小さいシーンの共有アセットが含まれている必要があります。ビルド設定ダイアログのシーンの順番は、アプリケーションが必要なアセットを見つけるために重要です。 ノート: デフォルトでは、Streaming Install オプションは無効になっています。つまり、この設定は使用できません。このプロパティを編集可能にするには、最初に Streaming Install オプションを有効にします。 |
Certificate
すべての UWP アプリには開発者を識別する証明書が必要です。

Select ボタンをクリックして、ローカルコンピューターから証明書ファイル (.pfx) を選択します。選択したファイルの名前が Select ボタンに表示されます。
既存の証明書ファイルがない場合は、Unity でファイルを生成することができます。
-
Create ボタンをクリックします。 Create Test Certificate for Microsoft Store ダイアログウィンドウが表示されます。

パッケージのパブリッシャーの名前を Publisher テキストボックスに入力します。
証明書をパスワードで保護することもできますが、これは必須ではありません。パスワードフィールドは空白にしておくことを推奨します。
-
Continue をクリックします。
ウィンドウを閉じると、Certificates セクションの Publisher と Isusued by に入力した名前が表示されます。Expiration date は、証明書を作成してから 1 年間に設定されます。

Application UI
Unity はこれらのオプションを直接 Package.appxmanifest ファイルにコピーします。

Player 設定の最上部 で設定した Display name の値がここに表示されます。これはアプリケーションの省略なしの名前です。
Microsoft Store のアプリケーションのタイルに表示したいテキストを Description テキストボックスに入力します。デフォルトは Package display name の値です。
File Type Associations、File Type、Protocol
File Type Associations、File Type、Protocol セクションでは、Microsoft Store アプリを特定のファイルタイプや URI スキームのデフォルトのハンドラーとして設定できます。

File Type Associations (ファイルタイプ関連付け) セクションで、Name テキストボックスに File Types (ファイルタイプ) のグループ名 (小文字のみ可) を入力します。このグループは、同じ表示名、ロゴ、情報やヒント、編集フラグを共有するファイルです。アプリケーションを更新しても維持できるグループ名を選んでください。
これをファイルの関連付けとして設定する場合は、以下のようにします。
- Add New ボタンをクリックします。空の入力フィールドが File Types リストに表示されます。複数のファイルタイプを加えられます。
- 特定のファイルタイプの Content Type テキストボックスに MIME コンテンツタイプを入力します。例えば、image/jpeg などです。
- File Type テキストボックスに登録するファイルタイプの前にピリオドを付けて入力します (例えば、.jpeg)。
これを URI スキームとの関連付けとして設定する場合は、Name テキストボックスにプロトコルを入力します。
詳細は、Microsoft ドキュメントの Auto-launching with file and URI associations (XAML) を参照してください。
Misc
Unity はイベントをサブスクライブすることで入力を受け取ります。 Input Source (入力元) 設定は、入力を取得する場所 (入力元) を定義します。現在、キーボード入力は常に CoreWindow から行われるため、マウスとタッチ入力にのみ適用されます。

| プロパティ | 説明 | |
|---|---|---|
| Default Language (.vcxproj) | 生成される Visual Studio プロジェクトの XML デフォルト言語を設定します。指定しない場合は、‘en-US’ が使用されます。 ノート: 変更は最初のファイル生成にのみ適用され、既存のファイルには影響しません。 |
|
| Input Source | どのソースから入力を受け取るかを定義します。現在、キーボード入力は常に CoreWindow からであるため、これはマウス入力とタッチ入力にのみ適用されます。 | |
| CoreWindow | CoreWindow イベントをサブスクライブします。これはデフォルトです。 | |
| Independent Input Source | 独立した入力元を設定し、そこから入力を受けます。 | |
| SwapChainPanel | SwapChainPanel イベントをサブスクライブします。 | |
Capabilities
Capabilities セクションを使用して、アプリケーションにアクセスする API やリソースを有効にします。これらは写真、音楽、または、カメラやマイクなどのデバイスである可能性があります。
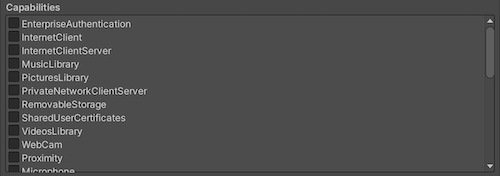
| プロパティ | 説明 |
|---|---|
| EnterpriseAuthentication | Windows ドメイン証明書を使用すると、ユーザーは証明書を使用してリモートリソースにログインでき、ユーザーがユーザー名とパスワードを入力したかのように動作します。 |
| InternetClient | アプリケーションがインターネットからのデータを受信できます。サーバーとしては機能しません。ローカルネットワークアクセスはありません。 |
| InternetClientServer | InternetClient と同じですが、アプリケーションがネットワーク接続の受信をリッスンする必要があるピアツーピア (P2P) シナリオも可能です。 |
| MusicLibrary | ユーザーの音楽にアクセスし、アプリケーションがユーザーの操作なしにライブラリ内のすべてのファイルを列挙し、アクセスできるようにします。この機能は、通常、音楽ライブラリ全体を使用するジュークボックスアプリケーションで使用されます。 |
| PicturesLibrary | ユーザーの画像にアクセスし、アプリケーションがユーザーの操作なしにライブラリ内のすべてのファイルを列挙し、アクセスできるようにします。この機能は、通常、ピクチャライブラリ全体を使用する写真表示アプリケーションで使用されます。 |
| PrivateNetworkClientServer | ファイアウォールを通して家のネットワークや会社のネットワーク内のインバウンドとアウトバウンドのアクセスを提供します。この機能は、通常、ローカルエリアネットワーク (LAN) 内で通信するゲームや、さまざまなローカルデバイスでデータを共有するアプリケーションに使用されます。 |
| RemovableStorage | USB キーや外付けハードドライブなどのリムーバブルストレージ内のファイルにアクセスします。 |
| SharedUserCertificates | スマートカードに保存された証明書など、ソフトウェアとハードウェアベースの証明書を共有ユーザーのストアに追加して、アプリケーションがアクセスすることを許可します。この機能は通常、認証にスマートカードを必要とする金融アプリケーションやエンタープライズアプリケーションに使用されます。 |
| VideosLibrary | ユーザーのビデオにアクセスし、アプリケーションがユーザーの操作なしにライブラリ内のすべてのファイルを列挙し、アクセスできるようにします。この機能は、通常、ビデオライブラリ全体を使用するビデオ再生アプリケーションで使用されます。 |
| WebCam | ビルトインのカメラや外部ウェブカメラのビデオフィードにアクセスし、写真やビデオを取得できるようにします。 ノート: ビデオストリームへのアクセスのみを許可します。オーディオストリームへのアクセスを許可するには、Microphone 機能を追加する必要があります。 |
| Proximity | 近接している複数のデバイスが互いに通信できるようにします。この機能は通常、複雑でないマルチプレイヤーゲームや、情報を交換するアプリケーションで使用されます。デバイスは、Bluetooth、Wi-Fi、インターネットなど、できる限り良い接続を提供する通信技術を使用しようとします。 |
| Microphone | マイクのオーディオフィードにアクセスします。これにより、接続したマイクからのオーディオを録音することができます。 |
| 場所 | PC の GPS センサーなどの専用ハードウェア、または使用可能なネットワーク情報から取得した位置情報機能にアクセスします。 |
| HumanInterfaceDevice | Human Interface Device API へのアクセスを可能にします。詳細は、How to specify device capabilities for HID を参照してください。 |
| AllJoyn | ネットワーク上の AllJoyn 対応アプリケーションとデバイスが互いを見つけ、相互作用することができます。 |
| BlockedChatMessages | スパムフィルターアプリケーションによってブロックされた SMS や MMS メッセージをアプリケーションが読むことができます。 |
| Chat | アプリケーションがすべての SMS と MMS メッセージを読み取りと書き込みをすることができます。 |
| CodeGeneration | アプリケーションに JIT 機能を提供する以下の関数にアプリケーションがアクセスできるようにします。 VirtualProtectFromApp CreateFileMappingFromApp OpenFileMappingFromApp MapViewOfFileFromApp |
| Objects3D | アプリケーションが 3D オブジェクトファイルにプログラムでアクセスすることができます。この機能は通常、3D オブジェクトライブラリ全体にアクセスする必要がある 3D アプリケーションやゲームで使用されます。 |
| PhoneCall | アプリケーションがデバイス上のすべての電話回線にアクセスし、以下の機能を実行できます。 電話回線で電話をかけ、ユーザーに確認を求めずにシステムのダイヤラーを表示します。 電話回線関連のメタデータにアクセスします。 電話回線関連のトリガーにアクセスします。 ユーザーが選択したスパムフィルターアプリケーションがブロックリストと発信元情報を設定して確認することができます。 |
| UserAccountInformation | ユーザーの名前と画像にアクセスします。 |
| VoipCall | アプリケーションが、Windows.ApplicationModel.Calls 名前空間の VOIP 呼び出し API にアクセスすることができます。 |
| Bluetooth | アプリケーションが、GATT (汎用アトリビュートプロファイル) と RFCOMM (Classic Basic Rate) プロトコルを使用して、すでにペア設定された Bluetooth デバイスと通信することができます。 |
| SpatialPerception | 空間マッピングデータへのプログラムによるアクセスを提供し、ユーザーの近くのアプリケーションが指定した空間領域のサーフェスに関する情報を MR アプリケーションに提供します。アプリケーションがこれらのサーフェスメッシュを明示的に使用する場合にのみ、SpatialPerception 機能を宣言します。なぜなら、この機能は、MR アプリケーションがユーザーの頭のポーズに基づいてホログラフィックのレンダリングを実行するのに必須ではないためです。 |
| InputInjectionBrokered | アプリケーションが HID、タッチ、ペン、キーボード、マウスなどのさまざまな方法での入力をプログラムでシステムに入力できるようにします。この機能は、通常、システムを制御できるコラボレーションアプリケーションに使用されます。 |
| Appointments | ユーザーの予定ストアにアクセスします。この機能を使用すると、同期されたネットワークアカウントから取得した予定や、予定ストアへの書き込みを行う他のアプリに対する読み取りアクセスが可能になります。この機能により、アプリケーションは新しいカレンダーを作成し、作成したカレンダーに予定を書き込むことができます。 |
| BackgroundMediaPlayback | MediaPlayer や AudioGraph などのクラス のようなメディア特有の API の動作を変更し、アプリケーションがバックグラウンドのときにメディアを再生できるようにします。すべてのアクティブなオーディオストリームはミュートできなくなりますが、アプリケーションがバックグラウンドに遷移しても引き続き音声が聞こえるようになります。また、アプリケーションの生存期間は再生中に自動的に延長されます。 |
| Contacts | さまざまな連絡先ストアの連絡先の集約ビューにアクセスを可能にします。この機能により、さまざまなネットワークやローカルの連絡先ストアから同期された連絡先に制限付きのアクセス (ネットワーク許可ルールが適用されます) ができます。 |
| LowLevelDevices | 多くの追加要件が満たされたときに、アプリケーションがカスタムデバイスへアクセスできます。 |
| OfflineMapsManagement | アプリケーションがオフラインマップにアクセスできます。 |
| PhoneCallHistoryPublic | アプリケーションが携帯電話やデバイスの VOIP 通話履歴情報の一部を読み取ることができます。この機能により、アプリケーションは VOIP のコール履歴エントリーに書き込むこともできます。 |
| PointOfService | Windows.Devices.PointOfService 名前空間の API へのアクセスを可能にします。この名前空間により、Point of Service (POS) バーコードスキャナーと磁気ストライプリーダーにアクセスできます。この名前空間は、UWP アプリからさまざまな製造者の POS デバイスにアクセスするための、ベンダーに依存しないインターフェースを提供します。 |
| RecordedCallsFolder | 録音した通話フォルダーにアプリケーションがアクセスできます。 |
| RemoteSystem | アプリケーションがユーザーの Microsoft アカウントに関連付けられたデバイスのリストにアクセスできます。複数のデバイスにわたる操作を実行するには、デバイスリストへのアクセスが必要です。 |
| SystemManagement | アプリケーションがシャットダウン、リブート、場所、タイムゾーンなどの基本的なシステム管理権限を持つことができます。 |
| UserDataTasks | アプリケーションがタスク設定の現在の状態にアクセスできます。 |
| UserNotificationListener | アプリケーションが通知設定の現在の状態にアクセスできます。 |
| GazeInput | 互換性のある視線追跡デバイスが接続されている場合、アプリケーションがユーザーの視線を検出できるようにします。 |
詳細は、App capability declarations を参照してください。
Unity はこれらのオプションを直接 Package.appxmanifest ファイルにコピーします。
ノート: 以前のパッケージの上にゲームを作成すると、Package.appxmanifest は上書きされません。
Supported Device Families
デバイスファミリーは、あるクラスのデバイスの API、システム特性、動作を識別します。また、ストアからアプリケーションをインストールできるデバイスも判別します。詳細は、Microsoft のDevice families overview を参照してください。
オプションが有効でない場合、デフォルトとして Windows.Universal が使用され、アプリケーションがすべてのデバイスファミリーで利用できるようになります。また、エディターの代わりに、PlayerSettings.WSATargetFamily の API 内で設定することもできます。
ノート: これらの設定は、新しい UWP Visual Studio ソリューションを生成する場合にのみ使用されます。既存のフォルダーに UWP を再構築する場合は、これらの設定を変更しても効果はありません。

| プロパティ | 説明 |
|---|---|
| Desktop | アプリケーションがデスクトップのデバイスファミリーをサポートしているかどうかを示します。 |
| Mobile | アプリケーションがモバイルのデバイスファミリーをサポートしているかどうかを示します。 |
| Holographic | アプリケーションが HoloLens (自己完結型ホログラフィックコンピューター) デバイスファミリーをサポートしているかどうかを示します。これは Mixed Reality アプリケーションに使用されます。 |
| Team | アプリケーションが Team のデバイスファミリーをサポートしているかどうかを示します。これは一般的に Microsoft Surface Hub デバイスに使用されます。 |
| IoT | アプリケーションが IoT デバイスファミリーをサポートしているかどうかを示します。 ノート: 現在、IoT をターゲットにするアプリケーションはアプリストアでは有効ではないため、開発目的でのみ使用する必要があります。 |
| IoTHeadless | アプリケーションが IoTHeadless デバイスファミリーをサポートしているかどうかを示します。 ノート: 現在、IoT をターゲットにするアプリケーションはアプリストアでは有効ではないため、開発目的でのみ使用する必要があります。 |
詳細は、Device family availability を参照してください。
PlayerSettingsWSA