Manual
- Unity User Manual (2019.2)
- Packages
- Verified and Preview packages
- 2D Animation
- 2D IK
- 2D Pixel Perfect
- 2D PSD Importer
- 2D SpriteShape
- Adaptive Performance
- Addressables
- Ads IAP Mediation Adaptor
- Advertisement
- AI Planner
- Alembic
- Analytics Library
- Android Logcat
- Animation Rigging
- AP Samsung Android
- AR Foundation
- AR Subsystems
- ARCore XR Plugin
- ARKit Face Tracking
- ARKit XR Plugin
- Asset Bundle Browser
- Asset Graph
- Barracuda
- Build Report Inspector
- Burst
- Cinemachine
- Collections
- Core RP Library
- Custom NUnit
- DOTS Android Platform
- DOTS Editor
- DOTS Linux Platform
- DOTS macOS Platform
- DOTS Platforms
- DOTS Web Platform
- DOTS Windows Platform
- Editor Coroutines
- Entities
- FBX Exporter
- Film and TV Toolbox
- Game Foundation
- Google Resonance Audio
- Google VR Android
- Google VR iOS
- Havok Physics
- High Definition RP
- Hybrid Renderer
- Immediate Window
- In App Purchasing
- Input System
- Jobs
- Lightweight RP
- Mathematics
- Область Memory
- Mobile Notifications
- Mono Cecil
- Multiplayer HLAPI
- Oculus Android
- Oculus Desktop
- OpenVR (Desktop)
- Package Validation Suite
- Performance testing API
- PlayableGraph Visualizer
- Polybrush
- Post Processing
- ProBuilder
- Profile Analyzer
- ProGrids
- Quick Search
- Remote Config
- Scriptable Build Pipeline
- Shader Graph
- Share WebGL Game
- Subsystem Registration
- Terrain Tools
- Test Framework
- TextMesh Pro
- UI Builder
- Unity AOV Recorder
- Unity Collaborate
- Unity Distribution Portal
- Unity Physics
- Unity Recorder
- Unity Reflect
- Unity Render Streaming
- Unity User Reporting
- USD
- Vector Graphics
- Visual Effect Graph
- Vuforia Engine AR
- WebRTC
- Windows Mixed Reality
- Windows XR Plugin
- Xiaomi SDK
- XR Interaction Toolkit
- XR Legacy Input Helpers
- XR Management
- Built-in packages
- 2D Sprite
- 2D Tilemap Editor
- AI
- Android JNI
- Animation
- Asset Bundle
- Audio
- Cloth
- Director
- Image Conversion
- IMGUI
- JSONSerialize
- Particle System
- Physics
- Physics 2D
- Screen Capture
- Terrain
- Terrain Physics
- Tilemap
- UI
- UIElements
- Umbra
- Unity Analytics
- Unity Timeline
- Unity UI
- Unity Web Request
- Unity Web Request Asset Bundle
- Unity Web Request Audio
- Unity Web Request Texture
- Unity Web Request WWW
- Vehicles
- Video
- VR
- Wind
- XR
- Packages by keywords
- Working with the Package Manager
- Creating custom packages
- Verified and Preview packages
- Working in Unity
- Installing Unity
- Getting Started
- Asset Workflow
- The Main Windows
- Создание геймплея.
- Editor Features
- 2D and 3D mode settings
- Preferences
- Presets
- Shortcuts Manager
- Build Settings
- Project Settings
- Visual Studio C# integration
- RenderDoc Integration
- Xcode Frame Debugger integration
- Editor Analytics
- Проверка обновлений
- IME в Unity
- Специальные Папки Проекта
- Reusing Assets between Projects
- Version Control
- Решение проблем в редакторе
- Advanced Development
- Advanced Editor Topics
- Сборка системы приложения
- Command line arguments
- Applying defaults to assets by folder
- Support for custom Menu Item and Editor features
- Asynchronous Shader compilation
- За кулисами
- AssetDatabase
- Text-Based Scene Files
- Cache Server
- Изменение исходных ассетов из кода
- Расширение редактора
- Выполнение Editor скриптов при запуске редактора Unity
- Upgrade Guides
- Использование автоматического обновления API
- Upgrading to Unity 2019.2
- Upgrading to Unity 2019.1
- Upgrading to Unity 2018.3
- Upgrading to Unity 2018.2
- Upgrading to Unity 2018.1
- Upgrading to Unity 2017.3
- Upgrading to Unity 2017.2
- Upgrading to Unity 2017.1
- Upgrading to Unity 5.6
- Upgrading to Unity 5.5
- Upgrading to Unity 5.4
- Upgrading to Unity 5.3
- Upgrading to Unity 5.2
- Upgrading to Unity 5.0
- Руководство по обновлению до Unity 4.0
- Обновление до Unity 3.5
- Importing
- 2D
- Геймплей в 2D
- 2D Sorting
- Sprites
- Tilemap
- Physics Reference 2D
- Графика
- Обзор графических возможностей
- Освещение
- Lighting overview
- Lighting Window
- Light Explorer
- Light sources
- Shadows
- Global Illumination
- Lightmapping
- Lightmap Parameters
- Baked ambient occlusion
- LOD for baked lightmaps
- Light Probes
- Reflection probes
- Lighting Modes
- GI visualizations in the Scene view
- Lighting Data Asset
- Lightmap Directional Modes
- Lightmaps: Technical information
- Material properties and the GI system
- Global Illumination UVs
- GI cache
- Light troubleshooting and performance
- Related topics
- Камеры
- Materials, Shaders & Textures
- Текстуры
- Creating and Using Materials
- Standard Shader
- Standard Particle Shaders
- Physically Based Rendering Material Validator
- Accessing and Modifying Material parameters via script
- Writing Shaders
- Legacy Shaders
- Video overview
- Ландшафтный движок
- Tree Editor
- Системы Частиц
- Post-processing overview
- Расширенные возможности рендеринга
- Procedural Mesh Geometry
- Оптимизация производительности графики
- Слои
- Освещение
- Справка по графическим возможностям
- Справочник по камерам
- Shader Reference
- Writing Surface Shaders
- Программирование вершинных и фрагментных (пиксельных) шейдеров
- Примеры вершинных и фрагментных шейдеров
- Shader semantics
- Accessing shader properties in Cg/HLSL
- Providing vertex data to vertex programs
- Встроенные подключаемые файлы для шейдеров
- Стандартные шейдерные предпроцессорные макросы
- Built-in shader helper functions
- Built-in shader variables
- Создание программ с несколькими вариантами шейдеров
- GLSL Shader programs
- Shading Language used in Unity
- Shader Compilation Target Levels
- Shader data types and precision
- Using sampler states
- Синтаксис ShaderLab: Shader
- Синтаксис ShaderLab: свойства
- Синтаксис ShaderLab: SubShader
- Синтаксис ShaderLab: Pass
- ShaderLab culling and depth testing
- Синтаксис ShaderLab: Blending
- Синтаксис ShaderLab: тэги Pass
- Синтаксис ShaderLab: Stencil
- Синтаксис ShaderLab: Name
- Синтаксис ShaderLab: цвет, материал, освещение
- ShaderLab: Legacy Texture Combiners
- Синтакс ShaderLab: Альфа тестинг (Alpha testing)
- Синтаксис ShaderLab: туман
- Синтаксис ShaderLab: BindChannels
- Синтаксис ShaderLab: UsePass
- Синтаксис ShaderLab: GrabPass
- ShaderLab: SubShader Tags
- Синтаксис ShaderLab: Pass
- Синтаксис ShaderLab: Fallback
- #Синтаксис ShaderLab: CustomEditor
- Синтаксис ShaderLab: другие команды
- Shader assets
- Расширенные возможности ShaderLab
- Unity's Rendering Pipeline
- Performance tips when writing shaders
- Rendering with Replaced Shaders
- Custom Shader GUI
- Использование текстур глубины
- Текстура глубины камеры
- Особенности рендеринга различных платформ
- Уровень детализации шейдера (Level Of Detail)
- Texture arrays
- Debugging DirectX 11/12 shaders with Visual Studio
- Debugging DirectX 12 shaders with PIX
- Implementing Fixed Function TexGen in Shaders
- Particle Systems reference
- Particle System
- Particle System modules
- Particle System Main module
- Emission module
- Shape Module
- Velocity over Lifetime module
- Noise module
- Limit Velocity Over Lifetime module
- Inherit Velocity module
- Force Over Lifetime module
- Color Over Lifetime module
- Color By Speed module
- Size over Lifetime module
- Size by Speed module
- Rotation Over Lifetime module
- Rotation By Speed module
- External Forces module
- Collision module
- Triggers module
- Sub Emitters module
- Texture Sheet Animation module
- Lights module
- Trails module
- Custom Data module
- Renderer module
- Particle System Force Field
- Справка по Визуальным Эффектам
- Mesh Components
- Текстурные компоненты
- Компоненты рендеринга
- Rendering Pipeline Details
- Подборка уроков по графике
- Уроки по графике
- Scriptable Render Pipeline
- Обзор графических возможностей
- Physics
- Скриптинг
- Обзор Скриптинга
- Создание и Использование Скриптов
- Variables and the Inspector
- Controlling GameObjects using components
- Функции событий
- Time and Framerate Management
- Создание и уничтожение игровых объектов (GameObjects)
- Coroutines
- Пространства имён
- Attributes
- Order of Execution for Event Functions
- Understanding Automatic Memory Management
- Platform dependent compilation
- Специальные папки и порядок компиляции скриптов
- Assembly Definitions
- Managed code stripping
- .NET profile support
- Referencing additional class library assemblies
- Stable scripting runtime: known limitations
- Generic Functions
- Scripting restrictions
- Script Serialization
- Unity События (UnityEvents)
- What is a Null Reference Exception?
- Important Classes
- Рецепты использования векторов
- Scripting Tools
- Event System
- C# Job System
- Обзор Скриптинга
- Multiplayer and Networking
- Multiplayer Overview
- Setting up a multiplayer project
- Using the Network Manager
- Using the Network Manager HUD
- The Network Manager HUD in LAN mode
- The Network Manager HUD in Matchmaker mode
- Converting a single-player game to Unity Multiplayer
- Debugging Information
- The Multiplayer High Level API
- Multiplayer Component Reference
- Multiplayer Classes Reference
- UnityWebRequest
- Аудио
- Аудио. Обзор.
- Аудио файлы
- Трекерные модули
- Audio Mixer
- Native Audio Plugin SDK
- Audio Profiler
- Ambisonic Audio
- Справочник по аудио
- Audio Clip
- Audio Listener
- Audio Source
- Audio Mixer
- Аудио эффекты (только для Pro версии)
- Audio Effects
- Audio Low Pass Effect
- Audio High Pass Effect
- Audio Echo Effect
- Audio Flange Effect
- Audio Distortion Effect
- Audio Normalize Effect
- Audio Parametric Equalizer Effect
- Audio Pitch Shifter Effect
- Audio Chorus Effect
- Audio Compressor Effect
- Audio SFX Reverb Effect
- Audio Low Pass Simple Effect
- Audio High Pass Simple Effect
- Reverb Zones
- Микрофон
- Audio Settings
- Анимация
- Animation System Overview
- Анимационные клипы
- Animator Controllers (контроллеры аниматоров)
- Аниматор и контроллер аниматора
- The Animator Window
- Конечные автоматы в анимации
- Blend Trees (Деревья смешивания)
- Working with blend shapes
- Animator Override Controllers
- Переназначение гуманоидных анимаций
- Performance and optimization
- Animation Reference
- Кривые анимации и события
- Playables API
- Словарь терминов анимации и Mecanim.
- Timeline
- Timeline overview
- Using the Timeline window
- Timeline window
- Timeline properties in the Inspector window
- Playable Director component
- Timeline glossary
- User interfaces (UI)
- UIElements Developer Guide
- Unity UI
- Сanvas (Полотно)
- Basic Layout
- Визуальные компоненты
- Компоненты взаимодействия
- Animation Integration
- Auto Layout
- Rich Text
- Справка по пользовательским интерфейсам
- Практические рекомендации по работе с UI (пользовательскими интерфейсами)
- Immediate Mode GUI (IMGUI)
- Навигация и поиск пути
- Navigation Overview
- Navigation System in Unity
- Inner Workings of the Navigation System
- Building a NavMesh
- NavMesh building components
- Advanced NavMesh Bake Settings
- Creating a NavMesh Agent
- Creating a NavMesh Obstacle
- Creating an Off-mesh Link
- Building Off-Mesh Links Automatically
- Building Height Mesh for Accurate Character Placement
- Navigation Areas and Costs
- Loading Multiple NavMeshes using Additive Loading
- Using NavMesh Agent with Other Components
- Справочник по навигации
- Navigation How-Tos
- Navigation Overview
- Unity Services
- Setting up your project for Unity Services
- Unity Organizations
- Unity Ads
- Unity Analytics
- Unity Analytics Overview
- Setting Up Analytics
- Analytics Dashboard
- Analytics events
- Funnels
- Remote Settings
- Unity Analytics A/B Testing
- Monetization
- User Attributes
- Unity Analytics Raw Data Export
- Data reset
- Upgrading Unity Analytics
- COPPA Compliance
- Unity Analytics and the EU General Data Protection Regulation (GDPR)
- Analytics Metrics, Segments, and Terminology
- Unity Cloud Build
- Automated Build Generation
- Supported platforms
- Supported versions of Unity
- Version control systems
- Using the Unity Developer Dashboard to configure Unity Cloud Build for Git
- Using the Unity Editor to configure Unity Cloud Build for Git
- Using the Unity Developer Dashboard to configure Unity Cloud Build for Mercurial
- Using the Unity Editor to configure Unity Cloud Build for Mercurial
- Using Apache Subversion (SVN) with Unity Cloud Build
- Using the Unity Developer Dashboard to configure Unity Cloud Build for Perforce
- Using the Unity Editor to configure Unity Cloud Build for Perforce
- Building for iOS
- Advanced options
- Build manifest
- Cloud Build REST API
- Unity IAP
- Setting up Unity IAP
- Cross Platform Guide
- Codeless IAP
- Defining products
- Subscription Product support
- Initialization
- Browsing Product Metadata
- Initiating Purchases
- Processing Purchases
- Handling purchase failures
- Restoring Transactions
- Purchase Receipts
- Receipt validation
- Store Extensions
- Cross-store installation issues with Android in-app purchase stores
- Store Guides
- Implementing a Store
- IAP Promo
- Unity Collaborate
- Setting up Unity Collaborate
- Adding team members to your Unity Project
- Viewing history
- Enabling Cloud Build with Collaborate
- Managing Unity Editor versions
- Reverting files
- Resolving file conflicts
- Excluding Assets from publishing to Collaborate
- Publishing individual files to Collaborate
- Restoring previous versions of a project
- In-Progress edit notifications
- Managing cloud storage
- Moving your Project to another version control system
- Collaborate troubleshooting tips
- Unity Cloud Diagnostics
- Unity Integrations
- Multiplayer Services
- XR
- XR SDKs
- Google VR
- Vuforia
- Windows Mixed Reality
- Unity XR Input
- XR API reference
- Mixed Reality Devices
- Обзор
- VR devices
- Single Pass Stereo rendering (Double-Wide rendering)
- VR Audio Spatializers
- VR frame timing
- XR SDKs
- Open-source repositories
- Asset Store Publishing
- Platform development
- Автономный
- macOS
- Apple TV
- WebGL
- WebGL Player settings
- Getting started with WebGL development
- WebGL Browser Compatibility
- Building and running a WebGL project
- WebGL: Deploying compressed builds
- Server configuration for WebAssembly streaming
- Debugging and troubleshooting WebGL builds
- WebGL Graphics
- WebGL Networking
- Using Audio In WebGL
- WebGL performance considerations
- Embedded Resources on WebGL
- Memory in WebGL
- WebGL: Interacting with browser scripting
- Using WebGL Templates
- Cursor locking and full-screen mode in WebGL
- Input in WebGL
- iOS
- Первые шаги в iOS разработке
- iOS build settings
- iOS Player settings
- iOS 2D Texture Overrides
- Продвинутые темы по iOS
- Features currently not supported by Unity iOS
- Troubleshooting on iOS devices
- Сообщение об ошибках, приводящих к "падениям" на iOS
- Android
- Getting started with Android development
- Android environment setup
- Unity Remote
- Troubleshooting Android development
- Building apps for Android
- Reporting crash bugs under Android
- Support for APK expansion files (OBB)
- Написание кода для Android
- Building and using plug-ins for Android
- Кастомизация экрана приветствия (Splash Screen) на Android
- Single-Pass Stereo Rendering for Android
- Android Player settings
- Android 2D Texture Overrides
- Gradle for Android
- Android Manifest
- App patching for fast development iteration
- Getting started with Android development
- Windows
- Windows General
- Universal Windows Platform
- Приложения Windows Store: Приступая к работе
- Universal Windows Platform: Deployment
- Universal Windows Platform (UWP) build settings
- Universal Windows Platform: Profiler
- Universal Windows Platform: Command line arguments
- Universal Windows Platform: Association launching
- Класс AppCallbacks
- Universal Windows Platform: WinRT API in C# scripts
- Universal Windows Player settings
- Universal Windows Platform: IL2CPP scripting back end
- ЧаВо
- Universal Windows Platform: Examples
- Universal Windows Platform: Code snippets
- Known issues
- Чеклист Мобильного Разработчика
- Experimental
- Legacy Topics
- Best practice guides
- Expert guides
- New in Unity 2019.2
- Glossary
- Unity User Manual (2019.2)
- Графика
- Обзор графических возможностей
- Materials, Shaders & Textures
- Physically Based Rendering Material Validator
Physically Based Rendering Material Validator
The Physically Based Rendering Material Validator is a draw mode in the Scene View. It allows you to make sure your materials use values which fall within the recommended reference values for physically-based shaders. If pixel values in a particular Material fall outside of the reference ranges, the Material Validator highlights the pixels in different colors to indicate failure.
To use the Material Validator, select the Scene View’s draw mode drop-down menu, which is is usually set to Shaded by default.

Navigate to the Material Validation section. The Material Validator has two modes: Validate Albedo and Validate Metal Specular.

Note: You can also check the recommended values with Unity’s Material Charts. You still need to use these charts when authoring Materials to decide your albedo and metal specular values. However, the Material Validator provides you with a visual, in-editor way of quickly checking whether your Materials’ values are valid once your Assets are in the Scene.
Also note: The validator only works in Linear color space. Physically Based Rendering is not intended for use with Gamma color space, so if you are using Physically Based Rendering and the PBR Material Validator, you should also be using Linear color space.
Validate Albedo mode
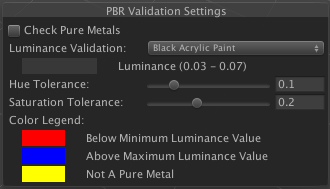
The PBR Validation Settings that appear in the Scene view when you set Material Validation to Validate Albedo.
| Property: | Function: | |
|---|---|---|
| Check Pure Metals | Enable this checkbox if you want the Material Validator to highlight in yellow any pixels it finds which Unity defines as metallic, but which have a non-zero albedo value. See Pure Metals, below, for more details. By default, this is not enabled. | |
| Luminance Validation | Use the drop-down to select a preset configuration for the Material Validator. If you select any option other than Default Luminance, you can also adjust the Hue Tolerance and Saturation Tolerance. The color bar underneath the name of the property indicates the albedo color of the configuration. The Luminance value underneath the drop-down indicates the minimum and maximum luminance value. The Material Validator highlights any pixels with a luminance value outside of these values. This is set to Default Luminance by default. | |
| Hue Tolerance | When checking the albedo color values of your material, this slider allows you to control the amount of error allowed between the hue of your material, and the hue in the validation configuration. | |
| Saturation Tolerance | When checking the albedo color values of your material, this slider allows you to control the amount of error allowed between the saturation of your material, and the saturation in the validation configuration. | |
| Color Legend | These colors correspond to the colours that the Material Validator displays in the Scene view when the pixels for that Material are outside the defined values. | |
| Red Below Minimum Luminance Value | The Material Validator highlights in red any pixels which are below the minimum luminance value defined in Luminance Validation (meaning that they are too dark). | |
| Blue Above Maximum Luminance Value | The Material Validator highlights in blue any pixels which are above the maximum luminance value defined in Luminance Validation (meaning that they are too bright). | |
| Yellow Not A Pure Metal | If you have Check Pure Metals enabled, the Material Validator highlights in yellow any pixels which Unity defines as metallic, but which have a non-zero albedo value. See Pure Metals, below, for more details. | |
Unity’s Material charts define the standard luminance range as 50–243 sRGB for non-metals, and 186–255 sRGB for metals. Validate Albedo mode colors any pixels outside of these ranges with different colors to indicate that the value is too low or too high.
In the example below, the first texture is below the minimum luminance value, and therefore too dark. The fourth texture is above the minimum luminance value, and therefore too bright.

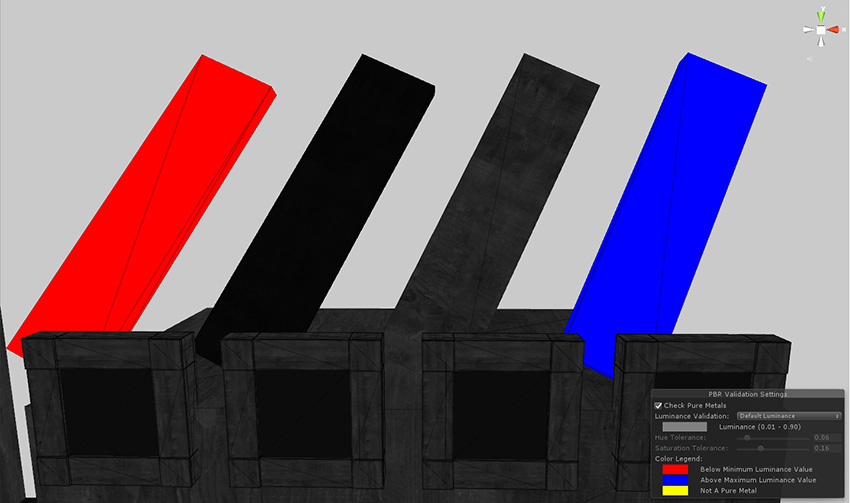
The material charts provide albedo values for common Materials. The brightness of albedo values has a dramatic impact on the amount of diffuse bounce light generated, so it is important for Global Illumination baking to make sure that your different Material types are within the correct luminance ranges, in proportion with each other. To help you get these values right, you can select from the presets in the Luminance Validation drop-down, which provides common Material albedo values to verify the luminance ranges of particular Material types.
Overriding the default luminance values
Depending on the art style of your project, you might want the luminance values of Materials to differ from the preset luminance ranges. In this case, you can override the built-in albedo values used by the Material Validator with your own values. To override the preset luminance ranges, assign an array of AlbedoSwatchInfo values for each desired Material type to the property EditorGraphicsSettings.albedoSwatches.
Validate Metal Specular mode
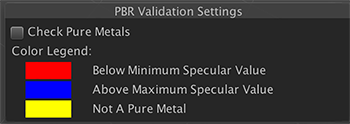
The PBR Validation Settings that appear in the Scene view when you set Material Validation to Validate Metal Specular.
| Свойство: | Функция: | |
|---|---|---|
| Check Pure Metals | Enable this checkbox if you want the Material Validator to highlight in yellow any pixels it finds which Unity defines as metallic, but which have a non-zero albedo value. See Pure Metals, below, for more details. By default, this is not enabled. | |
| Color Legend | These colors correspond to the colours that the Material Validator displays in the Scene view when the pixels for that Material are invalide - meaning their specular value falls outside the valid range for that type of material (metallic or non-metallic). See below this table for the valid ranges. | |
| Blue Below Minimum Specular Value | The Material Validator highlights in red any pixels which are below the minimum specular value. (40 for non-metallic, or 155 for metallic). | |
| Red Above Maximum Specular Value | The Material Validator highlights in blue any pixels which are above the maximum specular value. (75 for non-metallic, or 255 for metallic). | |
| Yellow Not A Pure Metal | If you have Check Pure Metals enabled, the Material Validator highlights in yellow any pixels which Unity defines as metallic, but which have a non-zero albedo value. See Pure Metals, below, for more details. | |
Unity’s Material charts define two separate specular color ranges:
- Non-metallic materials: 40–75 sRGB
- Metallic materials: 155 - 255 sRGB
In Unity, all non-metallic Materials have a constant specular color that always falls within the correct range. However, it is common for metallic Materials to have specular values that are too low. To help you identify metallic Materials with this issue, the Material Validator’s Validate Metal Specular mode colors all pixels that have a specular color value that is too low. This includes all non-metallic materials by definition.
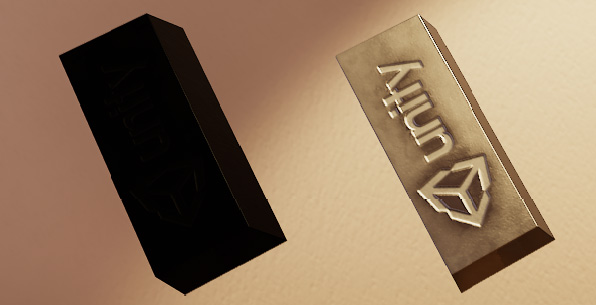
In the example below, the left material is below the minimum specular value, and therefore too dark. This also applies to the Scene’s background. The right material has specular values with in the valid range.

Pure Metals
Unity defines physically-based shading materials with a specular color greater than 155 sRGB as metallic. For Unity to define a metallic Material as a pure metal
If a non-metallic surface has a specular color value that is too high, but has a non-zero albedo value, this is often due to an authoring error. The Material Validator also has an option called Check Pure Metals. When you enable this option, the Material Validator colors in yellow any Material that Unity defines as metallic but which has a non-zero albedo value. An example of this can be seen in the images below. It shows three materials, the left and right materials are pure metals, but the middle material is not, so the Material Validator colors it yellow:
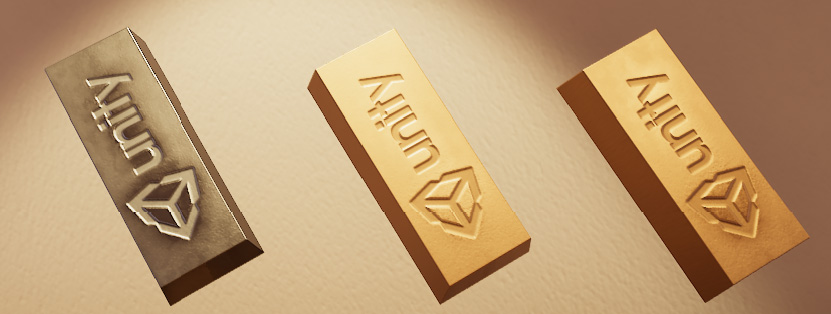

In the second image above, the background is red because the Materials in the background are below the minimum specular value for the Material Validator’s Validate Metal Specular mode.
For complex materials that combine metallic and non-metallic properties, the pure metal checker is likely to pick up some invalid pixels, but if a Material is totally invalid, it’s usually a sign of an authoring error.
Implementation
The Material Validator works with any Materials that use Unity’s Standard shader or surface shaders. However, custom shaders require a pass named "META". Most custom shaders that support lightmapping already have this pass defined. See documentation on Meta pass for more details.
Carry out the following steps to make your custom shader compatible with the Material Validator:
- Add the following pragma to the meta pass:
#pragma shader_feature EDITOR_VISUALIZATION - In the
UnityMetaInputstructure, assign the specular color of the Material to the field calledSpecularColor, as shown in the code example below.
Here is an example of a custom meta pass:
Pass
{
    Name "META"
    Tags { "LightMode"="Meta" }

    Cull Off

    CGPROGRAM
    #pragma vertex vert_meta
    #pragma fragment frag_meta

    #pragma shader_feature _EMISSION
    #pragma shader_feature _METALLICGLOSSMAP
    #pragma shader_feature _ _SMOOTHNESS_TEXTURE_ALBEDO_CHANNEL_A
    #pragma shader_feature ___ _DETAIL_MULX2
    #pragma shader_feature EDITOR_VISUALIZATION

    float4 frag_meta(v2f_meta i) : SV_TARGET
    {
        UnityMetaInput input;
        UNITY_INITIALIZE_OUTPUT(UnityMetaInput, input);
        float4 materialSpecularColor = float4(1.0f, 0.0f, 0.0f, 1.0f);
        float4 materialAlbedo = float4(0.0f, 1.0f, 0.0f, 1.0f);
        input.SpecularColor = materialSpecularColor;
        input.Albedo = materialAlbedo;

        return UnityMetaFragment(input);
    }
}
- 2018–03–28 Page published
- Material Validator updated in Unity 2017.3