Unity Manual
- Unity User Manual (2017.1)
- Working in Unity
- Basics
- Asset Workflow
- The Main Windows
- Creating Gameplay
- Editor Features
- Advanced Development
- Advanced Editor Topics
- Licenses and Activation
- Upgrade Guides
- 2D
- Graphics
- Graphics Overview
- Lighting
- Lighting overview
- Lighting Window
- Light Explorer
- Light sources
- Shadows
- Lighting Modes
- Global Illumination
- Light troubleshooting and performance
- Related topics
- Cameras
- Materials, Shaders & Textures
- Textures
- Creating and Using Materials
- Standard Shader
- Accessing and Modifying Material parameters via script
- Writing Shaders
- Legacy Shaders
- Video overview
- Terrain Engine
- Tree Editor
- Particle Systems
- Post-processing overview
- Reflection probes
- Cluster Rendering
- Advanced Rendering Features
- Procedural Materials
- Procedural Mesh Geometry
- Optimizing graphics performance
- Layers
- OctaneRender
- Lighting
- Graphics Reference
- Cameras Reference
- Shader Reference
- Writing Surface Shaders
- Writing vertex and fragment shaders
- Vertex and fragment shader examples
- Shader semantics
- Accessing shader properties in Cg/HLSL
- Providing vertex data to vertex programs
- Built-in shader include files
- Predefined Shader preprocessor macros
- Built-in shader helper functions
- Built-in shader variables
- Making multiple shader program variants
- GLSL Shader programs
- Shading Language used in Unity
- Shader Compilation Target Levels
- Shader data types and precision
- Using sampler states
- ShaderLab Syntax
- Shader assets
- Advanced ShaderLab topics
- Unity's Rendering Pipeline
- Performance tips when writing shaders
- Rendering with Replaced Shaders
- Custom Shader GUI
- Using Depth Textures
- Camera's Depth Texture
- Platform-specific rendering differences
- Shader Level of Detail
- Texture arrays
- Debugging DirectX 11 shaders with Visual Studio
- Implementing Fixed Function TexGen in Shaders
- Particle Systems reference
- Particle System
- Particle System modules
- Particle System Main module
- Emission module
- Particle System Shape Module
- Velocity Over Lifetime module
- Noise module
- Limit Velocity Over Lifetime module
- Inherit Velocity module
- Force Over Lifetime module
- Color Over Lifetime module
- Color By Speed module
- Size over Lifetime module
- Size by Speed module
- Rotation Over Lifetime module
- Rotation By Speed module
- External Forces module
- Collision module
- Triggers module
- Sub Emitters module
- Texture Sheet Animation module
- Lights module
- Trails module
- Custom Data module
- Renderer module
- Particle Systems (Legacy, prior to release 3.5)
- Visual Effects Reference
- Mesh Components
- Texture Components
- Rendering Components
- Rendering Pipeline Details
- Sprite Renderer
- Graphics HOWTOs
- How do I Import Alpha Textures?
- How do I Make a Skybox?
- How do I make a Mesh Particle Emitter? (Legacy Particle System)
- How do I make a Spot Light Cookie?
- How do I fix the rotation of an imported model?
- Water in Unity
- Art Asset best practice guide
- How do I import models from my 3D app?
- How to do Stereoscopic Rendering
- Graphics Tutorials
- Graphics Overview
- Physics
- Scripting
- Scripting Overview
- Creating and Using Scripts
- Variables and the Inspector
- Controlling GameObjects using components
- Event Functions
- Time and Framerate Management
- Creating and Destroying GameObjects
- Coroutines
- Namespaces
- Attributes
- Execution Order of Event Functions
- Understanding Automatic Memory Management
- Platform dependent compilation
- Special folders and script compilation order
- Generic Functions
- Scripting restrictions
- Script Serialization
- UnityEvents
- What is a Null Reference Exception?
- Important Classes
- Vector Cookbook
- Scripting Tools
- Event System
- Scripting Overview
- Multiplayer and Networking
- Networking Overview
- The High Level API
- Network System Concepts
- Setting up a Multiplayer Project from Scratch
- Using the Network Manager
- Object Spawning
- Custom Spawn Functions
- State Synchronization
- Remote Actions
- Player Objects
- Object Visibility
- Network Manager callbacks
- NetworkBehaviour callbacks
- Network Messages
- Local Discovery
- Scene Objects
- Converting a single-player game to Unity Multiplayer
- Multiplayer Lobby
- Network Clients and Servers
- Host Migration
- Using the Transport Layer API
- Setting up Unity Multiplayer
- Networking Tips for Mobile devices.
- UnityWebRequest
- The High Level API
- Networking Reference
- NetworkAnimator
- NetworkBehaviour
- NetworkClient
- NetworkConnection
- NetworkDiscovery
- NetworkIdentity
- Network Lobby Manager
- Network Lobby Player
- NetworkManager
- Network Manager HUD
- Network Proximity Checker
- NetworkReader
- NetworkServer
- NetworkStartPosition
- NetworkTransform
- NetworkTransformChild
- NetworkTransformVisualizer
- NetworkTransport
- NetworkWriter
- Networking Overview
- Audio
- Audio Overview
- Audio files
- Tracker Modules
- Audio Mixer
- Native Audio Plugin SDK
- Audio Profiler
- Ambisonic Audio
- Audio Reference
- Audio Clip
- Audio Listener
- Audio Source
- Audio Mixer
- Audio Filters
- Audio Effects
- Audio Low Pass Effect
- Audio High Pass Effect
- Audio Echo Effect
- Audio Flange Effect
- Audio Distortion Effect
- Audio Normalize Effect
- Audio Parametric Equalizer Effect
- Audio Pitch Shifter Effect
- Audio Chorus Effect
- Audio Compressor Effect
- Audio SFX Reverb Effect
- Audio Low Pass Simple Effect
- Audio Delay Effect
- Audio High Pass Simple Effect
- Reverb Zones
- Microphone
- Audio Settings
- Animation
- Animation System Overview
- Animation Clips
- Animation from external sources
- Animation Window Guide
- Animator Controllers
- Retargeting of Humanoid animations
- Performance and Optimization
- Animation Reference
- Animation HOWTOs
- Playables API
- A Glossary of animation terms
- Timeline
- UI
- Navigation and Pathfinding
- Navigation Overview
- Navigation System in Unity
- Inner Workings of the Navigation System
- Building a NavMesh
- NavMesh building components
- Advanced NavMesh Bake Settings
- Creating a NavMesh Agent
- Creating a NavMesh Obstacle
- Creating an Off-mesh Link
- Building Off-Mesh Links Automatically
- Building Height Mesh for Accurate Character Placement
- Navigation Areas and Costs
- Loading Multiple NavMeshes using Additive Loading
- Using NavMesh Agent with Other Components
- Navigation Reference
- Navigation How-Tos
- Navigation Overview
- Unity Services
- Setting up your project for Unity Services
- Unity Ads
- Unity Analytics
- Unity Cloud Build
- Unity IAP
- Setting up Unity IAP
- Cross Platform Guide
- Store Guides
- Implementing a Store
- Unity Collaborate
- Unity Performance Reporting
- Multiplayer Services
- Virtual Reality
- Open-source repositories
- Asset Store Publishing
- Platform-specific
- Standalone
- Apple Mac
- Apple TV
- WebGL
- WebGL Player Settings
- Getting started with WebGL development
- WebGL Browser Compatibility
- Building and running a WebGL project
- WebGL: Deploying compressed builds
- Debugging and trouble shooting WebGL builds
- WebGL Graphics
- WebGL Networking
- Using Audio In WebGL
- WebGL performance considerations
- Memory Considerations when targeting WebGL
- WebGL: Interacting with browser scripting
- Using WebGL Templates
- Cursor locking and full-screen mode in WebGL
- Input in WebGL
- iOS
- Getting started with iOS development
- iOS Player Settings
- iOS 2D Texture Overrides
- Upgrading to 64 bit iOS
- iOS Advanced Topics
- Features currently not supported by Unity iOS
- Troubleshooting on iOS devices
- Reporting crash bugs on iOS
- Android
- Getting started with Android development
- Android SDK/NDK setup
- Unity Remote
- Android Remote (DEPRECATED)
- Troubleshooting Android development
- Inside the Android build process
- Reporting crash bugs under Android
- Support for APK expansion files (OBB)
- Android Scripting
- Building and using plug-ins for Android
- Customizing an Android Splash Screen
- Single-Pass Stereo Rendering for Android
- Android Player Settings
- Android 2D Textures Overrides
- Gradle for Android
- Android Manifest
- Getting started with Android development
- Samsung TV
- Tizen
- Windows
- Windows General
- Universal Windows Platform
- Getting Started
- Universal Windows Platform: Deployment
- Universal Windows Platform: Profiler
- Universal Windows Platform: Command line arguments
- Universal Windows Platform: Association launching
- AppCallbacks class
- Universal Windows Platform: WinRT API in C# scripts
- Universal Windows Platform Player Settings
- Scripting Backends
- FAQ
- Universal Windows Platform: Examples
- Universal Windows Platform: Code snippets
- Known issues
- Windows Holographic
- Web Player
- Mobile Developer Checklist
- Experimental
- Legacy Topics
- Windows Store: Windows SDKs
- Asset Server (Team License)
- Legacy Network Reference Guide
- Legacy Asset Bundles
- Legacy Animation System
- Legacy GUI
- Legacy Unity Analytics (SDK Workflow)
- LegacyUnityRemote
- Best practice guides
- Expert guides
- New in Unity 2017.1
- Unity User Manual (2017.1)
- Working in Unity
- Asset Workflow
- Import Settings
Other Versions
Cannot access other versions offline!
Import Settings
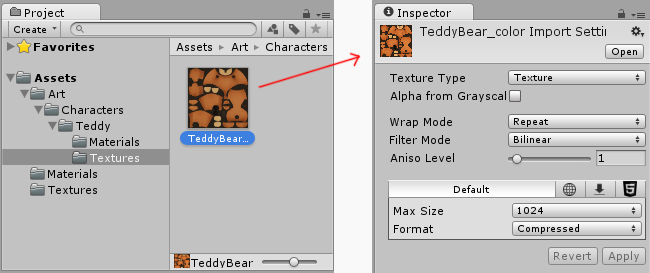
Each type of asset that Unity supports has a set of Import Settings, which affect how the asset appears or behaves. To view an asset’s import settings, select the asset in the Project View. The import settings for this asset will appear in the Inspector. The options that are displayed will vary depending on the type of asset that is selected.
For example, the import settings for an image will allow you to choose whether it’s imported as a texture, a 2D sprite, or a normal map. The import settings for an FBX file allow you to adjust the scale, generate normals or lightmap coordinates, and split & trim animation clips defined in the file.
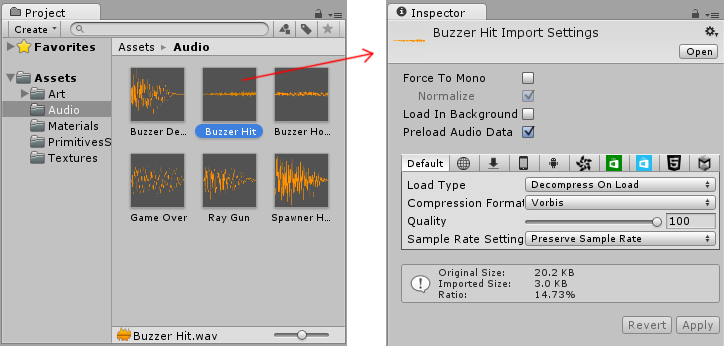
For other asset types, the import settings will look different. The various settings you see will relate to the type of asset selected. Here’s an example of an Audio asset, with its related import settings shown in the inspector.
If you are developing a cross-platform project, you can override the “default” settings and assign different import settings on a per-platform basis.
Did you find this page useful? Please give it a rating:
Thanks for rating this page!
What kind of problem would you like to report?
- This page needs code samples
- Code samples do not work
- Information is missing
- Information is incorrect
- Information is unclear or confusing
- There is a spelling/grammar error on this page
- Something else
Is something described here not working as you expect it to? It might be a Known Issue. Please check with the Issue Tracker at issuetracker.unity3d.com.
Thanks for letting us know! This page has been marked for review based on your feedback.
If you have time, you can provide more information to help us fix the problem faster.
Provide more information
Copyright © 2017 Unity Technologies. Publication: 2017.1-001R. Built: 2017-10-06.