Unity Manual
- Unity User Manual (2017.3)
- Working in Unity
- Basics
- Asset Workflow
- The Main Windows
- Creating Gameplay
- Editor Features
- Advanced Development
- Advanced Editor Topics
- Licenses and Activation
- Upgrade Guides
- 2D
- Graphics
- Graphics Overview
- Lighting
- Lighting overview
- Lighting Window
- Light Explorer
- Light sources
- Shadows
- Lighting Modes
- Global Illumination
- Light troubleshooting and performance
- Related topics
- Cameras
- Materials, Shaders & Textures
- Textures
- Creating and Using Materials
- Standard Shader
- Physically Based Rendering Material Validator
- Accessing and Modifying Material parameters via script
- Writing Shaders
- Legacy Shaders
- Video overview
- Terrain Engine
- Tree Editor
- Particle Systems
- Post-processing overview
- Reflection probes
- Advanced Rendering Features
- Procedural Materials
- Procedural Mesh Geometry
- Optimizing graphics performance
- Layers
- Lighting
- Graphics Reference
- Cameras Reference
- Shader Reference
- Writing Surface Shaders
- Writing vertex and fragment shaders
- Vertex and fragment shader examples
- Shader semantics
- Accessing shader properties in Cg/HLSL
- Providing vertex data to vertex programs
- Built-in shader include files
- Predefined Shader preprocessor macros
- Built-in shader helper functions
- Built-in shader variables
- Making multiple shader program variants
- GLSL Shader programs
- Shading Language used in Unity
- Shader Compilation Target Levels
- Shader data types and precision
- Using sampler states
- ShaderLab Syntax
- Shader assets
- Advanced ShaderLab topics
- Unity's Rendering Pipeline
- Performance tips when writing shaders
- Rendering with Replaced Shaders
- Custom Shader GUI
- Using Depth Textures
- Camera's Depth Texture
- Platform-specific rendering differences
- Shader Level of Detail
- Texture arrays
- Debugging DirectX 11 shaders with Visual Studio
- Implementing Fixed Function TexGen in Shaders
- Particle Systems reference
- Particle System
- Particle System modules
- Particle System Main module
- Emission module
- Particle System Shape Module
- Velocity over Lifetime module
- Noise module
- Limit Velocity Over Lifetime module
- Inherit Velocity module
- Force Over Lifetime module
- Color Over Lifetime module
- Color By Speed module
- Size over Lifetime module
- Size by Speed module
- Rotation Over Lifetime module
- Rotation By Speed module
- External Forces module
- Collision module
- Triggers module
- Sub Emitters module
- Texture Sheet Animation module
- Lights module
- Trails module
- Custom Data module
- Renderer module
- Particle Systems (Legacy, prior to release 3.5)
- Visual Effects Reference
- Mesh Components
- Texture Components
- Rendering Components
- Rendering Pipeline Details
- Sprite Renderer
- Graphics HOWTOs
- How do I Import Alpha Textures?
- How do I Make a Skybox?
- How do I make a Mesh Particle Emitter? (Legacy Particle System)
- How do I make a Spot Light Cookie?
- How do I fix the rotation of an imported model?
- Water in Unity
- Art Asset best practice guide
- How do I import models from my 3D app?
- How to do Stereoscopic Rendering
- Graphics Tutorials
- Graphics Overview
- Physics
- Scripting
- Scripting Overview
- Creating and Using Scripts
- Variables and the Inspector
- Controlling GameObjects using components
- Event Functions
- Time and Framerate Management
- Creating and Destroying GameObjects
- Coroutines
- Namespaces
- Attributes
- Execution Order of Event Functions
- Understanding Automatic Memory Management
- Platform dependent compilation
- Special folders and script compilation order
- Script compilation and assembly definition files
- Generic Functions
- Scripting restrictions
- Script Serialization
- UnityEvents
- What is a Null Reference Exception?
- Important Classes
- Vector Cookbook
- Scripting Tools
- Event System
- Scripting Overview
- Multiplayer and Networking
- Networking Overview
- The High Level API
- Network System Concepts
- Setting up a Multiplayer Project from Scratch
- Using the Network Manager
- Object Spawning
- Custom Spawn Functions
- State Synchronization
- Remote Actions
- Player Objects
- Object Visibility
- Network Manager callbacks
- NetworkBehaviour callbacks
- Network Messages
- Local Discovery
- Scene Objects
- Converting a single-player game to Unity Multiplayer
- Multiplayer Lobby
- Network Clients and Servers
- Host Migration
- Using the Transport Layer API
- Setting up Unity Multiplayer
- Networking Tips for Mobile devices.
- UnityWebRequest
- The High Level API
- Networking Reference
- NetworkAnimator
- NetworkBehaviour
- NetworkClient
- NetworkConnection
- NetworkDiscovery
- NetworkIdentity
- Network Lobby Manager
- Network Lobby Player
- NetworkManager
- Network Manager HUD
- Network Proximity Checker
- NetworkReader
- NetworkServer
- NetworkStartPosition
- NetworkTransform
- NetworkTransformChild
- NetworkTransformVisualizer
- NetworkTransport
- NetworkWriter
- Networking Overview
- Audio
- Audio Overview
- Audio files
- Tracker Modules
- Audio Mixer
- Native Audio Plugin SDK
- Audio Profiler
- Ambisonic Audio
- Audio Reference
- Audio Clip
- Audio Listener
- Audio Source
- Audio Mixer
- Audio Filters
- Audio Effects
- Audio Low Pass Effect
- Audio High Pass Effect
- Audio Echo Effect
- Audio Flange Effect
- Audio Distortion Effect
- Audio Normalize Effect
- Audio Parametric Equalizer Effect
- Audio Pitch Shifter Effect
- Audio Chorus Effect
- Audio Compressor Effect
- Audio SFX Reverb Effect
- Audio Low Pass Simple Effect
- Audio High Pass Simple Effect
- Reverb Zones
- Microphone
- Audio Settings
- Animation
- Animation System Overview
- Animation Clips
- Animation from external sources
- Animation Window Guide
- Animator Controllers
- Retargeting of Humanoid animations
- Performance and Optimization
- Animation Reference
- Animation HOWTOs
- Playables API
- A Glossary of animation terms
- Timeline
- UI
- Navigation and Pathfinding
- Navigation Overview
- Navigation System in Unity
- Inner Workings of the Navigation System
- Building a NavMesh
- NavMesh building components
- Advanced NavMesh Bake Settings
- Creating a NavMesh Agent
- Creating a NavMesh Obstacle
- Creating an Off-mesh Link
- Building Off-Mesh Links Automatically
- Building Height Mesh for Accurate Character Placement
- Navigation Areas and Costs
- Loading Multiple NavMeshes using Additive Loading
- Using NavMesh Agent with Other Components
- Navigation Reference
- Navigation How-Tos
- Navigation Overview
- Unity Services
- Setting up your project for Unity Services
- Unity Ads
- Unity Analytics
- Unity Cloud Build
- Unity IAP
- Setting up Unity IAP
- Cross Platform Guide
- Store Guides
- Implementing a Store
- IAP Promo
- Unity Collaborate
- Setting up Unity Collaborate
- Adding team members to your Unity Project
- Viewing history
- Enabling Cloud Build with Collaborate
- Managing Unity Editor versions
- Reverting files
- Resolving file conflicts
- Excluding Assets from publishing to Collaborate
- Publishing individual files to Collaborate
- Restoring previous versions of a project
- In-Progress edit notifications
- Collaborate troubleshooting tips
- Unity Performance Reporting
- Multiplayer Services
- Transferring Projects
- XR
- VR overview
- XR SDKs
- Unity XR input
- VR (XR) reference
- VR devices
- Mixed Reality Devices
- Single-Pass Stereo rendering
- VR Audio Spatializers
- Open-source repositories
- Asset Store Publishing
- Platform-specific
- Standalone
- Apple Mac
- Apple TV
- WebGL
- WebGL Player Settings
- Getting started with WebGL development
- WebGL Browser Compatibility
- Building and running a WebGL project
- WebGL: Deploying compressed builds
- Debugging and trouble shooting WebGL builds
- WebGL Graphics
- WebGL Networking
- Using Audio In WebGL
- WebGL performance considerations
- Memory Considerations when targeting WebGL
- WebGL: Interacting with browser scripting
- Using WebGL Templates
- Cursor locking and full-screen mode in WebGL
- Input in WebGL
- iOS
- Getting started with iOS development
- iOS Player Settings
- iOS 2D Texture Overrides
- Upgrading to 64 bit iOS
- iOS Advanced Topics
- Features currently not supported by Unity iOS
- Troubleshooting on iOS devices
- Reporting crash bugs on iOS
- Android
- Getting started with Android development
- Android SDK/NDK setup
- Unity Remote
- Android Remote (DEPRECATED)
- Troubleshooting Android development
- Inside the Android build process
- Reporting crash bugs under Android
- Support for APK expansion files (OBB)
- Android Scripting
- Building and using plug-ins for Android
- Customizing an Android Splash Screen
- Single-Pass Stereo Rendering for Android
- Android Player Settings
- Android 2D Textures Overrides
- Gradle for Android
- Android Manifest
- Getting started with Android development
- Windows
- Windows General
- Universal Windows Platform
- Getting Started
- Universal Windows Platform: Deployment
- Universal Windows Platform: Profiler
- Universal Windows Platform: Command line arguments
- Universal Windows Platform: Association launching
- AppCallbacks class
- Universal Windows Platform: WinRT API in C# scripts
- Universal Windows Platform Player Settings
- Scripting Backends
- FAQ
- Universal Windows Platform: Examples
- Universal Windows Platform: Code snippets
- Known issues
- Windows Holographic
- Web Player
- Mobile Developer Checklist
- Experimental
- Legacy Topics
- Windows Store: Windows SDKs
- Asset Server (Team License)
- Legacy Network Reference Guide
- Legacy Asset Bundles
- Legacy Animation System
- Legacy GUI
- Legacy Unity Analytics (SDK Workflow)
- LegacyUnityRemote
- Best practice guides
- Expert guides
- New in Unity 2017.3
- Unity User Manual (2017.3)
- Animation
- Animator Controllers
- Animation State Machines
- Animation Layers
Animation Layers
Unity uses Animation Layers for managing complex state machines for different body parts. An example of this is if you have a lower-body layer for walking-jumping, and an upper-body layer for throwing objects / shooting.
You can manage animation layers from the Layers Widget in the top-left corner of the Animator Controller.

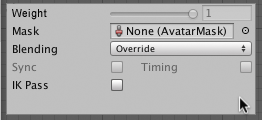
Clicking the gear wheel on the right of the window shows you the settings for this layer.

On each layer, you can specify the mask (the part of the animated model on which the animation would be applied), and the Blending type. Override means information from other layers will be ignored, while Additive means that the animation will be added on top of previous layers.
You can add a new layer by pressing the + above the widget.
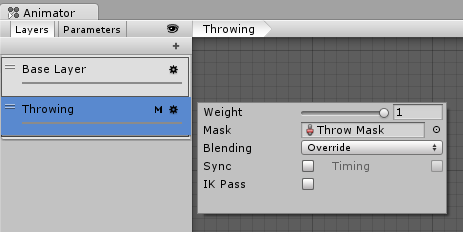
The Mask property is there to specify the mask used on this layer. For example if you wanted to play a throwing animation on just the upper body of your model, while having your character also able to walk, run or stand still at the same time, you would use a mask on the layer which plays the throwing animation where the upper body sections are defined, like this:

An ‘M’ symbol is visible in the Layers sidebar to indicate the layer has a mask applied.
For more on Avatar Body Masks, you can read this section
Animation Layer syncing
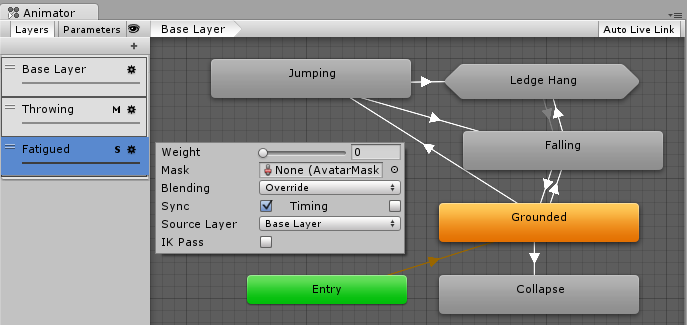
Sometimes it is useful to be able to re-use the same state machine in different layers. For example if you want to simulate “wounded” behavior, and have “wounded” animations for walk / run / jump instead of the “healthy” ones. You can click the Sync checkbox on one of your layers, and then select the layer you want to sync with. The state machine structure will then be the same, but the actual animation clips used by the states will be distinct.
This means the Synced layer does not have its own state machine definition at all - instead, it is an instance of the source of the synced layer. Any changes you make to the layout or structure of the state machine in the synced layer view (eg, adding/deleting states or transitions) is done to the source of the synced layer. The only changes that are unique to the synced layer are the selected animations used within each state.
The Timing checkbox allows the animator to adjust how long each animation in synced layers takes, determined by the weight. If Timing is unselected then animations on the synced layer will be adjusted. The adjustment will be stretched to the length of the animation on the original layer. If the option is selected the animation length will be a balance for both animations, based on weight. In both cases (chosen and not chosen) the animator adjusts the length of the animations. If not chosen then the original layer is the sole master. If chosen, it is then a compromise.

An ‘S’ is symbol is visible in the Layers sidebar to indicate the layer is a synced layer.
Did you find this page useful? Please give it a rating:
Thanks for rating this page!
What kind of problem would you like to report?
- This page needs code samples
- Code samples do not work
- Information is missing
- Information is incorrect
- Information is unclear or confusing
- There is a spelling/grammar error on this page
- Something else
Is something described here not working as you expect it to? It might be a Known Issue. Please check with the Issue Tracker at issuetracker.unity3d.com.
Thanks for letting us know! This page has been marked for review based on your feedback.
If you have time, you can provide more information to help us fix the problem faster.
Provide more information
You've told us this page needs code samples. If you'd like to help us further, you could provide a code sample, or tell us about what kind of code sample you'd like to see:
You've told us there are code samples on this page which don't work. If you know how to fix it, or have something better we could use instead, please let us know:
You've told us there is information missing from this page. Please tell us more about what's missing:
You've told us there is incorrect information on this page. If you know what we should change to make it correct, please tell us:
You've told us this page has unclear or confusing information. Please tell us more about what you found unclear or confusing, or let us know how we could make it clearer:
You've told us there is a spelling or grammar error on this page. Please tell us what's wrong:
You've told us this page has a problem. Please tell us more about what's wrong:
Thanks for helping to make the Unity documentation better!