Creating humanoid animation
This workflow demonstrates how to use a Timeline InstanceRefers to the link between a Timeline Asset and the GameObjects that the Timeline Asset animates in the scene. You create a Timeline instance by associating a Timeline Asset to a GameObject through a Playable Director component. The Timeline instance is scene-based. More info
See in Glossary to animate a humanoid character with external motion clips. This workflow also demonstrates how to match clip offsets, manually adjust clip offsets, and create blends between clips to minimize jumping and sliding. Although this workflow uses a humanoid character, you can use this animation method for any GameObjectThe fundamental object in Unity scenes, which can represent characters, props, scenery, cameras, waypoints, and more. A GameObject’s functionality is defined by the Components attached to it. More info
See in Glossary.
This workflow assumes that you have already created a TimelineGeneric term within Unity that refers to all features, windows, editors, and components related to creating, modifying, or reusing cut-scenes, cinematics, and game-play sequences. More info
See in Glossary instance with an empty Animation track bound to a humanoid.

From your project, drag a motion clip into the Animation track to create a new Animation clipAnimation data that can be used for animated characters or simple animations. It is a simple “unit” piece of motion, such as (one specific instance of) “Idle”, “Walk” or “Run”. More info
See in Glossary. For example, drag an idle pose as the first clip to start the humanoid from an idle position. Position and resize the idle clip as appropriate.

Add a second motion clip. In this example, a run and turn left clip (named Run_Left) is dragged onto the Animation track. Resize the Run_Left clip as appropriate. In this example, the Run_Left clip is resized to include one loop so that the Guard runs and turns 180 degrees.

Play the Timeline instance. Notice that the humanoid, Guard character, jumps between each Animation clip. This happens because the position of the humanoid character at the end of the first Animation clip (Idle) does not match the position at the start of the next Animation clip (Run_Left).
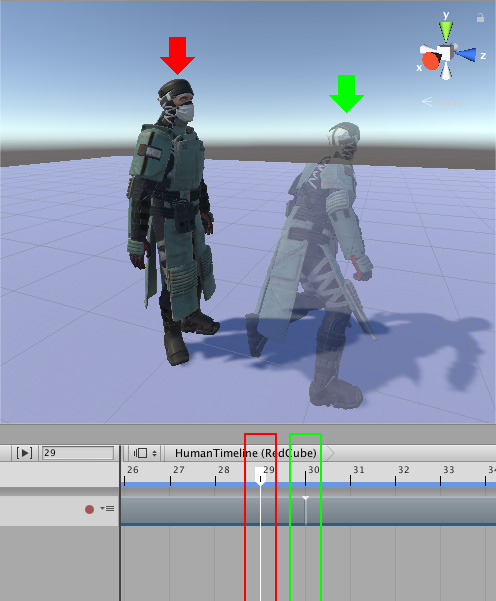
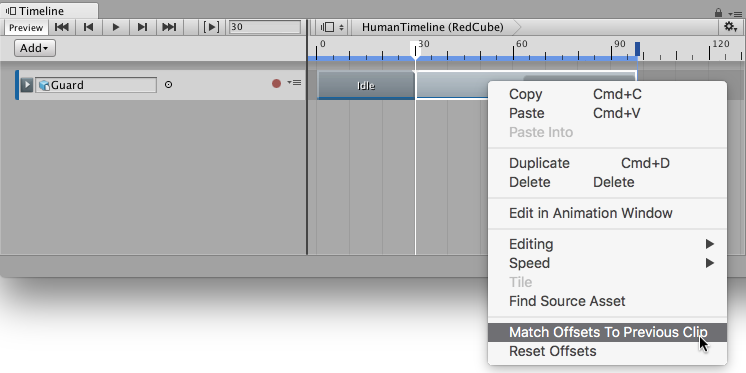
To fix the jump between clips, match the offset of each Animation clip. The Timeline Editor windowThe name of the window where you create, modify, and preview a Timeline instance. Modifications to a Timeline instance also affects the Timeline Asset. More info
See in Glossary provides a few different methods for matching offsets. In this example, the second Animation clip is matched with the previous clip. To do this, select the Run_Left clip, Right-click and select Match Offsets to Previous Clip.
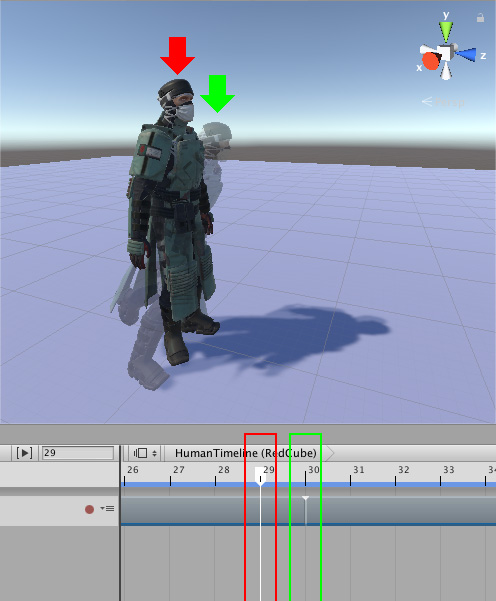
Play the Timeline instance again. Although the position and rotation of the humanoid matches, there is still a jump between the two Animation clips because the humanoid is in different poses. At the end of the first Animation clip, the humanoid is standing upright with its feet together. At the start of the second Animation clip, the humanoid is bent forward with its feet apart.
Create a blend to remove the jump and transition between the two poses. Adjust the size of the clips, the Blend AreaThe area where two Animation clips, Audio clips, or Control clips overlap. The overlap creates a transition that is referred to as a blend. The duration of the overlap is referred to as the blend area. The blend area sets the duration of the transition. More info
See in Glossary, the Clip In, and the shape of each Blend Curve to create a transition between the two poses. For example, in the transition between the Idle clip and the Run_Left clip, the Idle clip is changed to a duration of 36 and the Run_Left clip is repositioned to start at frame 25. The rest of the properties are left as their default values.

As the Idle clip transitions to the Run_Left clip, the blend removes the obvious jump between poses and transitions between most body parts naturally. However, blending between the different positions of the foot results in an unnatural foot slide.
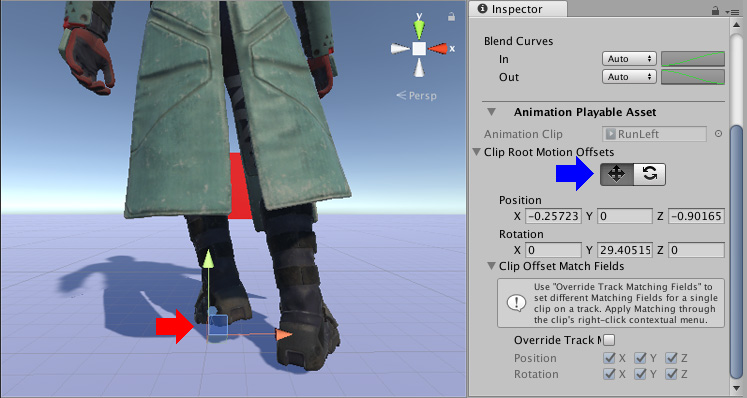
To fix foot sliding, you can manually adjust the root offset of an Animation clip so that the position of the foot changes less drastically, reducing the foot slide. To manually adjust the root offset, select the Animation clip in the Timeline Editor window. In the InspectorA Unity window that displays information about the currently selected GameObject, Asset or Project Settings, alowing you to inspect and edit the values. More info
See in Glossary window, expand Animation Playable AssetAny media or data that can be used in your game or Project. An asset may come from a file created outside of Unity, such as a 3D model, an audio file or an image. You can also create some asset types in Unity, such as an Animator Controller, an Audio Mixer or a Render Texture. More info
See in Glossary and expand Clip Root MotionMotion of character’s root node, whether it’s controlled by the animation itself or externally. More info
See in Glossary Offsets.
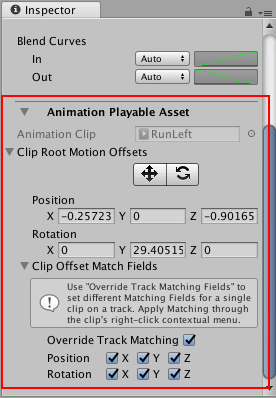
The Clip Root Motion Offsets, both position and rotation, are not zero because performing Match Offsets to Previous Clip already set these values to match the root (hips) of the previous humanoid at the end of the previous Animation clip.
Under Clip Root Motion Offsets, enable the Move tool. The Move GizmoA graphic overlay associated with a GameObject in a Scene, and displayed in the Scene View. Built-in scene tools such as the move tool are Gizmos, and you can create custom Gizmos using textures or scripting. Some Gizmos are only drawn when the GameObject is selected, while other Gizmos are drawn by the Editor regardless of which GameObjects are selected. More info
See in Glossary appears in the Scene viewAn interactive view into the world you are creating. You use the Scene View to select and position scenery, characters, cameras, lights, and all other types of Game Object. More info
See in Glossary, at the root of the Animation clip. Use one of the following methods to manual adjust the root offset position of the Animation clip:
In the sceneA Scene contains the environments and menus of your game. Think of each unique Scene file as a unique level. In each Scene, you place your environments, obstacles, and decorations, essentially designing and building your game in pieces. More info
See in Glossary view, drag the Move Gizmo.In the Inspector window, change the value of the appropriate Position property.
- 2017–12–07 Page published with limited editorial review
Did you find this page useful? Please give it a rating: