Unity Manual
- Unity User Manual 2022.1
- New in Unity 2022.1
- Packages and feature sets
- Released packages
- 2D Animation
- 2D Pixel Perfect
- 2D PSD Importer
- 2D SpriteShape
- 2D Tilemap Extras
- Adaptive Performance
- Addressables
- Advertisement Legacy
- Advertisement with Mediation
- Alembic
- Analytics
- Analytics Library
- Android Logcat
- Animation Rigging
- Apple ARKit XR Plugin
- AR Foundation
- Authentication
- Burst
- CCD Management
- Cinemachine
- Cloud Build
- Cloud Code
- Cloud Diagnostics
- Cloud Save
- Code Coverage
- Collections
- Device Simulator Devices
- Economy
- Editor Coroutines
- FBX Exporter
- Google ARCore XR Plugin
- In App Purchasing
- Input System
- iOS 14 Advertising Support
- JetBrains Rider Editor
- Live Capture
- Lobby
- Localization
- Magic Leap XR Plugin
- Mathematics
- ML Agents
- Mobile Notifications
- Multiplayer Tools
- Netcode for GameObjects
- Oculus XR Plugin
- OpenXR Plugin
- Polybrush
- Post Processing
- ProBuilder
- Profile Analyzer
- Recorder
- Relay
- Remote Config
- Scriptable Build Pipeline
- Sequences
- Splines
- System Metrics Mali
- Terrain Tools
- Test Framework
- TextMeshPro
- Timeline
- Tutorial Authoring Tools
- Tutorial Framework
- Unity Distribution Portal
- Unity Profiling Core API
- Unity Transport
- Version Control
- Visual Scripting
- Visual Studio Code Editor
- Visual Studio Editor
- WebGL Publisher
- XR Interaction Toolkit
- XR Plugin Management
- Release Candidates
- Pre-release packages
- Core packages
- Built-in packages
- AI
- Android JNI
- Animation
- Asset Bundle
- Audio
- Cloth
- Director
- Image Conversion
- IMGUI
- JSONSerialize
- NVIDIA
- Particle System
- Physics
- Physics 2D
- Screen Capture
- Terrain
- Terrain Physics
- Tilemap
- UI
- UIElements
- Umbra
- Unity Analytics
- Unity Web Request
- Unity Web Request Asset Bundle
- Unity Web Request Audio
- Unity Web Request Texture
- Unity Web Request WWW
- Vehicles
- Video
- VR
- Wind
- XR
- Experimental packages
- Packages by keywords
- Unity's Package Manager
- How Unity works with packages
- Concepts
- Configuration
- Package Manager window
- Access the Package Manager window
- List view
- Details view
- Features (detail) view
- Finding packages and feature sets
- Adding and removing
- Installing a feature set
- Installing from a registry
- Installing a package from a local folder
- Installing a package from a local tarball file
- Installing from a Git URL
- Adding a registry package by name
- Removing an installed package from a project
- Disabling a built-in package
- Switching to another package version
- Importing an Asset Store package
- Updating your Asset Store package
- Remove imported assets from a project
- Delete a package from the Asset Store cache
- Perform an action on multiple packages
- Finding package documentation
- Inspecting packages
- Scripting API for packages
- Scoped registries
- Resolution and conflict
- Project manifest
- Troubleshooting
- Creating custom packages
- Feature sets
- Released packages
- Working in Unity
- Installing Unity
- Upgrading Unity
- API updater
- Upgrade to Unity 2022.1
- Upgrading to Unity 2021 LTS
- Upgrading to Unity 2020 LTS
- Upgrading to Unity 2019 LTS
- Legacy Upgrade Guides
- Unity's interface
- Quickstart guides
- Create Gameplay
- Editor Features
- 2D and 3D mode settings
- Preferences
- Shortcuts Manager
- Build Settings
- Incremental build pipeline
- Project Settings
- Visual Studio C# integration
- RenderDoc Integration
- Editor Analytics
- Check For Updates
- IME in Unity
- Version Control
- Plastic SCM plugin for Unity
- Safe Mode
- Command line arguments
- Text-Based Scene Files
- Troubleshooting The Editor
- Analysis
- Memory in Unity
- Profiler overview
- Profiling your application
- Common Profiler markers
- The Profiler window
- Asset Loading Profiler module
- Audio Profiler module
- CPU Usage Profiler module
- File Access Profiler module
- Global Illumination Profiler module
- GPU Usage Profiler module
- Memory Profiler module
- Physics Profiler module
- 2D Physics Profiler module
- Rendering Profiler module
- UI and UI Details Profiler
- Video Profiler module
- Virtual Texturing Profiler module
- Customizing the Profiler
- Low-level native plug-in Profiler API
- Profiling tools
- Log files
- Understanding optimization in Unity
- Asset loading metrics
- Asset workflow
- Input
- 2D
- 2D game development quickstart guide
- 2D Sorting
- Sprites
- Tilemap
- Physics Reference 2D
- Graphics
- Render pipelines
- Render pipelines introduction
- Render pipeline feature comparison
- How to get, set, and configure the active render pipeline
- Choosing and configuring a render pipeline and lighting solution
- Using the Built-in Render Pipeline
- Using the Universal Render Pipeline
- Using the High Definition Render Pipeline
- Scriptable Render Pipeline fundamentals
- Creating a custom render pipeline
- Cameras
- Lighting
- Introduction to lighting
- Light sources
- Shadows
- The Lighting window
- Lighting Settings Asset
- The Light Explorer window
- Lightmapping
- The Progressive Lightmapper
- Lightmapping using Enlighten Baked Global Illumination
- Lightmapping: Getting started
- Lightmap Parameters Asset
- Directional Mode
- Lightmaps and LOD
- Ambient occlusion
- Lightmaps: Technical information
- Lightmapping and shaders
- Lightmap UVs introduction
- Lightmap seam stitching
- Custom fall-off
- Realtime Global Illumination using Enlighten
- Light Probes
- Reflection Probes
- Precomputed lighting data
- Scene View Draw Modes for lighting
- Models
- Meshes
- Textures
- Importing Textures
- Texture formats
- Mipmaps
- Render Texture
- Custom Render Textures
- Movie Textures
- 3D textures
- Texture arrays
- Cubemaps
- Cubemap arrays
- Streaming Virtual Texturing
- Streaming Virtual Texturing requirements and compatibility
- How Streaming Virtual Texturing works
- Enabling Streaming Virtual Texturing in your project
- Using Streaming Virtual Texturing in Shader Graph
- Cache Management for Virtual Texturing
- Marking textures as "Virtual Texturing Only"
- Virtual Texturing error material
- Sparse Textures
- Loading texture and mesh data
- Shaders
- Shaders core concepts
- Built-in shaders
- Standard Shader
- Standard Particle Shaders
- Autodesk Interactive shader
- Legacy Shaders
- Using Shader Graph
- Writing shaders
- Writing shaders overview
- ShaderLab
- ShaderLab: defining a Shader object
- ShaderLab: defining a SubShader
- ShaderLab: defining a Pass
- ShaderLab: adding shader programs
- ShaderLab: specifying package requirements
- ShaderLab: commands
- ShaderLab: grouping commands with the Category block
- ShaderLab command: AlphaToMask
- ShaderLab command: Blend
- ShaderLab command: BlendOp
- ShaderLab command: ColorMask
- ShaderLab command: Conservative
- ShaderLab command: Cull
- ShaderLab command: Offset
- ShaderLab command: Stencil
- ShaderLab command: UsePass
- ShaderLab command: GrabPass
- ShaderLab command: ZClip
- ShaderLab command: ZTest
- ShaderLab command: ZWrite
- ShaderLab legacy functionality
- HLSL in Unity
- GLSL in Unity
- Example shaders
- Writing Surface Shaders
- Writing shaders for different graphics APIs
- Understanding shader performance
- Materials
- Visual effects
- Post-processing and full-screen effects
- Particle systems
- Choosing your particle system solution
- Built-in Particle System
- Using the Built-in Particle System
- Particle System vertex streams and Standard Shader support
- Particle System GPU Instancing
- Particle System C# Job System integration
- Components and Modules
- Particle System
- Particle System modules
- Main module
- Emission module
- Shape module
- Velocity over Lifetime module
- Noise module
- Limit Velocity over Lifetime module
- Inherit Velocity module
- Lifetime by Emitter Speed module
- Force over Lifetime module
- Color over Lifetime module
- Color by Speed module
- Size over Lifetime module
- Size by Speed module
- Rotation over Lifetime module
- Rotation by Speed module
- External Forces module
- Collision module
- Triggers module
- Sub Emitters module
- Texture Sheet Animation module
- Lights module
- Trails module
- Custom Data module
- Renderer module
- Particle System Force Field
- Visual Effect Graph
- Decals and projectors
- Lens flares and halos
- Lines, trails, and billboards
- Sky
- Color
- Graphics API support
- Graphics performance and profiling
- Render pipelines
- World building
- Physics
- Built-in 3D Physics
- Character control
- Rigidbody physics
- Collision
- Introduction to collision
- Continuous collision detection (CCD)
- Create a vehicle with Wheel Colliders
- Physics Debug Visualization
- Box Collider component reference
- Capsule Collider component reference
- Terrain Collider component reference
- Wheel Collider component reference
- Mesh Collider component reference
- Sphere Collider component reference
- Physic Material component reference
- Joints
- Articulations
- Ragdoll physics
- Cloth
- Multi-scene physics
- Built-in 3D Physics
- Scripting
- Setting Up Your Scripting Environment
- Scripting concepts
- Important Classes
- Important Classes - GameObject
- Important Classes - MonoBehaviour
- Important Classes - Object
- Important Classes - Transform
- Important Classes - Vectors
- Important Classes - Quaternion
- ScriptableObject
- Important Classes - Time
- Important Classes - Mathf
- Important Classes - Random
- Important Classes - Debug
- Important Classes - Gizmos & Handles
- Unity architecture
- Plug-ins
- C# Job System
- Multiplayer and Networking
- Multiplayer Overview
- Setting up a multiplayer project
- Using the Network Manager
- Using the Network Manager HUD
- The Network Manager HUD in LAN mode
- The Network Manager HUD in Matchmaker mode
- Converting a single-player game to Unity Multiplayer
- Debugging Information
- Multiplayer Component Reference
- Multiplayer Classes Reference
- Multiplayer Encryption Plug-ins
- UnityWebRequest
- Audio
- Audio Overview
- Audio files
- Tracker Modules
- Audio Mixer
- Native Audio Plugin SDK
- Audio Profiler
- Ambisonic Audio
- Audio Reference
- Audio Clip
- Audio Listener
- Audio Source
- Audio Mixer
- Audio Filters
- Audio Effects
- Audio Low Pass Effect
- Audio High Pass Effect
- Audio Echo Effect
- Audio Flange Effect
- Audio Distortion Effect
- Audio Normalize Effect
- Audio Parametric Equalizer Effect
- Audio Pitch Shifter Effect
- Audio Chorus Effect
- Audio Compressor Effect
- Audio SFX Reverb Effect
- Audio Low Pass Simple Effect
- Audio High Pass Simple Effect
- Reverb Zones
- Microphone
- Audio Settings
- Video overview
- Animation
- Animation System Overview
- Rotation in animations
- Animation Clips
- Animator Controllers
- Retargeting of Humanoid animations
- Performance and optimization
- Animation Reference
- Animation FAQ
- Playables API
- A Glossary of animation terms
- Create user interfaces (UI)
- Comparison of UI systems in Unity
- UI Toolkit
- Get started with UI Toolkit
- UI Builder
- Structure UI with UXML
- The visual tree
- Write UXML Templates
- Load UXML from C# scripts
- UXML elements reference
- UXML element BindableElement
- UXML element BoundsField
- UXML element BoundsIntField
- UXML element Box
- UXML element Button
- UXML element ColorField
- UXML element CurveField
- UXML element DoubleField
- UXML element DropdownField
- UXML element EnumField
- UXML element EnumFlagsField
- UXML element FloatField
- UXML element Foldout
- UXML element GradientField
- UXML element GroupBox
- UXML element Hash128Field
- UXML element HelpBox
- UXML element IMGUIContainer
- UXML element Image
- UXML element InspectorElement
- UXML element IntegerField
- UXML element Label
- UXML element LayerField
- UXML element LayerMaskField
- UXML element LongField
- UXML element ListView
- UXML element MaskField
- UXML element MinMaxSlider
- UXML element MultiColumnListView
- UXML element MultiColumnTreeView
- UXML element ObjectField
- UXML element PopupWindow
- UXML element ProgressBar
- UXML element PropertyField
- UXML element RadioButton
- UXML element RadioButtonGroup
- UXML element RectField
- UXML element RectIntField
- UXML element RepeatButton
- UXML element ScrollView
- UXML element Scroller
- UXML element Slider
- UXML element SliderInt
- UXML element TagField
- UXML element TextElement
- UXML element TextField
- UXML element Toggle
- UXML element Toolbar
- UXML element ToolbarBreadcrumbs
- UXML element ToolbarButton
- UXML element ToolbarMenu
- UXML element ToolbarPopupSearchField
- UXML element ToolbarSearchField
- UXML element ToolbarSpacer
- UXML element ToolbarToggle
- UXML element TreeView
- UXML element TwoPaneSplitView
- UXML element Vector2Field
- UXML element Vector2IntField
- UXML element Vector3Field
- UXML element Vector3IntField
- UXML element Vector4Field
- UXML element VisualElement
- Style UI with USS
- Control behavior with events
- Controls
- Manage UI asset references from C# scripts
- Support for Editor UI
- Create a custom Editor window
- Create a Custom Inspector
- SerializedObject data binding
- Bindable elements reference
- Bindable data types and fields
- Binding system implementation details
- Binding examples
- Bind with binding path in C# script
- Bind without the binding path
- Bind with UXML and C# script
- Create a binding with the Inspector
- Bind to nested properties
- Bind to a UXML template
- Receive callbacks when a bound property changes
- Receive callbacks when any bound properties change
- Bind to a list with ListView
- Bind to a list without ListView
- Bind a custom control
- Bind a custom control to custom data type
- ViewData persistence
- Support for runtime UI
- Work with text
- Examples
- Create a transition in a custom Editor window
- Create a drag-and-drop UI inside a custom Editor window
- Create a drag-and-drop UI to drag between Editor windows
- Create list and tree views
- Create a tabbed menu for runtime
- Create a transition event
- Create looping transitions
- Create a pop-up window
- Wrap content inside a scroll view
- Migration guides
- Unity UI
- Immediate Mode GUI (IMGUI)
- Navigation and Pathfinding
- Navigation Overview
- Navigation System in Unity
- Inner Workings of the Navigation System
- Building a NavMesh
- NavMesh building components
- Advanced NavMesh Bake Settings
- Creating a NavMesh Agent
- Creating a NavMesh Obstacle
- Creating an OffMesh Link
- Building OffMesh Links Automatically
- Building Height Mesh for Accurate Character Placement
- Navigation Areas and Costs
- Loading Multiple NavMeshes using Additive Loading
- Using NavMesh Agent with Other Components
- Navigation Reference
- Navigation How-Tos
- Navigation Overview
- Unity Services
- Setting up your project for Unity services
- Unity Organizations
- Unity Ads
- Unity Analytics
- Unity Analytics Overview
- Setting Up Analytics
- Analytics Dashboard
- Analytics events
- Funnels
- Remote Settings
- Unity Analytics A/B Testing
- Monetization
- User Attributes
- Unity Analytics Raw Data Export
- Data reset
- Upgrading Unity Analytics
- COPPA Compliance
- Unity Analytics and the EU General Data Protection Regulation (GDPR)
- Unity Analytics and PIPL
- Analytics Metrics, Segments, and Terminology
- Unity Cloud Build
- Unity Cloud Content Delivery
- Unity IAP
- Setting up Unity IAP
- Cross Platform Guide
- Codeless IAP
- Defining products
- Subscription Product support
- Initialization
- Browsing Product Metadata
- Initiating Purchases
- Processing Purchases
- Handling purchase failures
- Restoring Transactions
- Purchase Receipts
- Receipt validation
- Store Extensions
- Cross-store installation issues with Android in-app purchase stores
- Store Guides
- Implementing a Store
- Unity Cloud Diagnostics
- Unity Integrations
- Multiplayer Services
- Unity Distribution Portal
- Unity Accelerator
- XR
- Unity's Asset Store
- Asset Store packages
- Publishing to the Asset Store
- Creating your Publisher Account
- Creating a new package draft
- Deleting a package draft
- Uploading assets to your package
- Filling in the package details
- Submitting your package for approval
- Viewing the status of your Asset Store submissions
- Collecting revenue
- Providing support to your customers
- Adding tags to published packages
- Connecting your account to Google Analytics
- Promoting your Assets
- Refunding your customers
- Upgrading packages
- Deprecating your Assets
- Issuing vouchers
- Managing your publishing team
- Asset Store Publisher portal
- Platform development
- Using Unity as a Library in other applications
- Deep linking
- Xcode frame debugger Unity integration
- Android
- Introducing Android
- Getting started with Android
- Developing for Android
- Android mobile scripting
- Input for Android devices
- Android application size restrictions
- Graphics for Android
- Testing and debugging
- Create and use plug-ins in Android
- Integrating Unity into Android applications
- Deep linking on Android
- Android thread configuration
- Device features and permissions
- Building and delivering for Android
- Chrome OS
- iOS
- Introducing iOS
- Getting started with iOS
- Developing for iOS
- Building and delivering for iOS
- Troubleshooting on iOS devices
- Reporting crash bugs on iOS
- Linux
- macOS
- tvOS
- WebGL
- Windows
- Universal Windows Platform
- Unity Search
- Legacy Topics
- Asset Server (Team License)
- Legacy Asset Bundles
- Legacy Animation System
- Navigation and Pathfinding
- Navigation Overview
- Navigation System in Unity
- Inner Workings of the Navigation System
- Building a NavMesh
- NavMesh building components
- Advanced NavMesh Bake Settings
- Creating a NavMesh Agent
- Creating a NavMesh Obstacle
- Creating an OffMesh Link
- Building OffMesh Links Automatically
- Building Height Mesh for Accurate Character Placement
- Navigation Areas and Costs
- Loading Multiple NavMeshes using Additive Loading
- Using NavMesh Agent with Other Components
- Navigation Reference
- Navigation How-Tos
- Navigation Overview
- Legacy Unity Analytics (SDK Workflow)
- Glossary
- Unity User Manual 2022.1
- 2D
- Sprites
- Sprite Editor
Sprite Editor
Sometimes a Sprite Texture contains just a single graphic element but it is often more convenient to combine several related graphics together into a single image. For example, the image could contain component parts of a single character, as with a car whose wheels move independently of the body. Unity makes it easy to extract elements from a composite image by providing a Sprite Editor for the purpose.
Note: Make sure the graphic you want to edit has its Texture Type set to Sprite (2D and UI). Refer to the SpritesA 2D graphic objects. If you are used to working in 3D, Sprites are essentially just standard textures but there are special techniques for combining and managing sprite textures for efficiency and convenience during development. More info
See in Glossary documentation for information on importing and setting up Sprites.
Sprite Textures with multiple elements need the Sprite Mode to be set to Multiple in the InspectorA Unity window that displays information about the currently selected GameObject, asset or project settings, allowing you to inspect and edit the values. More info
See in Glossary. (Texture Import Inspector image below.)
Opening the Sprite Editor
To open the Sprite Editor:
-
Select the 2D image you want to edit from the Project View (Fig 1: Project View).
Note that you can’t edit a Sprite by selecting it in the SceneA Scene contains the environments and menus of your game. Think of each unique Scene file as a unique level. In each Scene, you place your environments, obstacles, and decorations, essentially designing and building your game in pieces. More info
See in Glossary View. Click on the Sprite Editor button in the Texture Import InspectorAn Inspector that allows you to define how your images are imported from your project’s
Assetsfolder into the Unity Editor. More info
See in Glossary (Fig 2: Texture Import Inspector) and the Sprite Editor displays (Fig 3: Sprite Editor).
Note: You can only see the Sprite Editor button if the Texture Type on the image you have selected is set to Sprite (2D and UI).

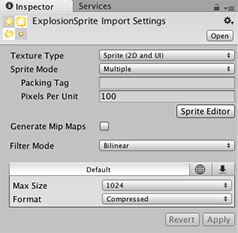
Note: Set the Sprite Mode to Multiple in the Texture Import Inspector if your image has several elements.

Along with the composite image, you will see a number of controls in the bar at the top of the window. The slider at the top right controls the zoom, while the color bar button to its left chooses whether you view the image itself or its alpha levels. The right-most slider controls the pixilation (mipmap) of the Texture. Moving the slider to the left reduces the resolution of the Sprite Texture. The most important control is the Slice menu at the top left, which gives you options for separating the elements of the image automatically.
Select the Apply and Revert buttons to keep or discard any changes you have made in the Sprite Editor window respectively. You set these buttons to show a confirmation dialog box before applying their effects in Unity’s Preferences window (menu: Edit > Preferences…). In the Preferences window, go to 2D > Sprite Editor Window to open the Sprite Editor window options.

Select the respective option to have a dialog box appear after selecting Apply or Revert to confirm your selection, preventing accidental saving or discarding of changes made.
Using the Editor
The most direct way to use the editor is to identify the elements manually. If you click on the image, you will see a rectangular selection area appear with handles in the corners. You can drag the handles or the edges of the SpriteRect to resize it around a specific element. Having isolated an element, you can add another by dragging a new SpriteRect in a separate part of the image. You’ll notice that when you have a SpriteRect selected, a panel appears in the bottom right of the window:
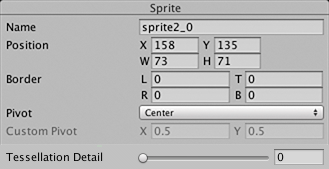
The controls in the panel let you choose a name for the Sprite graphic and set the position and size of the SpriteRect by its coordinates. A border width, for left, top, right and bottom can be specified in pixelsThe smallest unit in a computer image. Pixel size depends on your screen resolution. Pixel lighting is calculated at every screen pixel. More info
See in Glossary. The borders are useful when 9-Slicing Sprites. There are also settings for the Sprite’s pivot, which Unity uses as the coordinate origin and main “anchor point” of the graphic. You can choose from a number of default SpriteRect-relative positions (eg, Center, Top Right, etc) or use custom coordinates.
The Trim button next to the Slice menu item will resize the SpriteRect so that it fits tightly around the edge of the graphic based on transparency.
Note: Borders are only supported for the UI(User Interface) Allows a user to interact with your application. Unity currently supports three UI systems. More info
See in Glossary system, not for the 2D Sprite RendererA component that lets you display images as Sprites for use in both 2D and 3D scenes. More info
See in Glossary.
Automatic Slicing
Select the Slice tool and set its Type to Automatic to have Unity automatically slice a Texture into multiple individual Sprites by generating boundaries based on the surrounding transparency of each potential Sprite. For example, you can use Automatic Slicing to isolate regularly spaced graphical elements in a Texture, such as individual TilesA simple class that allows a sprite to be rendered on a Tilemap. More info
See in Glossary in a tile sheet.
After selecting the Slice tool from the Sprite Editor toolbarA row of buttons and basic controls at the top of the Unity Editor that allows you to interact with the Editor in various ways (e.g. scaling, translation). More info
See in Glossary and setting its Type to Automatic, the following editor panel appears:

In this panel, you can set the default pivot for each sliced Sprite with the Pivot and Custom Pivot options. If there are existing selections in the editor window before applying the Automatic slicing, select from the following options in the Method menu to choose how Unity handles the existing selections:
| Method | Function |
|---|---|
| Delete Existing | Deletes all SpriteRects in the Texture and adds the newly sliced SpriteRects. |
| Smart | If a newly sliced SpriteRect overlaps with one or more existing SpriteRects, the best overlapping original SpriteRect will have its position and size updated to the newly sliced SpriteRect. This newly sliced SpriteRect will then be discarded. |
| Safe | Maintains all original SpriteRects. If a newly sliced SpriteRect overlaps with an existing SpriteRect, it will be discarded. |
Grid by Cell Size or Grid by Cell Count options are also available for the slicing type. This is very useful when the Sprites have already been laid out in a regular pattern during creation:
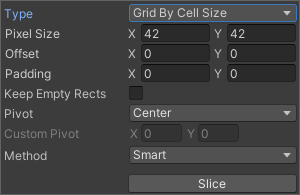

The Pixel Size values determine the height and width of the tiles in pixels. If you chose grid by cell count, Column & Row determines the number of columns and rows used for slicing. You can also use the Offset values to shift the grid position from the top-left of the image and the Padding values to inset the SpriteRects slightly from the grid. The Keep Empty Rects option lets you keep SpriteRects that do not have any pixels within them. This is useful for organising Sprites created from the texture based on their position in the texture. The Pivot can be set with one of nine preset locations or a Custom Pivot location can be set.
The Isometric Grid option attempts to slice the Sprite sheet which has its Sprites laid out in alternating rows of half height diamonds. When sliced, the resulting SpriteRects will have custom outlines and physics shapes corresponding to the half height diamonds.
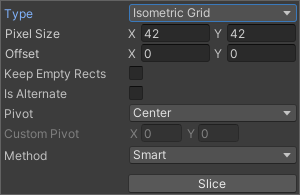
The Is Alternate option determines if the isometric diamonds are staggered across alternate rows. If set, the top most row is assumed to have its first diamond starting half a pixel size from the left side. If not, it assumes that the first diamond starts from the left side directly.
When slicing with the Grid options, previews of the SpriteRects are shown on the texture to help guide the slicing. Adjusting the slicing settings will update the previews accordingly. The preview SpriteRects shown may not be generated after slicing depending on the method used for handling existing SpriteRects or the pixel contents of the preview SpriteRects.
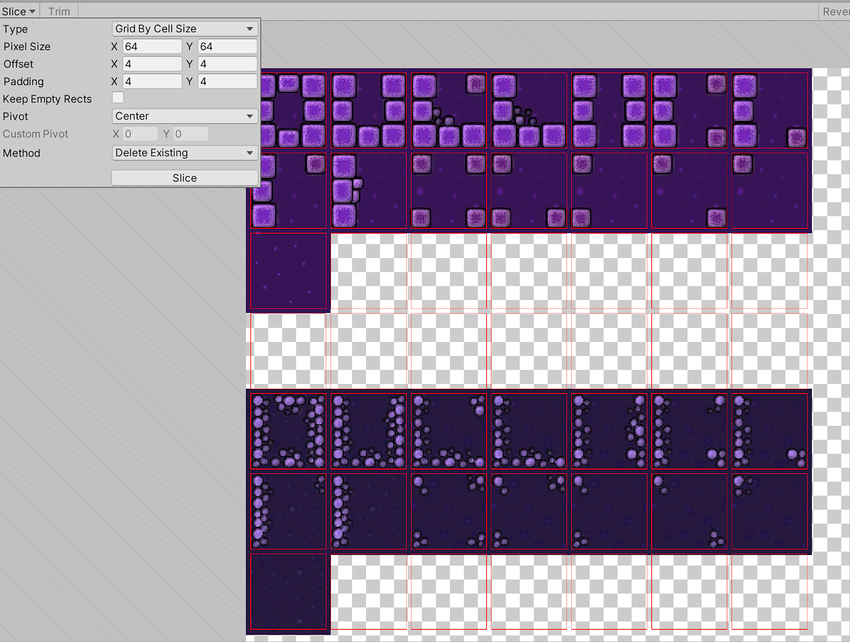
Note that you can manually edit any SpriteRect generated by any of these Automatic Slicing methods to fine-tune the shape of the SpriteRects.
Polygon Resizing
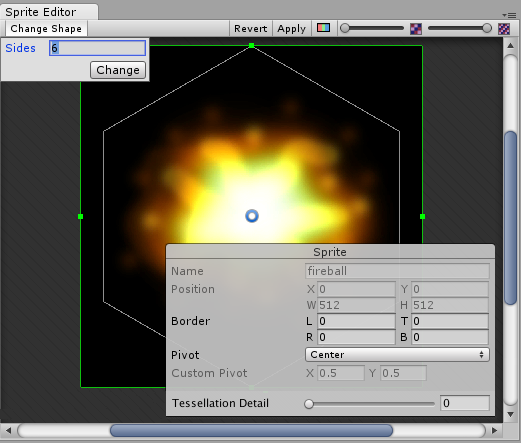
Open the Sprite Editor for a polygon and you have the option to change its shape, size, and pivot position.
Polygon shape

Enter the number of sides you want the polygon to have in the Sides field and click Change.
Polygon size and pivot
Polygon size
To change the polygon’s size, click on the Sprite to display green border lines and the Sprite information box. Click and drag on the green lines to create the border you want, and the values in the Border fields change.
Polygon pivot
To change the polygon’s pivot point (that is the axis point the polygon moves around), click on the image to display the Sprite information box. Click on the Pivot drop down menu and select an option. This displays a blue pivot circle on the polygon; its location depends on the pivot option to you have selected. If you want to change it further, select Custom Pivot and click and drag on the blue pivot circle to position it.
- Isometic Grid slicing option added to Sprite Editor in 2021.1 NewIn20211