Unity Manual
- Unity User Manual 2022.1
- New in Unity 2022.1
- Packages and feature sets
- Released packages
- 2D Animation
- 2D Pixel Perfect
- 2D PSD Importer
- 2D SpriteShape
- 2D Tilemap Extras
- Adaptive Performance
- Addressables
- Advertisement Legacy
- Advertisement with Mediation
- Alembic
- Analytics
- Analytics Library
- Android Logcat
- Animation Rigging
- Apple ARKit XR Plugin
- AR Foundation
- Authentication
- Burst
- CCD Management
- Cinemachine
- Cloud Build
- Cloud Code
- Cloud Diagnostics
- Cloud Save
- Code Coverage
- Collections
- Device Simulator Devices
- Economy
- Editor Coroutines
- FBX Exporter
- Google ARCore XR Plugin
- In App Purchasing
- Input System
- iOS 14 Advertising Support
- JetBrains Rider Editor
- Live Capture
- Lobby
- Localization
- Magic Leap XR Plugin
- Mathematics
- ML Agents
- Mobile Notifications
- Multiplayer Tools
- Netcode for GameObjects
- Oculus XR Plugin
- OpenXR Plugin
- Polybrush
- Post Processing
- ProBuilder
- Profile Analyzer
- Recorder
- Relay
- Remote Config
- Scriptable Build Pipeline
- Sequences
- Splines
- System Metrics Mali
- Terrain Tools
- Test Framework
- TextMeshPro
- Timeline
- Tutorial Authoring Tools
- Tutorial Framework
- Unity Distribution Portal
- Unity Profiling Core API
- Unity Transport
- Version Control
- Visual Scripting
- Visual Studio Code Editor
- Visual Studio Editor
- WebGL Publisher
- XR Interaction Toolkit
- XR Plugin Management
- Release Candidates
- Pre-release packages
- Core packages
- Built-in packages
- AI
- Android JNI
- Animation
- Asset Bundle
- Audio
- Cloth
- Director
- Image Conversion
- IMGUI
- JSONSerialize
- NVIDIA
- Particle System
- Physics
- Physics 2D
- Screen Capture
- Terrain
- Terrain Physics
- Tilemap
- UI
- UIElements
- Umbra
- Unity Analytics
- Unity Web Request
- Unity Web Request Asset Bundle
- Unity Web Request Audio
- Unity Web Request Texture
- Unity Web Request WWW
- Vehicles
- Video
- VR
- Wind
- XR
- Experimental packages
- Packages by keywords
- Unity's Package Manager
- How Unity works with packages
- Concepts
- Configuration
- Package Manager window
- Access the Package Manager window
- List view
- Details view
- Features (detail) view
- Finding packages and feature sets
- Adding and removing
- Installing a feature set
- Installing from a registry
- Installing a package from a local folder
- Installing a package from a local tarball file
- Installing from a Git URL
- Adding a registry package by name
- Removing an installed package from a project
- Disabling a built-in package
- Switching to another package version
- Importing an Asset Store package
- Updating your Asset Store package
- Remove imported assets from a project
- Delete a package from the Asset Store cache
- Perform an action on multiple packages
- Finding package documentation
- Inspecting packages
- Scripting API for packages
- Scoped registries
- Resolution and conflict
- Project manifest
- Troubleshooting
- Creating custom packages
- Feature sets
- Released packages
- Working in Unity
- Installing Unity
- Upgrading Unity
- API updater
- Upgrade to Unity 2022.1
- Upgrading to Unity 2021 LTS
- Upgrading to Unity 2020 LTS
- Upgrading to Unity 2019 LTS
- Legacy Upgrade Guides
- Unity's interface
- Quickstart guides
- Create Gameplay
- Editor Features
- 2D and 3D mode settings
- Preferences
- Shortcuts Manager
- Build Settings
- Incremental build pipeline
- Project Settings
- Visual Studio C# integration
- RenderDoc Integration
- Editor Analytics
- Check For Updates
- IME in Unity
- Version Control
- Plastic SCM plugin for Unity
- Safe Mode
- Command line arguments
- Text-Based Scene Files
- Troubleshooting The Editor
- Analysis
- Memory in Unity
- Profiler overview
- Profiling your application
- Common Profiler markers
- The Profiler window
- Asset Loading Profiler module
- Audio Profiler module
- CPU Usage Profiler module
- File Access Profiler module
- Global Illumination Profiler module
- GPU Usage Profiler module
- Memory Profiler module
- Physics Profiler module
- 2D Physics Profiler module
- Rendering Profiler module
- UI and UI Details Profiler
- Video Profiler module
- Virtual Texturing Profiler module
- Customizing the Profiler
- Low-level native plug-in Profiler API
- Profiling tools
- Log files
- Understanding optimization in Unity
- Asset loading metrics
- Asset workflow
- Input
- 2D
- 2D game development quickstart guide
- 2D Sorting
- Sprites
- Tilemap
- Physics Reference 2D
- Graphics
- Render pipelines
- Render pipelines introduction
- Render pipeline feature comparison
- How to get, set, and configure the active render pipeline
- Choosing and configuring a render pipeline and lighting solution
- Using the Built-in Render Pipeline
- Using the Universal Render Pipeline
- Using the High Definition Render Pipeline
- Scriptable Render Pipeline fundamentals
- Creating a custom render pipeline
- Cameras
- Lighting
- Introduction to lighting
- Light sources
- Shadows
- The Lighting window
- Lighting Settings Asset
- The Light Explorer window
- Lightmapping
- The Progressive Lightmapper
- Lightmapping using Enlighten Baked Global Illumination
- Lightmapping: Getting started
- Lightmap Parameters Asset
- Directional Mode
- Lightmaps and LOD
- Ambient occlusion
- Lightmaps: Technical information
- Lightmapping and shaders
- Lightmap UVs introduction
- Lightmap seam stitching
- Custom fall-off
- Realtime Global Illumination using Enlighten
- Light Probes
- Reflection Probes
- Precomputed lighting data
- Scene View Draw Modes for lighting
- Models
- Meshes
- Textures
- Importing Textures
- Texture formats
- Mipmaps
- Render Texture
- Custom Render Textures
- Movie Textures
- 3D textures
- Texture arrays
- Cubemaps
- Cubemap arrays
- Streaming Virtual Texturing
- Streaming Virtual Texturing requirements and compatibility
- How Streaming Virtual Texturing works
- Enabling Streaming Virtual Texturing in your project
- Using Streaming Virtual Texturing in Shader Graph
- Cache Management for Virtual Texturing
- Marking textures as "Virtual Texturing Only"
- Virtual Texturing error material
- Sparse Textures
- Loading texture and mesh data
- Shaders
- Shaders core concepts
- Built-in shaders
- Standard Shader
- Standard Particle Shaders
- Autodesk Interactive shader
- Legacy Shaders
- Using Shader Graph
- Writing shaders
- Writing shaders overview
- ShaderLab
- ShaderLab: defining a Shader object
- ShaderLab: defining a SubShader
- ShaderLab: defining a Pass
- ShaderLab: adding shader programs
- ShaderLab: specifying package requirements
- ShaderLab: commands
- ShaderLab: grouping commands with the Category block
- ShaderLab command: AlphaToMask
- ShaderLab command: Blend
- ShaderLab command: BlendOp
- ShaderLab command: ColorMask
- ShaderLab command: Conservative
- ShaderLab command: Cull
- ShaderLab command: Offset
- ShaderLab command: Stencil
- ShaderLab command: UsePass
- ShaderLab command: GrabPass
- ShaderLab command: ZClip
- ShaderLab command: ZTest
- ShaderLab command: ZWrite
- ShaderLab legacy functionality
- HLSL in Unity
- GLSL in Unity
- Example shaders
- Writing Surface Shaders
- Writing shaders for different graphics APIs
- Understanding shader performance
- Materials
- Visual effects
- Post-processing and full-screen effects
- Particle systems
- Choosing your particle system solution
- Built-in Particle System
- Using the Built-in Particle System
- Particle System vertex streams and Standard Shader support
- Particle System GPU Instancing
- Particle System C# Job System integration
- Components and Modules
- Particle System
- Particle System modules
- Main module
- Emission module
- Shape module
- Velocity over Lifetime module
- Noise module
- Limit Velocity over Lifetime module
- Inherit Velocity module
- Lifetime by Emitter Speed module
- Force over Lifetime module
- Color over Lifetime module
- Color by Speed module
- Size over Lifetime module
- Size by Speed module
- Rotation over Lifetime module
- Rotation by Speed module
- External Forces module
- Collision module
- Triggers module
- Sub Emitters module
- Texture Sheet Animation module
- Lights module
- Trails module
- Custom Data module
- Renderer module
- Particle System Force Field
- Visual Effect Graph
- Decals and projectors
- Lens flares and halos
- Lines, trails, and billboards
- Sky
- Color
- Graphics API support
- Graphics performance and profiling
- Render pipelines
- World building
- Physics
- Built-in 3D Physics
- Character control
- Rigidbody physics
- Collision
- Introduction to collision
- Continuous collision detection (CCD)
- Create a vehicle with Wheel Colliders
- Physics Debug Visualization
- Box Collider component reference
- Capsule Collider component reference
- Terrain Collider component reference
- Wheel Collider component reference
- Mesh Collider component reference
- Sphere Collider component reference
- Physic Material component reference
- Joints
- Articulations
- Ragdoll physics
- Cloth
- Multi-scene physics
- Built-in 3D Physics
- Scripting
- Setting Up Your Scripting Environment
- Scripting concepts
- Important Classes
- Important Classes - GameObject
- Important Classes - MonoBehaviour
- Important Classes - Object
- Important Classes - Transform
- Important Classes - Vectors
- Important Classes - Quaternion
- ScriptableObject
- Important Classes - Time
- Important Classes - Mathf
- Important Classes - Random
- Important Classes - Debug
- Important Classes - Gizmos & Handles
- Unity architecture
- Plug-ins
- C# Job System
- Multiplayer and Networking
- Multiplayer Overview
- Setting up a multiplayer project
- Using the Network Manager
- Using the Network Manager HUD
- The Network Manager HUD in LAN mode
- The Network Manager HUD in Matchmaker mode
- Converting a single-player game to Unity Multiplayer
- Debugging Information
- Multiplayer Component Reference
- Multiplayer Classes Reference
- Multiplayer Encryption Plug-ins
- UnityWebRequest
- Audio
- Audio Overview
- Audio files
- Tracker Modules
- Audio Mixer
- Native Audio Plugin SDK
- Audio Profiler
- Ambisonic Audio
- Audio Reference
- Audio Clip
- Audio Listener
- Audio Source
- Audio Mixer
- Audio Filters
- Audio Effects
- Audio Low Pass Effect
- Audio High Pass Effect
- Audio Echo Effect
- Audio Flange Effect
- Audio Distortion Effect
- Audio Normalize Effect
- Audio Parametric Equalizer Effect
- Audio Pitch Shifter Effect
- Audio Chorus Effect
- Audio Compressor Effect
- Audio SFX Reverb Effect
- Audio Low Pass Simple Effect
- Audio High Pass Simple Effect
- Reverb Zones
- Microphone
- Audio Settings
- Video overview
- Animation
- Animation System Overview
- Rotation in animations
- Animation Clips
- Animator Controllers
- Retargeting of Humanoid animations
- Performance and optimization
- Animation Reference
- Animation FAQ
- Playables API
- A Glossary of animation terms
- Create user interfaces (UI)
- Comparison of UI systems in Unity
- UI Toolkit
- Get started with UI Toolkit
- UI Builder
- Structure UI with UXML
- The visual tree
- Write UXML Templates
- Load UXML from C# scripts
- UXML elements reference
- UXML element BindableElement
- UXML element BoundsField
- UXML element BoundsIntField
- UXML element Box
- UXML element Button
- UXML element ColorField
- UXML element CurveField
- UXML element DoubleField
- UXML element DropdownField
- UXML element EnumField
- UXML element EnumFlagsField
- UXML element FloatField
- UXML element Foldout
- UXML element GradientField
- UXML element GroupBox
- UXML element Hash128Field
- UXML element HelpBox
- UXML element IMGUIContainer
- UXML element Image
- UXML element InspectorElement
- UXML element IntegerField
- UXML element Label
- UXML element LayerField
- UXML element LayerMaskField
- UXML element LongField
- UXML element ListView
- UXML element MaskField
- UXML element MinMaxSlider
- UXML element MultiColumnListView
- UXML element MultiColumnTreeView
- UXML element ObjectField
- UXML element PopupWindow
- UXML element ProgressBar
- UXML element PropertyField
- UXML element RadioButton
- UXML element RadioButtonGroup
- UXML element RectField
- UXML element RectIntField
- UXML element RepeatButton
- UXML element ScrollView
- UXML element Scroller
- UXML element Slider
- UXML element SliderInt
- UXML element TagField
- UXML element TextElement
- UXML element TextField
- UXML element Toggle
- UXML element Toolbar
- UXML element ToolbarBreadcrumbs
- UXML element ToolbarButton
- UXML element ToolbarMenu
- UXML element ToolbarPopupSearchField
- UXML element ToolbarSearchField
- UXML element ToolbarSpacer
- UXML element ToolbarToggle
- UXML element TreeView
- UXML element TwoPaneSplitView
- UXML element Vector2Field
- UXML element Vector2IntField
- UXML element Vector3Field
- UXML element Vector3IntField
- UXML element Vector4Field
- UXML element VisualElement
- Style UI with USS
- Control behavior with events
- Controls
- Manage UI asset references from C# scripts
- Support for Editor UI
- Create a custom Editor window
- Create a Custom Inspector
- SerializedObject data binding
- Bindable elements reference
- Bindable data types and fields
- Binding system implementation details
- Binding examples
- Bind with binding path in C# script
- Bind without the binding path
- Bind with UXML and C# script
- Create a binding with the Inspector
- Bind to nested properties
- Bind to a UXML template
- Receive callbacks when a bound property changes
- Receive callbacks when any bound properties change
- Bind to a list with ListView
- Bind to a list without ListView
- Bind a custom control
- Bind a custom control to custom data type
- ViewData persistence
- Support for runtime UI
- Work with text
- Examples
- Create a transition in a custom Editor window
- Create a drag-and-drop UI inside a custom Editor window
- Create a drag-and-drop UI to drag between Editor windows
- Create list and tree views
- Create a tabbed menu for runtime
- Create a transition event
- Create looping transitions
- Create a pop-up window
- Wrap content inside a scroll view
- Migration guides
- Unity UI
- Immediate Mode GUI (IMGUI)
- Navigation and Pathfinding
- Navigation Overview
- Navigation System in Unity
- Inner Workings of the Navigation System
- Building a NavMesh
- NavMesh building components
- Advanced NavMesh Bake Settings
- Creating a NavMesh Agent
- Creating a NavMesh Obstacle
- Creating an OffMesh Link
- Building OffMesh Links Automatically
- Building Height Mesh for Accurate Character Placement
- Navigation Areas and Costs
- Loading Multiple NavMeshes using Additive Loading
- Using NavMesh Agent with Other Components
- Navigation Reference
- Navigation How-Tos
- Navigation Overview
- Unity Services
- Setting up your project for Unity services
- Unity Organizations
- Unity Ads
- Unity Analytics
- Unity Analytics Overview
- Setting Up Analytics
- Analytics Dashboard
- Analytics events
- Funnels
- Remote Settings
- Unity Analytics A/B Testing
- Monetization
- User Attributes
- Unity Analytics Raw Data Export
- Data reset
- Upgrading Unity Analytics
- COPPA Compliance
- Unity Analytics and the EU General Data Protection Regulation (GDPR)
- Unity Analytics and PIPL
- Analytics Metrics, Segments, and Terminology
- Unity Cloud Build
- Unity Cloud Content Delivery
- Unity IAP
- Setting up Unity IAP
- Cross Platform Guide
- Codeless IAP
- Defining products
- Subscription Product support
- Initialization
- Browsing Product Metadata
- Initiating Purchases
- Processing Purchases
- Handling purchase failures
- Restoring Transactions
- Purchase Receipts
- Receipt validation
- Store Extensions
- Cross-store installation issues with Android in-app purchase stores
- Store Guides
- Implementing a Store
- Unity Cloud Diagnostics
- Unity Integrations
- Multiplayer Services
- Unity Distribution Portal
- Unity Accelerator
- XR
- Unity's Asset Store
- Asset Store packages
- Publishing to the Asset Store
- Creating your Publisher Account
- Creating a new package draft
- Deleting a package draft
- Uploading assets to your package
- Filling in the package details
- Submitting your package for approval
- Viewing the status of your Asset Store submissions
- Collecting revenue
- Providing support to your customers
- Adding tags to published packages
- Connecting your account to Google Analytics
- Promoting your Assets
- Refunding your customers
- Upgrading packages
- Deprecating your Assets
- Issuing vouchers
- Managing your publishing team
- Asset Store Publisher portal
- Platform development
- Using Unity as a Library in other applications
- Deep linking
- Xcode frame debugger Unity integration
- Android
- Introducing Android
- Getting started with Android
- Developing for Android
- Android mobile scripting
- Input for Android devices
- Android application size restrictions
- Graphics for Android
- Testing and debugging
- Create and use plug-ins in Android
- Integrating Unity into Android applications
- Deep linking on Android
- Android thread configuration
- Device features and permissions
- Building and delivering for Android
- Chrome OS
- iOS
- Introducing iOS
- Getting started with iOS
- Developing for iOS
- Building and delivering for iOS
- Troubleshooting on iOS devices
- Reporting crash bugs on iOS
- Linux
- macOS
- tvOS
- WebGL
- Windows
- Universal Windows Platform
- Unity Search
- Legacy Topics
- Asset Server (Team License)
- Legacy Asset Bundles
- Legacy Animation System
- Navigation and Pathfinding
- Navigation Overview
- Navigation System in Unity
- Inner Workings of the Navigation System
- Building a NavMesh
- NavMesh building components
- Advanced NavMesh Bake Settings
- Creating a NavMesh Agent
- Creating a NavMesh Obstacle
- Creating an OffMesh Link
- Building OffMesh Links Automatically
- Building Height Mesh for Accurate Character Placement
- Navigation Areas and Costs
- Loading Multiple NavMeshes using Additive Loading
- Using NavMesh Agent with Other Components
- Navigation Reference
- Navigation How-Tos
- Navigation Overview
- Legacy Unity Analytics (SDK Workflow)
- Glossary
- Unity User Manual 2022.1
- Create user interfaces (UI)
- UI Toolkit
- Support for Editor UI
- Create a custom Editor window
Create a custom Editor window
Custom Editor windows allow you to extend Unity by implementing your own editors and workflows. This guide covers creating an Editor window through code, reacting to user input, making the UI(User Interface) Allows a user to interact with your application. Unity currently supports three UI systems. More info
See in Glossary resizable and handling hot-reloading.
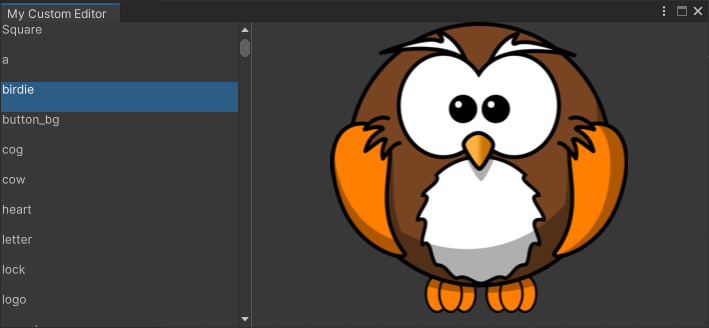
In this tutorial, you will create a spriteA 2D graphic objects. If you are used to working in 3D, Sprites are essentially just standard textures but there are special techniques for combining and managing sprite textures for efficiency and convenience during development. More info
See in Glossary browser, which finds and displays all sprites inside the project, and shows them as a list. Selecting a sprite in the list will display the image on the right side of the window.
You can find the completed example in the Editor window script section.
Prerequisites
This guide is for developers familiar with Unity, but new to UI Toolkit. It’s recommended to have a basic understanding of Unity and C# scripting.
This guide also references the following concepts:
- Visual TreeAn object graph, made of lightweight nodes, that holds all the elements in a window or panel. It defines every UI you build with the UI Toolkit.
See in Glossary - Controls
Content
Controls used in this guide:
In this guide, you’ll do the following:
- Create the Editor window script.
- Create a menu entry to open the window.
- Add UI controls to the window.
- Write code to respond to user selections.
- Make the UI resizable.
- Support hot-reloading in the Editor.
Create the Editor window script
| Tip |
|---|
You can generate the necessary code to create an Editor window script in the Unity Editor. From the Project window, right-click and select Create > UI Toolkit > Editor Window. For this guide please disable the UXML and USS checkboxes. You might also have to add additional using directives at the top of the file, as shown below. |
You can create Editor windows through C# scriptsA piece of code that allows you to create your own Components, trigger game events, modify Component properties over time and respond to user input in any way you like. More info
See in Glossary in your project. A custom Editor window is a class that derives from the EditorWindow class.
Create a new script file MyCustomEditor.cs under the Assets/Editor folder. Paste the following code into the script:
using System.Collections.Generic;
using System.Linq;
using UnityEditor;
using UnityEngine;
using UnityEngine.UIElements;

public class MyCustomEditor : EditorWindow
{
}
| Note |
|---|
This is an Editor-only window that includes the UnityEditor namespace, so the file must be placed under the Editor folder, or inside an Editor-only Assembly Definition. |
Create a menu entry to open the window
To open the new Editor window, you must create an entry in the Editor menu.
Add the MenuItem attribute to a static method. In this example, the name of the static method is ShowMyEditor().
Inside ShowMyEditor(), call the EditorWindow.GetWindow() method to create and display the window. It returns an EditorWindow object. To set the window title, change the EditorWindow.titleContent property.
Add the following function inside the MyCustomEditor class created in the previous step.
[MenuItem("Tools/My Custom Editor")]
public static void ShowMyEditor()
{
  // This method is called when the user selects the menu item in the Editor
  EditorWindow wnd = GetWindow<MyCustomEditor>();
  wnd.titleContent = new GUIContent("My Custom Editor");
}
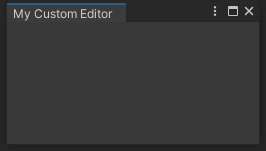
Test your new window by opening it via the Unity Editor menu Tools > My Custom Editor.
Add UI controls to the window
UI Toolkit uses the CreateGUI method to add controls to Editor UI, and Unity calls the CreateGUI method automatically when the window needs to display. This method works the same way as methods such as Awake or Update.
You can add UI controls to the UI by adding visual elementsA node of a visual tree that instantiates or derives from the C# VisualElement class. You can style the look, define the behaviour, and display it on screen as part of the UI. More info
See in Glossary to the visual tree. The VisualElement.Add() method is used to add children to an existing visual element. The visual tree of an Editor window is accessed via the rootvisualElement property.
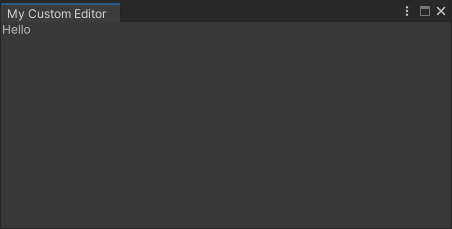
To get started, add a CreateGUI() function to your custom Editor class and add a ‘Hello’ label:
public void CreateGUI()
{
  rootVisualElement.Add(new Label("Hello"));
}
| Note |
|---|
To present a list of sprites, use AssetDatabase functions to find all sprites in a project. |
Replace the code inside CreateGUI() with the code below to enumerate all sprites inside the project.
public void CreateGUI()
{
  // Get a list of all sprites in the project
  var allObjectGuids = AssetDatabase.FindAssets("t:Sprite");
  var allObjects = new List<Sprite>();
  foreach (var guid in allObjectGuids)
  {
    allObjects.Add(AssetDatabase.LoadAssetAtPath<Sprite>(AssetDatabase.GUIDToAssetPath(guid)));
  }
}
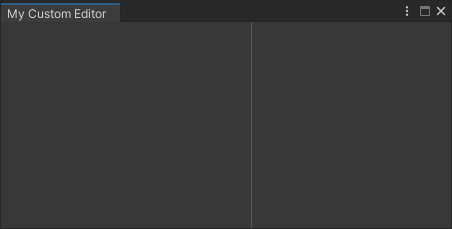
For the sprite browser, the top-level visual element will be a TwoPaneSplitView. This control splits the available window space into two panes: one fixed-size and one flexible-size. When you resize the window, only the flexible pane resizes, while the fixed-size pane remains the same size.
For the TwoPaneSplitView control to work, it needs to have exactly two children. Add code inside CreateGUI() to create a TwoPaneSplitview, then add two child elements as placeholders for different controls.
// Create a two-pane view with the left pane being fixed with
var splitView = new TwoPaneSplitView(0, 250, TwoPaneSplitViewOrientation.Horizontal);

// Add the view to the visual tree by adding it as a child to the root element
rootVisualElement.Add(splitView);

// A TwoPaneSplitView always needs exactly two child elements
var leftPane = new VisualElement();
splitView.Add(leftPane);
var rightPane = new VisualElement();
splitView.Add(rightPane);
The image below shows the custom window with the two empty panels. The divider bar can be moved.
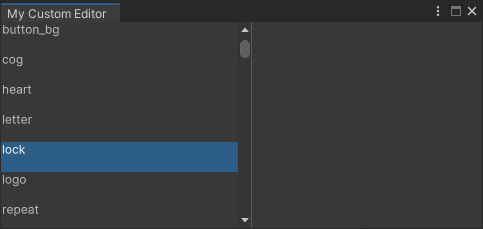
For the sprite browser, the left pane will be a list containing the names of all sprites found in the project. The ListView control derives from VisualElement, so it’s easy to modify the code to use a ListView instead of a blank VisualElement.
Modify the code inside the CreateGUI() function to create a ListView control for the left pane instead of a VisualElement.
public void CreateGUI()
{
  ...
  var leftPane = new ListView();
  splitView.Add(leftPane);
  ...
}
The ListView control displays a list of selectable items. It’s optimized to create only enough elements to cover the visible area, and pool and recycle the visual elements as you scroll the list. This optimizes performance and reduces the memory footprint, even in lists that have many items.
To take advantage of this, the ListView must be properly initialized with the following:
- An array of data items.
- A callback function to create an individual visual list entry in the list.
- A bind function that initializes a visual list entry with an item from the data array.
You can create complex UI structures for each element in the list, but this example uses a simple text label to display the sprite name.
Add code to the bottom CreateGUI() function that initializes the ListView.
public void CreateGUI()
{
  ...
  // Initialize the list view with all sprites' names
  leftPane.makeItem = () => new Label();
  leftPane.bindItem = (item, index) => { (item as Label).text = allObjects[index].name; };
  leftPane.itemsSource = allObjects;
}
The image below shows the Editor window with a scrollable list view and selectable items.
For reference, below is the current code for the CreateGUI() function in its entirety:
public void CreateGUI()
{
  // Get a list of all sprites in the project
  var allObjectGuids = AssetDatabase.FindAssets("t:Sprite");
  var allObjects = new List<Sprite>();
  foreach (var guid in allObjectGuids)
  {
    allObjects.Add(AssetDatabase.LoadAssetAtPath<Sprite>(AssetDatabase.GUIDToAssetPath(guid)));
  }

  // Create a two-pane view with the left pane being fixed with
  var splitView = new TwoPaneSplitView(0, 250, TwoPaneSplitViewOrientation.Horizontal);

  // Add the panel to the visual tree by adding it as a child to the root element
  rootVisualElement.Add(splitView);

  // A TwoPaneSplitView always needs exactly two child elements
  var leftPane = new ListView();
  splitView.Add(leftPane);
  var rightPane = new VisualElement();
  splitView.Add(rightPane);

  // Initialize the list view with all sprites' names
  leftPane.makeItem = () => new Label();
  leftPane.bindItem = (item, index) => { (item as Label).text = allObjects[index].name; };
  leftPane.itemsSource = allObjects;
}
Add callbacks
When you select a sprite from the list in the left pane, its image must display on the right pane. To do this you need to provide a callback function that the ListView can call when the user makes a selection. The ListView control has an onSelectionChange property for this purpose.
The callback function receives a list that contains the item or items chosen by the user. It’s possible to configure the ListView to allow multi-selection, but by default the selection mode is limited to a single item.
Add a callback function when the user changes the selection from the list in the left pane.
public void CreateGUI()
{
  ...

  // React to the user's selection
  leftPane.onSelectionChange += OnSpriteSelectionChange;
}

private void OnSpriteSelectionChange(IEnumerable<object> selectedItems)
{
}
| Note |
|---|
| If you lose your window and the menu doesn’t reopen, close all floating panels through the menu under Window > Panels > Close all floating panels, or reset your window layout. |
To display the image of the selected sprite on the right side of the window, the function needs to be able to access the right-hand pane of the TwoPaneSplitView. You can make this control a member variable of the class to be able to access it inside the callback function.
Turn the rightPane created inside CreateGUI() into a member variable.
private VisualElement m_RightPane;

public void CreateGUI()
{
  ...

  m_RightPane = new VisualElement();
  splitView.Add(m_RightPane);

  ...
}
With a reference to the TwoPaneSplitView, you can access the right pane via the flexedPane property.
Before creating a new Image control on the right pane, use VisualElement.Clear() to remove the previous image. This method removes all children from an existing visual element.
Clear the right pane from all previous content and create a new Image control for the selected sprite.
private void OnSpriteSelectionChange(IEnumerable<object> selectedItems)
{
  // Clear all previous content from the pane
  m_RightPane.Clear();

  // Get the selected sprite
  var selectedSprite = selectedItems.First() as Sprite;
  if (selectedSprite == null)
    return;

  // Add a new Image control and display the sprite
  var spriteImage = new Image();
  spriteImage.scaleMode = ScaleMode.ScaleToFit;
  spriteImage.sprite = selectedSprite;

  // Add the Image control to the right-hand pane
  m_RightPane.Add(spriteImage);
}
| Note |
|---|
Make sure to include using System.Linq; at the top of your file to use the First() method on the selectedItems parameter. |
Test your sprite browser in the Editor. The image below shows the custom Editor window in action.

Make the UI resizable
Editor windows are resizable within their minimum and maximum allowed dimensions. You can set these dimensions in C# when creating the window by writing to the EditorWindow.minSize and EditorWindow.maxSize properties. To prevent a window from resizing, assign the same dimension to both properties.
Limit the size of your custom editor window by adding the following lines to the bottom of the ShowMyEditor() function:
[MenuItem("Tools/My Custom Editor")]
public static void ShowMyEditor()
{
  // This method is called when the user selects the menu item in the Editor
  EditorWindow wnd = GetWindow<MyCustomEditor>();
  wnd.titleContent = new GUIContent("My Custom Editor");

  // Limit size of the window
  wnd.minSize = new Vector2(450, 200);
  wnd.maxSize = new Vector2(1920, 720);
}
For situations where the window dimensions are too small to display the entire UI, you must use a ScrollView element to provide scrolling for the window, or the content might become inaccessible.
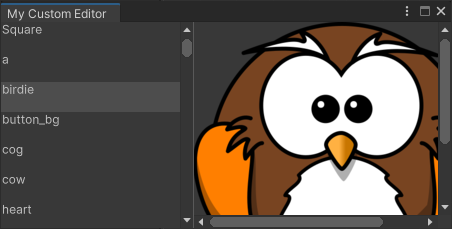
The ListView on the left pane is using a ScrollView internally, but the right pane is a regular VisualElement. Changing this to a ScrollView control automatically displays scrollbars when the window is too small to fit the entire image in its original size.
Exchange the right pane VisualElement for a ScrollView with bidirectional scrolling.
public void CreateGUI()
{
  ...

  m_RightPane = new ScrollView(ScrollViewMode.VerticalAndHorizontal);
  splitView.Add(m_RightPane);

  ...
}
The image below shows the sprite browser window with scrollbars.
Close and reopen your custom Editor window to test out the new size limits.
| Note |
|---|
In Unity 2021.2 and up, Unity doesn’t respect the minSize and maxSize properties when the window is docked. This allows the user to resize dock areas without limitations. Consider creating a ScrollView as one of your top-level elements and place all UI inside of it to make your UI as responsive as possible. |
Support hot-reloading in the Editor
A proper Editor window must work with the hot-reloading workflow that happens in the Unity Editor. A C# domain reload occurs when scripts recompile or when the Editor enters Play mode. You can learn more about this topic on the Script Serialization page.
To see this in action in the Editor window you just created, open the sprite browser, select a sprite, and then enter Play mode. The window resets, and the selection disappears.
Since VisualElement objects aren’t serializable, the UI must be recreated every time a reload happens in Unity. This means that the CreateGUI() method is invoked after the reload has completed. This lets you restore the UI state before the reload by storing necessary data in your EditorWindow class.
Add a member variable to save the selected index in the sprite list.
public class MyCustomEditor : EditorWindow
{
    [SerializeField] private int m_SelectedIndex = -1;

    ....
}
When you make a selection, the new selection index of the list view can be stored inside this member variable. You can restore the selection index during creation of the UI inside the CreateGUI() function.
Add code to the end of the CreateGUI() function to store and restore the selected list index.
public void CreateGUI()
{
  ...

  // Restore the selection index from before the hot reload
  leftPane.selectedIndex = m_SelectedIndex;

  // Store the selection index when the selection changes
  leftPane.onSelectionChange += (items) => { m_SelectedIndex = leftPane.selectedIndex; };
}
Select a sprite from the list and enter Play mode to test hot-reloading.
Editor window script
The code below is the final script of the Editor window created during this guide. You can paste the code directly into a file called MyCustomEditor.cs inside the Assets/Editor folder to see it in the Unity Editor.
using System.Collections.Generic;
using System.Linq;
using UnityEditor;
using UnityEngine;
using UnityEngine.UIElements;

public class MyCustomEditor : EditorWindow
{
  [SerializeField] private int m_SelectedIndex = -1;
  private VisualElement m_RightPane;

  [MenuItem("Tools/My Custom Editor")]
  public static void ShowMyEditor()
  {
    // This method is called when the user selects the menu item in the Editor
    EditorWindow wnd = GetWindow<MyCustomEditor>();
    wnd.titleContent = new GUIContent("My Custom Editor");

    // Limit size of the window
    wnd.minSize = new Vector2(450, 200);
    wnd.maxSize = new Vector2(1920, 720);
  }

  public void CreateGUI()
  {
    // Get a list of all sprites in the project
    var allObjectGuids = AssetDatabase.FindAssets("t:Sprite");
    var allObjects = new List<Sprite>();
    foreach (var guid in allObjectGuids)
    {
      allObjects.Add(AssetDatabase.LoadAssetAtPath<Sprite>(AssetDatabase.GUIDToAssetPath(guid)));
    }

    // Create a two-pane view with the left pane being fixed with
    var splitView = new TwoPaneSplitView(0, 250, TwoPaneSplitViewOrientation.Horizontal);

    // Add the panel to the visual tree by adding it as a child to the root element
    rootVisualElement.Add(splitView);

    // A TwoPaneSplitView always needs exactly two child elements
    var leftPane = new ListView();
    splitView.Add(leftPane);
    m_RightPane = new ScrollView(ScrollViewMode.VerticalAndHorizontal);
    splitView.Add(m_RightPane);

    // Initialize the list view with all sprites' names
    leftPane.makeItem = () => new Label();
    leftPane.bindItem = (item, index) => { (item as Label).text = allObjects[index].name; };
    leftPane.itemsSource = allObjects;

    // React to the user's selection
    leftPane.onSelectionChange += OnSpriteSelectionChange;

    // Restore the selection index from before the hot reload
    leftPane.selectedIndex = m_SelectedIndex;

    // Store the selection index when the selection changes
    leftPane.onSelectionChange += (items) => { m_SelectedIndex = leftPane.selectedIndex; };
  }

  private void OnSpriteSelectionChange(IEnumerable<object> selectedItems)
  {
    // Clear all previous content from the pane
    m_RightPane.Clear();

    // Get the selected sprite
    var selectedSprite = selectedItems.First() as Sprite;
    if (selectedSprite == null)
      return;

    // Add a new Image control and display the sprite
    var spriteImage = new Image();
    spriteImage.scaleMode = ScaleMode.ScaleToFit;
    spriteImage.sprite = selectedSprite;

    // Add the Image control to the right-hand pane
    m_RightPane.Add(spriteImage);
  }
}