Unity Manual
- Unity User Manual 2022.1
- New in Unity 2022.1
- Packages and feature sets
- Released packages
- 2D Animation
- 2D Pixel Perfect
- 2D PSD Importer
- 2D SpriteShape
- 2D Tilemap Extras
- Adaptive Performance
- Addressables
- Advertisement Legacy
- Advertisement with Mediation
- Alembic
- Analytics
- Analytics Library
- Android Logcat
- Animation Rigging
- Apple ARKit XR Plugin
- AR Foundation
- Authentication
- Burst
- CCD Management
- Cinemachine
- Cloud Build
- Cloud Code
- Cloud Diagnostics
- Cloud Save
- Code Coverage
- Collections
- Device Simulator Devices
- Economy
- Editor Coroutines
- FBX Exporter
- Google ARCore XR Plugin
- In App Purchasing
- Input System
- iOS 14 Advertising Support
- JetBrains Rider Editor
- Live Capture
- Lobby
- Localization
- Magic Leap XR Plugin
- Mathematics
- ML Agents
- Mobile Notifications
- Multiplayer Tools
- Netcode for GameObjects
- Oculus XR Plugin
- OpenXR Plugin
- Polybrush
- Post Processing
- ProBuilder
- Profile Analyzer
- Recorder
- Relay
- Remote Config
- Scriptable Build Pipeline
- Sequences
- Splines
- System Metrics Mali
- Terrain Tools
- Test Framework
- TextMeshPro
- Timeline
- Tutorial Authoring Tools
- Tutorial Framework
- Unity Distribution Portal
- Unity Profiling Core API
- Unity Transport
- Version Control
- Visual Scripting
- Visual Studio Code Editor
- Visual Studio Editor
- WebGL Publisher
- XR Interaction Toolkit
- XR Plugin Management
- Release Candidates
- Pre-release packages
- Core packages
- Built-in packages
- AI
- Android JNI
- Animation
- Asset Bundle
- Audio
- Cloth
- Director
- Image Conversion
- IMGUI
- JSONSerialize
- NVIDIA
- Particle System
- Physics
- Physics 2D
- Screen Capture
- Terrain
- Terrain Physics
- Tilemap
- UI
- UIElements
- Umbra
- Unity Analytics
- Unity Web Request
- Unity Web Request Asset Bundle
- Unity Web Request Audio
- Unity Web Request Texture
- Unity Web Request WWW
- Vehicles
- Video
- VR
- Wind
- XR
- Experimental packages
- Packages by keywords
- Unity's Package Manager
- How Unity works with packages
- Concepts
- Configuration
- Package Manager window
- Access the Package Manager window
- List view
- Details view
- Features (detail) view
- Finding packages and feature sets
- Adding and removing
- Installing a feature set
- Installing from a registry
- Installing a package from a local folder
- Installing a package from a local tarball file
- Installing from a Git URL
- Adding a registry package by name
- Removing an installed package from a project
- Disabling a built-in package
- Switching to another package version
- Importing an Asset Store package
- Updating your Asset Store package
- Remove imported assets from a project
- Delete a package from the Asset Store cache
- Perform an action on multiple packages
- Finding package documentation
- Inspecting packages
- Scripting API for packages
- Scoped registries
- Resolution and conflict
- Project manifest
- Troubleshooting
- Creating custom packages
- Feature sets
- Released packages
- Working in Unity
- Installing Unity
- Upgrading Unity
- API updater
- Upgrade to Unity 2022.1
- Upgrading to Unity 2021 LTS
- Upgrading to Unity 2020 LTS
- Upgrading to Unity 2019 LTS
- Legacy Upgrade Guides
- Unity's interface
- Quickstart guides
- Create Gameplay
- Editor Features
- 2D and 3D mode settings
- Preferences
- Shortcuts Manager
- Build Settings
- Incremental build pipeline
- Project Settings
- Visual Studio C# integration
- RenderDoc Integration
- Editor Analytics
- Check For Updates
- IME in Unity
- Version Control
- Plastic SCM plugin for Unity
- Safe Mode
- Command line arguments
- Text-Based Scene Files
- Troubleshooting The Editor
- Analysis
- Memory in Unity
- Profiler overview
- Profiling your application
- Common Profiler markers
- The Profiler window
- Asset Loading Profiler module
- Audio Profiler module
- CPU Usage Profiler module
- File Access Profiler module
- Global Illumination Profiler module
- GPU Usage Profiler module
- Memory Profiler module
- Physics Profiler module
- 2D Physics Profiler module
- Rendering Profiler module
- UI and UI Details Profiler
- Video Profiler module
- Virtual Texturing Profiler module
- Customizing the Profiler
- Low-level native plug-in Profiler API
- Profiling tools
- Log files
- Understanding optimization in Unity
- Asset loading metrics
- Asset workflow
- Input
- 2D
- 2D game development quickstart guide
- 2D Sorting
- Sprites
- Tilemap
- Physics Reference 2D
- Graphics
- Render pipelines
- Render pipelines introduction
- Render pipeline feature comparison
- How to get, set, and configure the active render pipeline
- Choosing and configuring a render pipeline and lighting solution
- Using the Built-in Render Pipeline
- Using the Universal Render Pipeline
- Using the High Definition Render Pipeline
- Scriptable Render Pipeline fundamentals
- Creating a custom render pipeline
- Cameras
- Lighting
- Introduction to lighting
- Light sources
- Shadows
- The Lighting window
- Lighting Settings Asset
- The Light Explorer window
- Lightmapping
- The Progressive Lightmapper
- Lightmapping using Enlighten Baked Global Illumination
- Lightmapping: Getting started
- Lightmap Parameters Asset
- Directional Mode
- Lightmaps and LOD
- Ambient occlusion
- Lightmaps: Technical information
- Lightmapping and shaders
- Lightmap UVs introduction
- Lightmap seam stitching
- Custom fall-off
- Realtime Global Illumination using Enlighten
- Light Probes
- Reflection Probes
- Precomputed lighting data
- Scene View Draw Modes for lighting
- Models
- Meshes
- Textures
- Importing Textures
- Texture formats
- Mipmaps
- Render Texture
- Custom Render Textures
- Movie Textures
- 3D textures
- Texture arrays
- Cubemaps
- Cubemap arrays
- Streaming Virtual Texturing
- Streaming Virtual Texturing requirements and compatibility
- How Streaming Virtual Texturing works
- Enabling Streaming Virtual Texturing in your project
- Using Streaming Virtual Texturing in Shader Graph
- Cache Management for Virtual Texturing
- Marking textures as "Virtual Texturing Only"
- Virtual Texturing error material
- Sparse Textures
- Loading texture and mesh data
- Shaders
- Shaders core concepts
- Built-in shaders
- Standard Shader
- Standard Particle Shaders
- Autodesk Interactive shader
- Legacy Shaders
- Using Shader Graph
- Writing shaders
- Writing shaders overview
- ShaderLab
- ShaderLab: defining a Shader object
- ShaderLab: defining a SubShader
- ShaderLab: defining a Pass
- ShaderLab: adding shader programs
- ShaderLab: specifying package requirements
- ShaderLab: commands
- ShaderLab: grouping commands with the Category block
- ShaderLab command: AlphaToMask
- ShaderLab command: Blend
- ShaderLab command: BlendOp
- ShaderLab command: ColorMask
- ShaderLab command: Conservative
- ShaderLab command: Cull
- ShaderLab command: Offset
- ShaderLab command: Stencil
- ShaderLab command: UsePass
- ShaderLab command: GrabPass
- ShaderLab command: ZClip
- ShaderLab command: ZTest
- ShaderLab command: ZWrite
- ShaderLab legacy functionality
- HLSL in Unity
- GLSL in Unity
- Example shaders
- Writing Surface Shaders
- Writing shaders for different graphics APIs
- Understanding shader performance
- Materials
- Visual effects
- Post-processing and full-screen effects
- Particle systems
- Choosing your particle system solution
- Built-in Particle System
- Using the Built-in Particle System
- Particle System vertex streams and Standard Shader support
- Particle System GPU Instancing
- Particle System C# Job System integration
- Components and Modules
- Particle System
- Particle System modules
- Main module
- Emission module
- Shape module
- Velocity over Lifetime module
- Noise module
- Limit Velocity over Lifetime module
- Inherit Velocity module
- Lifetime by Emitter Speed module
- Force over Lifetime module
- Color over Lifetime module
- Color by Speed module
- Size over Lifetime module
- Size by Speed module
- Rotation over Lifetime module
- Rotation by Speed module
- External Forces module
- Collision module
- Triggers module
- Sub Emitters module
- Texture Sheet Animation module
- Lights module
- Trails module
- Custom Data module
- Renderer module
- Particle System Force Field
- Visual Effect Graph
- Decals and projectors
- Lens flares and halos
- Lines, trails, and billboards
- Sky
- Color
- Graphics API support
- Graphics performance and profiling
- Render pipelines
- World building
- Physics
- Built-in 3D Physics
- Character control
- Rigidbody physics
- Collision
- Introduction to collision
- Continuous collision detection (CCD)
- Create a vehicle with Wheel Colliders
- Physics Debug Visualization
- Box Collider component reference
- Capsule Collider component reference
- Terrain Collider component reference
- Wheel Collider component reference
- Mesh Collider component reference
- Sphere Collider component reference
- Physic Material component reference
- Joints
- Articulations
- Ragdoll physics
- Cloth
- Multi-scene physics
- Built-in 3D Physics
- Scripting
- Setting Up Your Scripting Environment
- Scripting concepts
- Important Classes
- Important Classes - GameObject
- Important Classes - MonoBehaviour
- Important Classes - Object
- Important Classes - Transform
- Important Classes - Vectors
- Important Classes - Quaternion
- ScriptableObject
- Important Classes - Time
- Important Classes - Mathf
- Important Classes - Random
- Important Classes - Debug
- Important Classes - Gizmos & Handles
- Unity architecture
- Plug-ins
- C# Job System
- Multiplayer and Networking
- Multiplayer Overview
- Setting up a multiplayer project
- Using the Network Manager
- Using the Network Manager HUD
- The Network Manager HUD in LAN mode
- The Network Manager HUD in Matchmaker mode
- Converting a single-player game to Unity Multiplayer
- Debugging Information
- Multiplayer Component Reference
- Multiplayer Classes Reference
- Multiplayer Encryption Plug-ins
- UnityWebRequest
- Audio
- Audio Overview
- Audio files
- Tracker Modules
- Audio Mixer
- Native Audio Plugin SDK
- Audio Profiler
- Ambisonic Audio
- Audio Reference
- Audio Clip
- Audio Listener
- Audio Source
- Audio Mixer
- Audio Filters
- Audio Effects
- Audio Low Pass Effect
- Audio High Pass Effect
- Audio Echo Effect
- Audio Flange Effect
- Audio Distortion Effect
- Audio Normalize Effect
- Audio Parametric Equalizer Effect
- Audio Pitch Shifter Effect
- Audio Chorus Effect
- Audio Compressor Effect
- Audio SFX Reverb Effect
- Audio Low Pass Simple Effect
- Audio High Pass Simple Effect
- Reverb Zones
- Microphone
- Audio Settings
- Video overview
- Animation
- Animation System Overview
- Rotation in animations
- Animation Clips
- Animator Controllers
- Retargeting of Humanoid animations
- Performance and optimization
- Animation Reference
- Animation FAQ
- Playables API
- A Glossary of animation terms
- Create user interfaces (UI)
- Comparison of UI systems in Unity
- UI Toolkit
- Get started with UI Toolkit
- UI Builder
- Structure UI with UXML
- The visual tree
- Write UXML Templates
- Load UXML from C# scripts
- UXML elements reference
- UXML element BindableElement
- UXML element BoundsField
- UXML element BoundsIntField
- UXML element Box
- UXML element Button
- UXML element ColorField
- UXML element CurveField
- UXML element DoubleField
- UXML element DropdownField
- UXML element EnumField
- UXML element EnumFlagsField
- UXML element FloatField
- UXML element Foldout
- UXML element GradientField
- UXML element GroupBox
- UXML element Hash128Field
- UXML element HelpBox
- UXML element IMGUIContainer
- UXML element Image
- UXML element InspectorElement
- UXML element IntegerField
- UXML element Label
- UXML element LayerField
- UXML element LayerMaskField
- UXML element LongField
- UXML element ListView
- UXML element MaskField
- UXML element MinMaxSlider
- UXML element MultiColumnListView
- UXML element MultiColumnTreeView
- UXML element ObjectField
- UXML element PopupWindow
- UXML element ProgressBar
- UXML element PropertyField
- UXML element RadioButton
- UXML element RadioButtonGroup
- UXML element RectField
- UXML element RectIntField
- UXML element RepeatButton
- UXML element ScrollView
- UXML element Scroller
- UXML element Slider
- UXML element SliderInt
- UXML element TagField
- UXML element TextElement
- UXML element TextField
- UXML element Toggle
- UXML element Toolbar
- UXML element ToolbarBreadcrumbs
- UXML element ToolbarButton
- UXML element ToolbarMenu
- UXML element ToolbarPopupSearchField
- UXML element ToolbarSearchField
- UXML element ToolbarSpacer
- UXML element ToolbarToggle
- UXML element TreeView
- UXML element TwoPaneSplitView
- UXML element Vector2Field
- UXML element Vector2IntField
- UXML element Vector3Field
- UXML element Vector3IntField
- UXML element Vector4Field
- UXML element VisualElement
- Style UI with USS
- Control behavior with events
- Controls
- Manage UI asset references from C# scripts
- Support for Editor UI
- Create a custom Editor window
- Create a Custom Inspector
- SerializedObject data binding
- Bindable elements reference
- Bindable data types and fields
- Binding system implementation details
- Binding examples
- Bind with binding path in C# script
- Bind without the binding path
- Bind with UXML and C# script
- Create a binding with the Inspector
- Bind to nested properties
- Bind to a UXML template
- Receive callbacks when a bound property changes
- Receive callbacks when any bound properties change
- Bind to a list with ListView
- Bind to a list without ListView
- Bind a custom control
- Bind a custom control to custom data type
- ViewData persistence
- Support for runtime UI
- Work with text
- Examples
- Create a transition in a custom Editor window
- Create a drag-and-drop UI inside a custom Editor window
- Create a drag-and-drop UI to drag between Editor windows
- Create list and tree views
- Create a tabbed menu for runtime
- Create a transition event
- Create looping transitions
- Create a pop-up window
- Wrap content inside a scroll view
- Migration guides
- Unity UI
- Immediate Mode GUI (IMGUI)
- Navigation and Pathfinding
- Navigation Overview
- Navigation System in Unity
- Inner Workings of the Navigation System
- Building a NavMesh
- NavMesh building components
- Advanced NavMesh Bake Settings
- Creating a NavMesh Agent
- Creating a NavMesh Obstacle
- Creating an OffMesh Link
- Building OffMesh Links Automatically
- Building Height Mesh for Accurate Character Placement
- Navigation Areas and Costs
- Loading Multiple NavMeshes using Additive Loading
- Using NavMesh Agent with Other Components
- Navigation Reference
- Navigation How-Tos
- Navigation Overview
- Unity Services
- Setting up your project for Unity services
- Unity Organizations
- Unity Ads
- Unity Analytics
- Unity Analytics Overview
- Setting Up Analytics
- Analytics Dashboard
- Analytics events
- Funnels
- Remote Settings
- Unity Analytics A/B Testing
- Monetization
- User Attributes
- Unity Analytics Raw Data Export
- Data reset
- Upgrading Unity Analytics
- COPPA Compliance
- Unity Analytics and the EU General Data Protection Regulation (GDPR)
- Unity Analytics and PIPL
- Analytics Metrics, Segments, and Terminology
- Unity Cloud Build
- Unity Cloud Content Delivery
- Unity IAP
- Setting up Unity IAP
- Cross Platform Guide
- Codeless IAP
- Defining products
- Subscription Product support
- Initialization
- Browsing Product Metadata
- Initiating Purchases
- Processing Purchases
- Handling purchase failures
- Restoring Transactions
- Purchase Receipts
- Receipt validation
- Store Extensions
- Cross-store installation issues with Android in-app purchase stores
- Store Guides
- Implementing a Store
- Unity Cloud Diagnostics
- Unity Integrations
- Multiplayer Services
- Unity Distribution Portal
- Unity Accelerator
- XR
- Unity's Asset Store
- Asset Store packages
- Publishing to the Asset Store
- Creating your Publisher Account
- Creating a new package draft
- Deleting a package draft
- Uploading assets to your package
- Filling in the package details
- Submitting your package for approval
- Viewing the status of your Asset Store submissions
- Collecting revenue
- Providing support to your customers
- Adding tags to published packages
- Connecting your account to Google Analytics
- Promoting your Assets
- Refunding your customers
- Upgrading packages
- Deprecating your Assets
- Issuing vouchers
- Managing your publishing team
- Asset Store Publisher portal
- Platform development
- Using Unity as a Library in other applications
- Deep linking
- Xcode frame debugger Unity integration
- Android
- Introducing Android
- Getting started with Android
- Developing for Android
- Android mobile scripting
- Input for Android devices
- Android application size restrictions
- Graphics for Android
- Testing and debugging
- Create and use plug-ins in Android
- Integrating Unity into Android applications
- Deep linking on Android
- Android thread configuration
- Device features and permissions
- Building and delivering for Android
- Chrome OS
- iOS
- Introducing iOS
- Getting started with iOS
- Developing for iOS
- Building and delivering for iOS
- Troubleshooting on iOS devices
- Reporting crash bugs on iOS
- Linux
- macOS
- tvOS
- WebGL
- Windows
- Universal Windows Platform
- Unity Search
- Legacy Topics
- Asset Server (Team License)
- Legacy Asset Bundles
- Legacy Animation System
- Navigation and Pathfinding
- Navigation Overview
- Navigation System in Unity
- Inner Workings of the Navigation System
- Building a NavMesh
- NavMesh building components
- Advanced NavMesh Bake Settings
- Creating a NavMesh Agent
- Creating a NavMesh Obstacle
- Creating an OffMesh Link
- Building OffMesh Links Automatically
- Building Height Mesh for Accurate Character Placement
- Navigation Areas and Costs
- Loading Multiple NavMeshes using Additive Loading
- Using NavMesh Agent with Other Components
- Navigation Reference
- Navigation How-Tos
- Navigation Overview
- Legacy Unity Analytics (SDK Workflow)
- Glossary
Cloth
Switch to ScriptingThe Cloth component works with the Skinned MeshThe main graphics primitive of Unity. Meshes make up a large part of your 3D worlds. Unity supports triangulated or Quadrangulated polygon meshes. Nurbs, Nurms, Subdiv surfaces must be converted to polygons. More info
See in Glossary Renderer to provide a physics-based solution for simulating fabrics. It is specifically designed for character clothing, and only works with the Skinned Mesh RendererA mesh component that takes the geometry from the Mesh Filter and renders it at the position defined by the object’s Transform component. More info
See in Glossary. If you add a Cloth component to a GameObjectThe fundamental object in Unity scenes, which can represent characters, props, scenery, cameras, waypoints, and more. A GameObject’s functionality is defined by the Components attached to it. More info
See in Glossary with a regular Mesh Renderer, Unity removes the Mesh Renderer and adds a Skinned Mesh Renderer.
To attach a Cloth component to GameObject that has a Skinned Mesh Renderer, select the GameObject in the Editor, click the Add Component button in the Inspector window, and select Physics > Cloth. The component appears in the Inspector.

Properties
| Property | Function |
|---|---|
| Stretching Stiffness | Stretching stiffness of the cloth. |
| Bending Stiffness | Bending stiffness of the cloth. |
| Use Tethers | Apply constraints that help to prevent the moving cloth particles from going too far away from the fixed ones. This helps to reduce excess stretchiness. |
| Use Gravity | Should gravitational acceleration be applied to the cloth? |
| Damping | Motion damping coefficient. |
| External Acceleration | A constant, external acceleration applied to the cloth. |
| Random Acceleration | A random, external acceleration applied to the cloth. |
| World Velocity Scale | How much world-space movement of the character will affect cloth vertices. |
| World Acceleration Scale | How much world-space acceleration of the character will affect cloth vertices. |
| Friction | The friction of the cloth when colliding with the character. |
| Collision Mass Scale | How much to increase mass of colliding particles. |
| Use Continuous Collision | Enable continuous collisionA collision occurs when the physics engine detects that the colliders of two GameObjects make contact or overlap, when at least one has a Rigidbody component and is in motion. More info See in Glossary to improve collision stability. |
| Use Virtual Particles | Add one virtual particle per triangle to improve collision stability. |
| Solver Frequency | Number of solver iterations per second. |
| Sleep Threshold | Cloth’s sleep threshold. |
| Capsule CollidersA capsule-shaped collider component that handles collisions for GameObjects like barrels and character limbs. More info See in Glossary |
An array of CapsuleColliders which this Cloth instance should collide with. |
| Sphere CollidersA sphere-shaped collider component that handles collisions for GameObjects like balls or other things that can be roughly approximated as a sphere for the purposes of physics. More info See in Glossary |
An array of ClothSphereColliderPairs which this Cloth instance should collide with. |
Details
Cloth does not react to all collidersAn invisible shape that is used to handle physical collisions for an object. A collider doesn’t need to be exactly the same shape as the object’s mesh - a rough approximation is often more efficient and indistinguishable in gameplay. More info
See in Glossary in a sceneA Scene contains the environments and menus of your game. Think of each unique Scene file as a unique level. In each Scene, you place your environments, obstacles, and decorations, essentially designing and building your game in pieces. More info
See in Glossary, nor does it apply forces back to the world. When it has been added the Cloth component will not react to or influence any other bodies at all. Thus Cloth and the world do not recognise or see each other until you manually add colliders from the world to the Cloth component. Even after that, the simulation is still one-way: cloth reacts to those bodies but doesn’t apply forces back.
Additionally, you can only use three types of colliders with cloth: a sphere, a capsule, and conical capsule colliders, constructed using two sphere colliders. These restrictions all exist to help boost performance.
Edit Constraints Tool
You can apply constraints to specific vertices of the cloth to give them more or less freedom of movement.
In the InspectorA Unity window that displays information about the currently selected GameObject, asset or project settings, allowing you to inspect and edit the values. More info
See in Glossary, select Edit cloth constraints (top-left button) in the Cloth component. When the tool is active, small spheres appear in the Scene viewAn interactive view into the world you are creating. You use the Scene View to select and position scenery, characters, cameras, lights, and all other types of Game Object. More info
See in Glossary on all vertices of the mesh. They represent the cloth particles to which you can apply constraints. The Cloth Constraints tool window also appears at the bottom right of the Scene view.
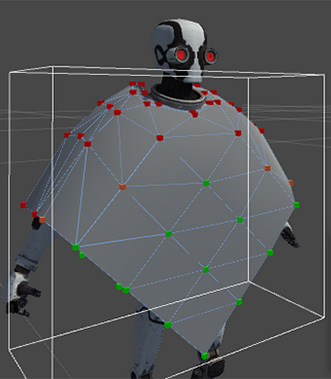
Constraint types and colors
For each cloth particle, you can set and display two types of constraints: * Max Distance – the maximum distance a cloth particle can travel from its vertex position. * Surface Penetration – how deep the cloth particle can penetrate the mesh.
The color of a particle represents the relative value of its constraint within the cloth, according to the type of constraint currently selected.
Constraints visualization
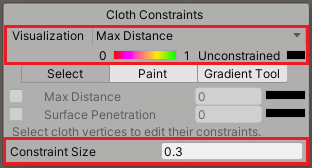
| Property | Function | |
|---|---|---|
| Visualization | Allows you to select which constraint type and which particles to display. | |
| Max Distance | Displays only the Max Distance values of the cloth particles. | |
| Surface Penetration | Displays only the Surface Penetration values of the cloth particles. | |
| Manipulate Backfaces | Enable this option to visualize and manipulate particles that might be hidden behind the current facing part of the cloth. | |
| [ Color spectrum ] | Provides the correspondance between particle colors and constraint values for the above selected constraint type, according to the mimimum and maximum values currently applied within the whole cloth. Black always means that the particle has no constraint. | |
| Constraint Size | The display size of the spheres that represent the cloth particles. Adjust this value at your convenience to ease your constraints edition. This property has no effect on the constraints themselves. | |
Constraints edition modes
You can use 3 different modes to edit the cloth constraint values.
| Mode | Description |
|---|---|
| Select | Allows you to apply a fixed constraint value to a pre-selected group of particles. |
| Paint | Allows you to apply a fixed constraint value by painting the cloth particles with a brush. |
| Gradient | Allows to apply a left-to-right linear gradient of constraint values to a pre-selected group of particles. |
The tool properties and the steps that you need to perform are different according to the mode you are using. In all cases, the last step corresponds to the action that applies the constraint values.
With the Select mode:
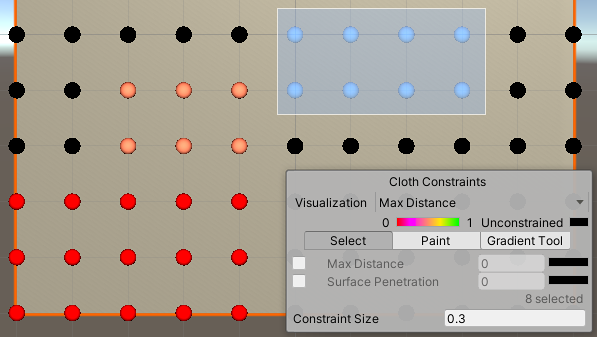
- Use the mouse cursor to draw a selection box or click on particles one at a time.
- Enable the constraint type that you want to apply to your selection: Max Distance, Surface Penetration, or both.
- Set a value according to the constraint type you just enabled.
With the Paint mode:
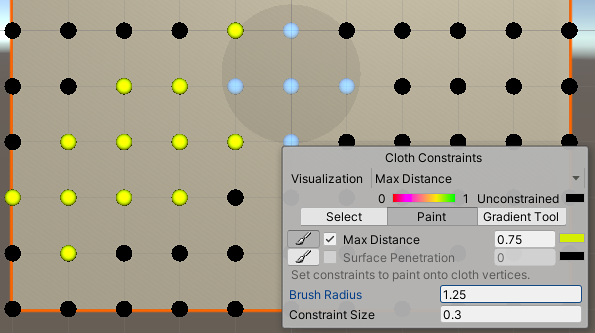
- Adjust the Brush Radius according to the area you need to cover with the brush.
- Enable the constraint type you want to apply: Max Distance, Surface Penetration, or both.
- Set a paint value according to the constraint type you just enabled.
- Paint the constraints on the particles with the brush.
With the Gradient mode:
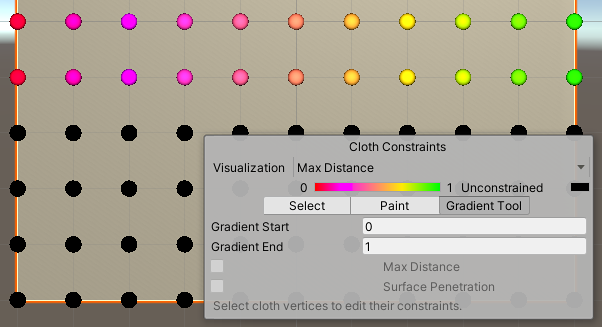
- Ensure to toggle on the 2D view in the Scene view (the tool cannot apply a gradient when in 3D view).
- Use the mouse cursor to draw a selection box or click on particles one at a time.
- Set the limit values of the gradient you want to apply left-to-right within your selection: Gradient Start and Gradient End.
- Enable the constraint type that you want to apply to your selection: Max Distance, Surface Penetration, or both.
Self collision and intercollision
Cloth collision makes character clothing and other fabrics in your game move more realistically. In Unity, a cloth has several cloth particles that handle collision. You can set up cloth particles for:
- Self-collision, which prevents cloth from penetrating itself.
- Intercollision, which allows cloth particles to collide with each other.
To set up the collision particles for a cloth, select the Self Collision and Intercollision button in the Cloth inspector:
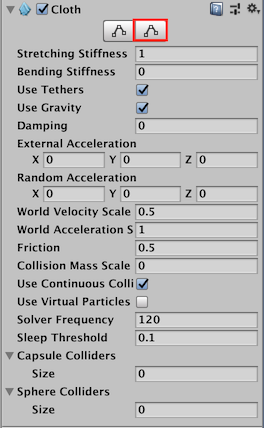
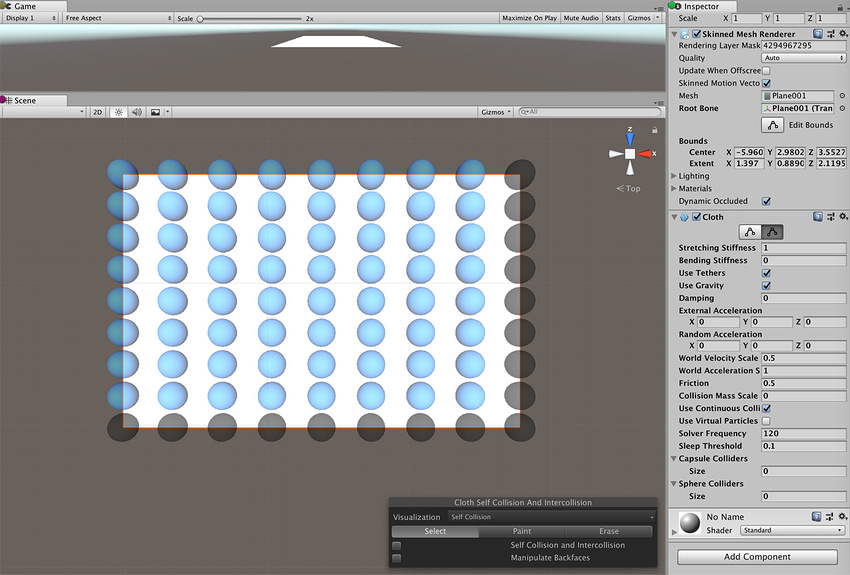
The Cloth Self Collision And Intercollision window appears in the Scene view:

Cloth particles appear automatically for skinned Meshes with a Cloth component. Initially, none of the cloth particles are set to use collision. These unused particles appear black:
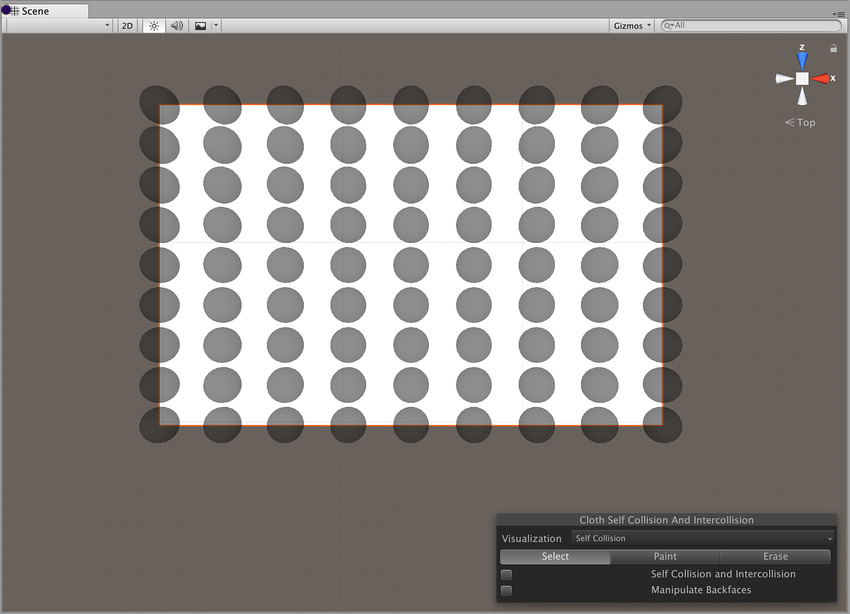
To apply self-collision or intercollision, you need to select a single set of particles to apply collision to. To select a set of particles for collision, click the Select button:

Now left-click and drag to select the particles you want to apply collision to:
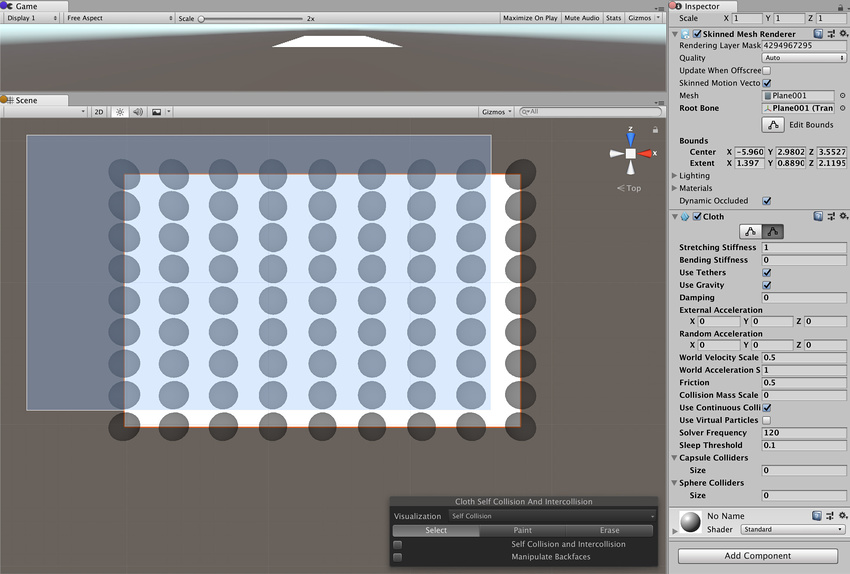
The selected particles appear in blue:
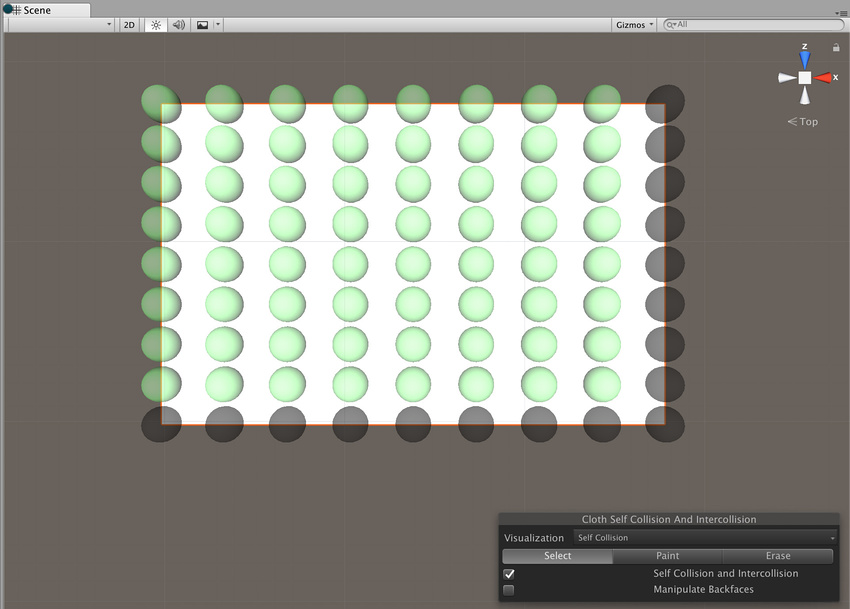
Tick the Self Collision and Intercollision checkbox to apply collision to the selected particles:

The particles you specify for use in collision appear in green:
To enable the self collision behavior for a cloth, to go the Self Collision section of the Cloth Inspector window and set Distance and Stiffness to non-zero values:
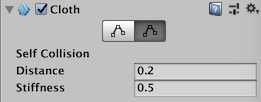
| Property: | Function: |
|---|---|
| Distance | The diameter of a sphere around each particle. Unity ensures that these spheres do not overlap during simulations. Distance should be smaller than the smallest distance between two particles in the configuration. If the distance is larger, self collision may violate some distance constraints and result in jittering. |
| Stiffness | How strong the separating impulse between particles should be. The cloth solver calculates this and it should be enough to keep the particles separated. |
Self collision and intercollision can take a significant amount of the overall simulation time. Consider keeping the collision distance small and using self collision indices to reduce the number of particles that collide with each other.
Self collision uses vertices, not triangles, so don’t expect self collision to work perfectly for Meshes with triangles much larger than the cloth thickness.
Paint and Erase modes allow you to add or remove particles for use in collision by holding the left mouse button down and dragging individual cloth particles:

When in Paint or Erase mode, particles specified for collision are green, unspecified particles are black, and particles underneath the brush are blue:
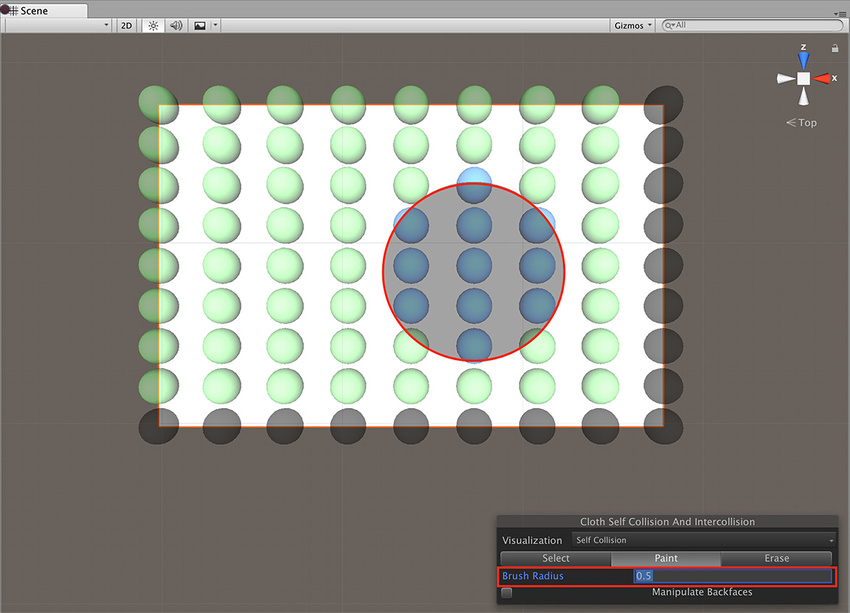
Cloth intercollision
You specify particles for intercollision in the same way as you specify particles for self collision, as described above. As with self collision, you specify one set of particles for intercollision.
To enable intercollision behavior, open the Physics settings (from the main menu in Unity: Edit > Project SettingsA broad collection of settings which allow you to configure how Physics, Audio, Networking, Graphics, Input and many other areas of your project behave. More info
See in Glossary, then select the Physics category) and set Distance and Stiffness to non-zero values in the Cloth InterCollision section:
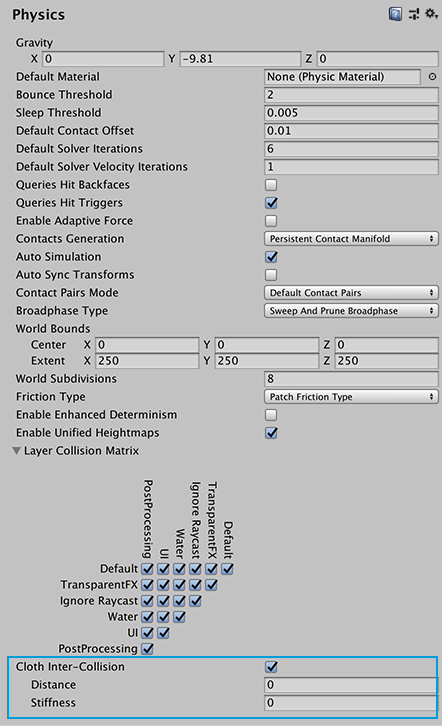
Cloth intercollision Distance and Stiffness properties have the same function as self collision Distance and Stiffness properties, which are described above.
Collider collision
Cloth is unable to simply collide with arbitrary world geometry, and now will only interact with the colliders specified in either the Capsule Colliders or Sphere Colliders arrays.
The sphere colliders array can contain either a single valid SphereCollider instance (with the second one being null), or a pair. In the former cases the ClothSphereColliderPair just represents a single sphere collider for the cloth to collide against. In the latter case, it represents a conic capsule shape defined by the two spheres, and the cone connecting the two. Conic capsule shapes are useful for modelling limbs of a character.
2017–12–05 Page amended
Cloth self collision and intercollision added in 2017.3 NewIn20173