手册
- Unity User Manual 2021.2
- New in Unity 2021.2
- Packages and feature sets
- Released packages
- 2D Animation
- 2D Pixel Perfect
- 2D PSD Importer
- 2D SpriteShape
- 2D Tilemap Extras
- Adaptive Performance
- Addressables
- Advertisement
- Alembic
- Analytics Library
- Android Logcat
- Animation Rigging
- AR Foundation
- ARCore XR Plugin
- ARKit Face Tracking
- ARKit XR Plugin
- Burst
- Cinemachine
- Code Coverage
- Editor Coroutines
- FBX Exporter
- In App Purchasing
- Input System
- iOS 14 广告支持
- JetBrains Rider 编辑器
- Live Capture
- Localization
- Magic Leap XR Plugin
- ML Agents
- Mobile Notifications
- Oculus XR Plugin
- OpenXR 插件
- Polybrush
- Post Processing
- ProBuilder
- Profile Analyzer
- Recorder
- Remote Config
- Scriptable Build Pipeline
- Sequences
- Terrain Tools
- Test Framework
- TextMeshPro
- 时间轴
- Tutorial Authoring Tools
- Tutorial Framework
- Unity Distribution Portal
- 版本控制
- Visual Scripting
- Visual Studio Code 编辑器
- Visual Studio 编辑器
- WebGL Publisher
- XR Plugin Management
- Release Candidates
- Pre-release packages
- 核心包
- 内置包
- AI
- Android JNI
- 动画
- Asset Bundle
- Audio
- 布料
- Director
- Image Conversion
- IMGUI
- JSONSerialize
- NVIDIA
- Particle System
- 物理 (Physics)
- Physics 2D
- Screen Capture
- Terrain
- Terrain Physics
- Tilemap
- UI
- UIElements
- Umbra
- Unity Analytics
- Unity Web Request
- Unity Web Request Asset Bundle
- Unity Web Request Audio
- Unity Web Request Texture
- Unity Web Request WWW
- Vehicles
- Video
- VR
- Wind
- XR
- Experimental packages
- 按关键字排列的包
- Unity 的 Package Manager
- 创建自定义包
- Feature sets
- Released packages
- 在 Unity 中操作
- 安装 Unity
- 升级 Unity
- Unity 的界面
- Quickstart guides
- 创建游戏玩法
- 编辑器功能
- 分析
- 资源工作流程
- 输入
- 2D
- 图形
- 渲染管线
- 摄像机
- 后期处理
- 光照
- 模型
- 网格
- 纹理
- 着色器
- 着色器核心概念
- 内置着色器
- 标准着色器
- 标准粒子着色器
- Autodesk Interactive 着色器
- 旧版着色器
- 内置着色器的用途和性能
- 普通着色器系列
- 透明着色器系列
- 透明镂空着色器系列
- 自发光着色器系列
- 反光着色器系列
- 反射顶点光照 (Reflective Vertex-Lit)
- 反光漫射 (Reflective Diffuse)
- 反光镜面反射 (Reflective Specular)
- 反光凹凸漫射 (Reflective Bumped Diffuse)
- 反光凹凸镜面反射 (Reflective Bumped Specular)
- 反光视差漫射 (Reflective Parallax Diffuse)
- 反光视差镜面反射 (Reflective Parallax Specular)
- 反光法线贴图无光照 (Reflective Normal Mapped Unlit)
- 反光法线贴图顶点光照 (Reflective Normal mapped Vertex-lit)
- 使用 Shader Graph
- 编写着色器
- 编写着色器概述
- ShaderLab
- ShaderLab:定义 Shader 对象
- ShaderLab:定义子着色器
- ShaderLab:定义一个通道
- ShaderLab:添加着色器程序
- ShaderLab: specifying package requirements
- ShaderLab:命令
- ShaderLab:使用 Category 代码块对命令进行分组
- ShaderLab 命令:AlphaToMask
- ShaderLab 命令:Blend
- ShaderLab 命令:BlendOp
- ShaderLab 命令:ColorMask
- ShaderLab 命令:Conservative
- ShaderLab 命令:Cull
- ShaderLab 命令:Offset
- ShaderLab 命令:模板
- ShaderLab 命令:UsePass
- ShaderLab 命令:GrabPass
- ShaderLab 命令:ZClip
- ShaderLab 命令:ZTest
- ShaderLab 命令:ZWrite
- ShaderLab 旧版功能
- Unity 中的 HLSL
- Unity 中的 GLSL
- 着色器示例
- 编写表面着色器
- 为不同的图形 API 编写着色器
- 着色器性能和性能分析
- 材质
- 粒子系统
- 选择粒子系统解决方案
- 内置粒子系统
- 使用内置粒子系统
- 粒子系统顶点流和标准着色器支持
- 粒子系统 GPU 实例化
- 粒子系统 C# 作业系统集成
- 组件和模块
- 粒子系统 (Particle System)
- 粒子系统模块
- Main module
- Emission 模块
- Shape module
- Velocity over Lifetime 模块
- Noise 模块
- Limit Velocity over Lifetime module
- Inherit Velocity 模块
- Lifetime by Emitter Speed module
- Force over Lifetime module
- Color over Lifetime module
- Color by Speed module
- Size over Lifetime 模块
- Size by Speed 模块
- Rotation over Lifetime module
- Rotation by Speed module
- External Forces 模块
- Collision 模块
- Triggers 模块
- Sub Emitters 模块
- Texture Sheet Animation 模块
- Lights 模块
- Trails 模块
- Custom Data 模块
- Renderer 模块
- 粒子系统力场 (Particle System Force Field)
- Visual Effect Graph
- 创建环境
- 天空
- 视觉效果组件
- 颜色
- 图形 API 支持
- 优化图形性能
- 物理系统
- 脚本
- 多玩家和联网
- 音频
- 视频概述
- 动画
- 创建用户界面 (UI)
- 导航和寻路
- Unity 服务
- Setting up your project for Unity services
- Unity Organizations
- Unity Ads
- Unity Analytics
- Unity Cloud Build
- Setting up Cloud Build
- Using the Unity Developer Dashboard to configure Cloud Build for Git
- Using the Unity Developer Dashboard to configure Cloud Build for Mercurial
- 将 Apache Subversion (SVN) 用于 Unity Cloud Build
- Using the Unity Developer Dashboard to configure Cloud Build for Perforce
- 使用 Unity 开发者控制面板 (Developer Dashboard) 对 Unity Cloud Build 进行 Plastic 配置
- 发布到 iOS
- 高级选项
- 在 Unity Cloud Build 中使用可寻址资源
- 编译清单
- 计划构建
- Cloud Build REST API
- Setting up Cloud Build
- Unity Cloud Content Delivery
- Unity IAP
- Setting up Unity IAP
- 跨平台指南
- 应用商店指南
- 实现应用商店
- Unity Collaborate
- Setting up Unity Collaborate
- Adding team members to your Unity project
- 查看历史记录
- Enabling Cloud Build with Collaborate
- 管理 Unity Editor 版本
- Reverting files
- Resolving file conflicts
- 排除资源使其不发布到 Collaborate
- 将单个文件发布到 Collaborate
- 还原项目至以前的版本
- 进行中 (In-Progress) 编辑通知
- 管理云存储
- 将项目移动到另一个版本控制系统
- Unity Accelerator
- Collaborate troubleshooting tips
- Unity Cloud Diagnostics
- Unity Integrations
- Multiplayer 服务
- Unity 分发平台
- XR
- 开源代码仓库
- Unity Asset Store
- 平台开发
- 将“Unity 用作库”用于其他应用程序
- Deep linking
- Xcode frame debugger Unity integration
- Android
- Introducing Android
- Getting started with Android
- Developing for Android
- Building and delivering for Android
- Android 开发故障排除
- 报告 Android 下的崩溃错误
- Chrome OS
- iOS
- Linux
- macOS
- tvOS
- WebGL
- Windows
- 将 Unity 集成到 Windows 和 UWP 应用程序中
- Windows 通用
- 通用 Windows 平台
- 已知问题
- Unity Search
- 旧版主题
- 术语表
- Unity User Manual 2021.2
- 旧版主题
- 旧版 Asset Bundle
- 在 Unity 4 中创建 Asset Bundle
在 Unity 4 中创建 Asset Bundle
在早于 Unity 5 的 Unity 版本中,必须单独使用编辑器脚本选择资源并将其添加到 Bundle。(在 Unity 5 中,我们在编辑器中提供了工具,以方便将资源分配给特定的 Bundle)。本页面的信息适用于在 Unity 4 中处理旧版项目的用户,并假设使用的是 Unity 4。
要创建 Asset Bundle,必须使用 BuildPipeline 编辑器类。使用编辑器类的所有脚本必须放在名为 Editor 的文件夹中(可位于 Assets 文件夹内的任何位置)。以下是此类脚本的 C# 示例:
// 旧版 Unity 4 示例。不可用于 Unity 5 和更高版本
using UnityEngine;
using UnityEditor;

public class ExportAssetBundles {
    [MenuItem("Assets/Build AssetBundle")]
    static void ExportResource () {
        string path = "Assets/myAssetBundle.unity3d";
        Object[] selection = Selection.GetFiltered(typeof(Object), SelectionMode.DeepAssets);
        BuildPipeline.BuildAssetBundle(Selection.activeObject, selection, path,
                                       BuildAssetBundleOptions.CollectDependencies
                                     | BuildAssetBundleOptions.CompleteAssets);
    }
}
编辑器脚本不需要应用于游戏对象,而是由编辑器使用。前面的示例将在编辑器的“Assets”菜单中创建一个名为“Build AssetBundle”的新菜单项。
要使用此示例,请执行以下操作:
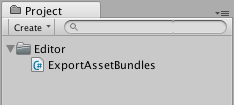
- 在 Project 视图中名为 Editor 的文件夹内创建一个名为 ExportAssetBundles.cs 的 C# 脚本文件。
- 在项目文件夹中选择要包含在 AssetBundle 中的一个或多个资源。
- 从 Assets 菜单中选择 Build AssetBundle。单击“Save”以创建 AssetBundle。
- ExportResource 函数的第一行将设置 AssetBundle 的路径。
- 下一行将需要包含在 AssetBundle 中的选定资源设置为在 Project 窗口中选择的对象。
BuildAssetBundle 函数行将创建 AssetBundle 并将其保存到指定位置。第一个参数指定 mainAsset,这是一种从 AssetBundle 加载资源时可直接使用 mainAsset 属性获取的特殊资源。设置主资源 (main Asset) 不是必须的,如果不使用这种资源,可对该参数使用 null 值。第二个参数是构成 AssetBundle 的对象数组。第三个参数指定磁盘上用于保存 AssetBundle 的位置。最后一个参数是构建 AssetBundle 时使用的构建标志或选项。这些 BuildAssetBundleOptions 可使用按位 OR 运算符加以组合。
构建 AssetBundle 应该是发布前执行的步骤,只需一次函数调用(例如使用一个构建所有 AssetBundle 的菜单项)进行一次即可。在开发应用程序时,应编写辅助脚本;通过脚本,只需单击一次或在批处理模式下无需用户干预,即可为目标平台构建所有 AssetBundle。
您可以使用三种类方法来构建 AssetBundle:
BuildPipeline.BuildAssetBundle 允许您构建任何资源类型的 AssetBundle。
当您仅希望包含进行流传输和加载的场景作为数据时,使用 BuildPipeline.BuildStreamedSceneAssetBundle。
BuildPipeline.BuildAssetBundleExplicitAssetNames 与 BuildPipeline.BuildAssetBundle 相同,但有一个额外的参数可为每个对象指定自定义字符串标识符(名称)。
如何构建 AssetBundle 的示例
构建 Asset Bundle 是通过编辑器脚本完成的。BuildPipeline.BuildAssetBundle 的脚本文档中提供了此过程的一个基本示例。
为了此示例的需要,请将以上链接中的脚本复制并粘贴到一个名为 ExportAssetBundles 的新 C# 脚本中。此脚本应放在名为 Editor 的文件夹中,以便它能在 Unity Editor 中运行。

现在,在 Assets 菜单中,应该会看到两个新的菜单选项。

Build AssetBundle From Selection - Track dependencies。此选项可将当前对象构建到 Asset Bundle 中并包含其所有依赖项。例如,如果您有一个由多个层级结构层组成的预制件,则将以递归方式将所有子对象和组件添加到 Asset Bundle 中。
Build AssetBundle From Selection - No dependency tracking。此方法与前一种方法相反,仅会包含您选择的单个资源。
在此示例中,应创建一个新的预制件。首先通过 GameObject > 3D Object > Cube 创建新立方体(此操作将在 Hierarchy 视图中创建新的立方体)。然后,将立方体从 Hierarchy 视图拖动到 Project 视图中,此过程将创建该对象的预制件。
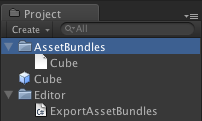
然后,应右键单击 Project 窗口中的立方体 (Cube) 预制件,并选择 Build AssetBundle From Selection - Track dependencies。 此时,您将看到一个窗口,用于保存“捆绑的”资源。如果您创建了一个名为“AssetBundles”的新文件夹并将立方体保存为 __Cube.unity3d__,Project 窗口现在将如下所示。

此时,您可以将 AssetBundle Cube.unity3d 移动到本地存储设备上的其他位置,或将其上传到您选择的服务器。
构建 Asset Bundle 时如何更改资源属性的示例
您可以使用 AssetDatabase.ImportAsset 强制在调用 BuildPipeline.BuildAssetBundle 之前重新导入资源,然后使用 AssetPostprocessor.OnPreprocessTexture 设置所需的属性。以下示例将向您展示如何在构建 Asset Bundle 时设置不同的纹理压缩。
// 旧版 Unity 4 示例。不可用于 Unity 5 和更高版本。
// 从 Project 视图中的选定对象构建 Asset Bundle,
// 并使用 AssetPostprocessor 更改纹理格式。

using UnityEngine;
using UnityEditor;

public class ExportAssetBundles {

    // 存储 TextureProcessor 的当前纹理格式。
    public static TextureImporterFormat textureFormat;

    [MenuItem("Assets/Build AssetBundle From Selection - PVRTC_RGB2")]
    static void ExportResourceRGB2 () {
        textureFormat = TextureImporterFormat.PVRTC_RGB2;
        ExportResource();
    }

    [MenuItem("Assets/Build AssetBundle From Selection - PVRTC_RGB4")]
    static void ExportResourceRGB4 () {
        textureFormat = TextureImporterFormat.PVRTC_RGB4;
        ExportResource();
    }

    static void ExportResource () {
        // 显示保存面板。
        string path = EditorUtility.SaveFilePanel ("Save Resource", "", "New Resource", "unity3d");

        if (path.Length != 0) {
            // 从当前所选项构建资源文件。
            Object[] selection = Selection.GetFiltered(typeof(Object), SelectionMode.DeepAssets);

            foreach (object asset in selection) {
                string assetPath = AssetDatabase.GetAssetPath((UnityEngine.Object) asset);
                if (asset is Texture2D) {
                    // 强制通过 TextureProcessor 重新导入。
                    AssetDatabase.ImportAsset(assetPath);
                }
            }

            BuildPipeline.BuildAssetBundle(Selection.activeObject,
                                           selection,
                                           path,
                                           BuildAssetBundleOptions.CollectDependencies |
                                           BuildAssetBundleOptions.CompleteAssets);
            Selection.objects = selection;
        }
    }
}
// 旧版 Unity 4 示例。不可用于 Unity 5 和更高版本。
// 构建 Asset Bundle 时更改纹理格式。

using UnityEngine;
using UnityEditor;

public class TextureProcessor : AssetPostprocessor
{
    void OnPreprocessTexture() {
        TextureImporter importer = assetImporter as TextureImporter;
        importer.textureFormat = ExportAssetBundles.textureFormat;
    }
}
此外还可使用 AssetDatabase.ImportAssetOptions 控制资源的导入方式。
在测试环境中,有时需要测试更改,而此更改需要重新构建 AssetBundle。在此类情况下,建议在构建 AssetBundle 时使用 BuildAssetBundleOptions.UncompressedAssetBundle 选项。此选项可加快构建和加载 AssetBundle 的速度,但也会导致它们更大,因此下载时间更长。
在生产环境中构建 AssetBundle
首次使用 AssetBundle 时,似乎按照以上示例所示手动构建它们就足够了。但随着项目规模增大和资源数量增加,手动执行此过程的效率不高。更好的方法是编写一个为项目构建所有 AssetBundle 的函数。例如,您可以使用一个文本文件将资源文件映射到 AssetBundle 文件。
Did you find this page useful? Please give it a rating:
Thanks for rating this page!
What kind of problem would you like to report?
Thanks for letting us know! This page has been marked for review based on your feedback.
If you have time, you can provide more information to help us fix the problem faster.
Provide more information
You've told us this page needs code samples. If you'd like to help us further, you could provide a code sample, or tell us about what kind of code sample you'd like to see:
You've told us there are code samples on this page which don't work. If you know how to fix it, or have something better we could use instead, please let us know:
You've told us there is information missing from this page. Please tell us more about what's missing:
You've told us there is incorrect information on this page. If you know what we should change to make it correct, please tell us:
You've told us this page has unclear or confusing information. Please tell us more about what you found unclear or confusing, or let us know how we could make it clearer:
You've told us there is a spelling or grammar error on this page. Please tell us what's wrong:
You've told us this page has a problem. Please tell us more about what's wrong:
Thank you for helping to make the Unity documentation better!
Your feedback has been submitted as a ticket for our documentation team to review.
We are not able to reply to every ticket submitted.