WMR quick start guide
Windows Mixed Reality (WMR) applications are Universal Windows Applications, and follow the same general guidelines as other Windows Store applications. The development environment is Visual Studio 2017, and does not require an additional SDK installation (Visual Studio installs the necessary SDKs).
Installing required tools
You must install a number of tools on your PC and headset before you can develop Windows Mixed Reality applications. These tools include:
Visual Studio 2017 with required workloads installed (Universal Windows Platform development and Game development with Unity).
HoloLens Emulator and Holographic Templates (Only required for HoloLens development).
To ensure that you install all of the required tools for developing Windows Mixed Reality applications (on both HoloLens and immersive headsets) follow the instructions from Microsoft’s documentation on Installing the Tools.
For detailed information on developing for Windows Mixed Reality, see Microsoft’s WMR documentation.
After you have installed the required tools, follow the short guide below to set up a Unity project and publish on Windows Mixed Reality devices.
Project set up
A Unity project for Windows Mixed Reality is very similar to a Unity project for other platforms, with a few notable exceptions. To fully support Windows Mixed Reality features, you need to change cameraA component which creates an image of a particular viewpoint in your scene. The output is either drawn to the screen or captured as a texture. More info
See in Glossary, performance and publishing settings as outlined in the following sections.
Camera settings
Ensure that the TagA reference word which you can assign to one or more GameObjects to help you identify GameObjects for scripting purposes. For example, you might define and “Edible” Tag for any item the player can eat in your game. More info
See in Glossary for the Camera you intend to use to track the HMD’s position is set to MainCamera. To check this, select the Camera you want to use, and in the InspectorA Unity window that displays information about the currently selected GameObject, Asset or Project Settings, alowing you to inspect and edit the values. More info
See in Glossary window, see the Tag drop-down. Unity automatically applies this tag to the default Camera in the SceneA Scene contains the environments and menus of your game. Think of each unique Scene file as a unique level. In each Scene, you place your environments, obstacles, and decorations, essentially designing and building your game in pieces. More info
See in Glossary.

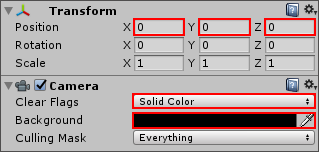
For HoloLens , set the Clear Flags property of the Main Camera to Solid Color rather than the default Skybox, and set the Background color to black (R = 0, G = 0, B = 0, A = 0). You should also make sure the Camera’s Transform position is set to (0, 0, 0).
Performance settings
For HoloLens only, use the Fastest quality setting in Edit > Project SettingsA broad collection of settings which allow you to configure how Physics, Audio, Networking, Graphics, Input and many other areas of your Project behave. More info
See in Glossary > Quality. This maximizes performance and reduces power consumption. In particular, avoid soft shadows and shadow cascades, because they require too many resources to use on the HoloLens.

To learn more about optimizing your Windows Mixed Reality application, see Microsoft’s documentation on Performance recommendations for Unity.
Publishing settings
To enable important system capabilities for a Windows Mixed Reality application, go to Player SettingsA settings manager that lets you set various player-specific options for the final game built by Unity. More info
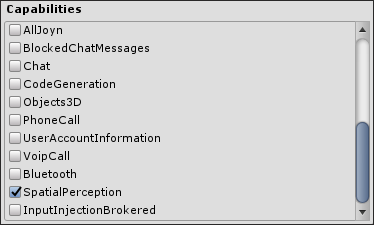
See in Glossary > Publishing Settings and check the box for each option you want to use from the Capabilities list.

Note: Not all of the publishing settings in the Capabilities list are specific to Windows Mixed Reality. For more information, see WSA Player Settings.
The following table describes the important capability settings for publishing Windows Mixed Reality applications:
| Capability Setting | Immersive headset support | HoloLens support |
Description |
|---|---|---|---|
| InternetClient | Y | Y | Provides access to your Internet connection for outgoing connections to the Internet. WMR requires this for voice recognition. |
| InternetClientServer | Y | Y | Provides access to your Internet connection, including incoming unsolicited connections from the Internet. The app can send information to or from your computer through a firewall. WMR requires this for voice recognition. Note: If this is active, you don’t need to use InternetClient. |
| MusicLibrary | Y | N | Provides access to your music library and playlists, including the capability to add, change, or delete files. This allows you to use VideoCaptureA Unity API that allows you to record videos directly to the file system in the MP4 format. More info See in Glossary audio recording functionality in your WMR app. |
| PicturesLibrary | Y | Y | Your picture library, including the capability to add, change, or delete files. This capability also includes pictures libraries on HomeGroup computers, along with picture file types on locally connected media servers. |
| VideosLibrary | Y | N | Your video library, including the capability to add, change, or delete files. This capability also includes video libraries on HomeGroup computers, along with video file types on locally connected media servers. |
| WebCam | N | Y | Allows you to use PhotoCaptureAn API that enables you to take photos from a HoloLens web camera and store them in memory or on disk. More info See in Glossary and VideoCapture functionality in your app. |
| Microphone | Y | Y | Allows you to use voice recognition functionality in your app. |
| Bluetooth | Y | Y | Enables bluetooth communication in your app. WMR requires this to allow you to use Windows Mixed Reality spatial controllers. |
| SpatialPerception | N | Y | Allows you to use Spatial MappingThe process of mapping real-world surfaces into the virtual world. More info See in Glossary in your app. |
For more detail on these capabilities, see the Microsoft documentation.
Exporting a Visual Studio solution
When you have created your project and are ready to test it, export the project to a Visual Studio solution. To deploy your WMR application you must first build a Visual Studio solution with Unity.
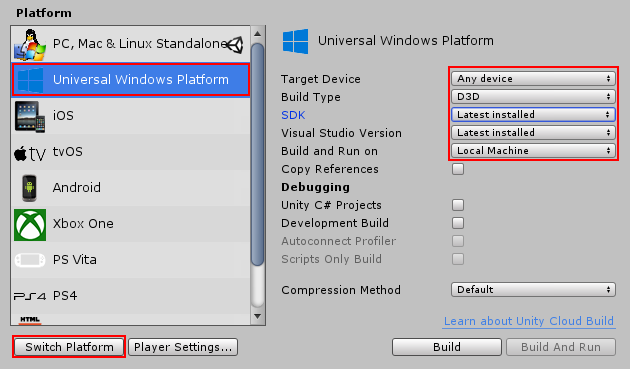
Go to File > Build Settings and select Universal Windows PlatformAn IAP feature that supports Microsoft’s In App Purchase simulator, which allows you to test IAP purchase flows on devices before publishing your application. More info
See in Glossary from the Platform list. Now click the Switch Platform button at the bottom left of the window to configure the Editor to build for Windows.

For a standard build, the default settings work correctly for Windows Mixed Reality immersive headsets.
To build for HoloLens, you should change the Target Device setting to HoloLensAn XR headset for using apps made for the Windows Mixed Reality platform. More info
See in Glossary.
The table below provides a list of the Build Settings available for the Universal Windows Platform and describes their usage.
| Setting | Description | |
|---|---|---|
| Target Device | Choose Any Device to build for immersive headsets and HoloLens to build for HoloLens. This is important for optimisation. | |
| Build Type | Choose from D3D (Direct3D) or XAML. | |
| D3D | Gives faster results than XAML because there is no XAML layer in the app. This builds the app in 3D exclusive space, and you can’t switch to a 2D XAML app or modify this after generation. | |
| XAML | Adds an XAML code layer over the app, which allows the user to switch from the 3D app and open a 2D app. XAML code can be modified after generation. The most common example of this is using a touch keyboard for the HoloLens. | |
| SDK | Select the specific version of Windows 10 SDK your app uses. This is set to Latest installed by default. | |
| Visual Studio Version | Select the specific version of Visual Studio to generate a solution (.sln) for. This is set to Latest installed by default, which is the recommended setting if you have Visual Studio 2017 installed. | |
| Build and Run on | Choose which device your application runs on when you click the Build and Run button. This is set to Local Machine by default, and you should not need to change this. Note: Unity ignores this option when you click the Build button. |
|
| Copy References | Enables copying of UnityPlayer.dll, associated dlls and data to the generated solution folder instead of referencing them directly from Unity installation folder. This requires extra space, but enables the generated solution to be portable (you can copy it to another machine and build it even if Unity is not installed on that machine). | |
| Unity C# Projects | Allows inclusion of the scripting files from your project in the generated solution. This setting is only available when you set the Scripting BackendA framework that powers scripting in Unity. Unity supports three different scripting backends depending on target platform: Mono, .NET and IL2CPP. Universal Windows Platform, however, supports only two: .NET and IL2CPP. More info See in Glossary to .NET. |
|
| Development BuildA development build includes debug symbols and enables the Profiler. More info See in Glossary |
Unlocks debug features and allows developers to test and debug built projects. This allows you to connect the built project to the Unity profilerA window that helps you to optimize your game. It shows how much time is spent in the various areas of your game. For example, it can report the percentage of time spent rendering, animating or in your game logic. More info See in Glossary, and provides other development features such as more verbose debug log outputs. Enabling this setting also makes the Scripts Only Build and Autoconnect Profiler settings available. |
|
| Autoconnect Profiler | Allow Unity’s built-in profiler to automatically connect to the build. This is only available when Development Build is enabled. | |
| Scripts Only Build | Build only the scriptsA piece of code that allows you to create your own Components, trigger game events, modify Component properties over time and respond to user input in any way you like. More info See in Glossary of a project. This is only available when Development Build is enabled. |
|
Before you can build your app, you should configure your Player Settings to build Windows Mixed Reality applications correctly:
From the Build Settings window, click Player Settings > XR Settings.
Enable Virtual Reality Supported.
Click the + button on the Virtual Reality Devices list and select Windows Mixed RealityA mixed reality platform developed by Microsoft, built around the API of Windows 10. More info
See in Glossary.
After you have configured your Build Settings, click the BuildThe process of compiling your Project into a format that is ready to run on a specific platform or platforms. More info
See in Glossary button. Build your project to a new folder and remember the location.
To deploy your app from Visual Studio, do the following:
In Visual Studio, open the generated solution file (.sln) located inside the folder where you built your project.
-
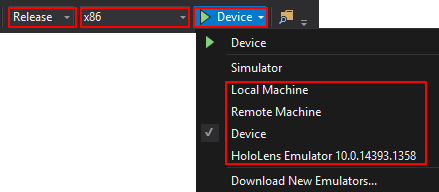
In the main Visual Studio taskbar (left to right in image below), change the target platform for your solution, and select which device to run the solution on.

Click the dropdown arrow on the right of the Run button (marked by a green arrowhead) and a list of possible devices will appear.
There are four main options to test and run your Windows Mixed Reality application from Visual Studio:
- Local Machine
- Remote Machine
- Device
- HoloLens Emulator
The sections below describe these options in more detail. Not all of these options work for all WMR devices; some are specific to HoloLens or immersive headsets.
Local Machine (immersive headsets only)
Local Machine allows you to build your application and install it to the Mixed Reality Portal on your Windows 10 PC. When built, your app automatically runs on your PC, and you can test it through your immersive headset.
You can launch your application again at any time through the Start menu from the Mixed Reality Portal.
Remote Machine (HoloLens only)
Remote Machine prompts you to enter the IP address of the HoloLens or other headset you wish deploy to. When you click Run with Remote Machine selected, a dialog box asks you for a PIN for the device.
To get this PIN:
Switch on your HoloLens and go to HoloLens Settings.
Select the For Developers tab and enable Developer Mode using the provided toggle button.
Select the Pair button to get the PIN and enter it into Visual Studio in the popup box.
Your application remote installs onto your HoloLens and, when the build process is complete, runs on the device automatically.
Device (HoloLens only)
Device allows you to build your Visual Studio project and deploy it to a HoloLens device connected to your PC via a USB cable.
When you click Run, Visual Studio builds the project, installs the app on the connected HoloLens, and runs on the device automatically once the build process is complete.
HoloLens Emulator (HoloLens only)
HoloLens Emulator allows you to build the Visual Studio project and run the app on an installed HoloLens emulator. This emulator lets you test your app and simulate gestures and other inputs on your PC before you deploy it to a HoloLens device.
Including Scripts in your generated solution (optional)
Tick the Unity C# Projects checkbox to include the scripting files from your project in the generated solution. This allows you to edit and debug your scripts without needing to re-export from Unity. You only need to re-export when your project settings or content change. This setting is only available when you set the Scripting Backend to .NET.
You can use either IL2CPPA Unity-developed scripting back-end which you can use as an alternative to Mono when building Projects for some platforms. More info
See in Glossary or .NET scripting backends for your application. To change the Scripting Backend, go to Player Settings > Other Settings and select the relevant backend in the Configuration section.
For more information on ILCPP, see Unity’s documentation on How IL2CCP works.
For more information on building to Windows Mixed Reality devices, see Microsoft’s documentation on Exporting and building a Unity Visual Studio solution.
2018–03–27 Page published with editorial review
New content added for XR API changes in 2017.3
Did you find this page useful? Please give it a rating: