マニュアル
- Unity マニュアル (2017.1)
- Unity を使用する
- Unity 入門
- アセットワークフロー
- 主なウィンドウ
- ゲームの作成
- エディター機能
- 高度なゲーム開発
- エディターの高度なトピック
- ライセンスアクティベーション
- アップグレードガイド
- 2D
- グラフィックス
- グラフィックスの概要
- ライティング
- カメラ
- マテリアルとシェーダーとテクスチャ
- ビデオの概要
- Terrain (地形) エンジン
- Tree エディター
- パーティクルシステム
- ポストプロセシングの概要
- リフレクションプローブ
- クラスターレンダリング
- 高度なレンダリング機能
- プロシージャルマテリアル
- プロシージャルジオメトリ
- グラフィックスパフォーマンスの最適化
- レイヤー
- OctaneRender
- グラフィカルな機能
- カメラ
- シェーダーリファレンス
- パーティクルシステム
- パーティクルシステム
- パーティクルシステムモジュール
- #Particle System メインモジュール
- Emission モジュール
- パーティクルシステム Shape モジュール
- Velocity Over Lifetime モジュール
- Noise モジュール
- Limit Velocity Over Lifetime モジュール
- Inherit Velocity モジュール
- Force Over Lifetime モジュール
- Color Over Lifetime モジュール
- Color By Speed モジュール
- Size Over Lifetime モジュール
- Size by Speed モジュール
- Rotation Over Lifetime モジュール
- Rotation By Speed モジュール
- External Forces モジュール
- Collision モジュール
- Triggers モジュール
- Sub Emitters モジュール
- Texture Sheet Animation モジュール
- Lights モジュール
- Trails モジュール
- Custom Data モジュール
- Renderer モジュール
- パーティクルシステム (Unity3.5 以前の旧 Particles システム)
- ビジュアルエフェクト
- メッシュのコンポーネント
- Texture コンポーネント
- コンポーネントのレンダリング
- レンダリングパイプラインについての詳細
- Sprite Renderer
- グラフィックスの使い方
- グラフィックスチュートリアル
- グラフィックスの概要
- 物理演算
- スクリプト
- マルチプレイヤーとネットワーキング
- ネットワークの概要
- ネットワーキング リファレンス
- NetworkAnimator
- NetworkBehaviour
- NetworkClient
- NetworkConnection
- NetworkDiscovery
- NetworkIdentity
- Network Lobby Manager
- Network Lobby Player
- NetworkManager
- Network Manager HUD
- Network Proximity Checker
- NetworkReader
- NetworkServer
- NetworkStartPosition
- NetworkTransform
- NetworkTransformChild
- NetworkTransformVisualizer
- NetworkTransport
- NetworkWriter
- オーディオ
- オーディオの概要
- オーディオファイル
- トラッカーモジュール
- Audio Mixer
- ネイティブオーディオプラグイン SDK
- Audio プロファイラー
- アンビソニックなオーディオ
- オーディオリファレンス
- オーディオクリップ
- Audio Listener
- オーディオソース
- Audio Mixer
- Audio Filter
- Audio Effect
- Audio Low Pass Effect
- Audio High Pass Effect
- Audio Echo Effect
- Audio Flange Effect
- Audio Distortion Effect
- Audio Normalize Effect
- Audio Parametric Equalizer Effect
- Audio Pitch Shifter Effect
- Audio Chorus Effect
- Audio Compressor Effect
- Audio SFX Reverb Effect
- Audio Low Pass Simple Effect
- Audio Delay Effect
- Audio High Pass Simple Effect
- Reverb Zones
- Microphone(マイク)
- Audio Settings
- アニメーション
- タイムライン
- UI
- ナビゲーションと経路探索
- Unity サービス
- Unity Services のためのプロジェクトの設定
- Unity Ads
- Unity Analytics
- Unity Cloud Build
- Unity IAP
- Unity IAP のセットアップ
- クロスプラットフォームガイド
- ストア ガイド
- ストアの実装
- Unity Collaborate
- Unity Performance Reporting
- Multiplayer
- バーチャルリアリティ
- オープンソースリポジトリ
- アセットストアへの公開
- プラットフォーム別情報
- スタンドアロン
- Apple Mac
- Apple TV
- WebGL
- iOS
- Android
- Android 用の開発を始める
- Android Player Settings
- Android の 2D テクスチャ オーバーライド
- Android の Gradle
- Android マニフェスト
- Samsung TV
- Tizen
- Windows
- Windows 全般
- ユニバーサル Windows プラットフォーム
- はじめに
- ユニバーサル Windows プラットフォーム: 展開
- ユニバーサル Windows プラットフォーム: プロファイラー
- ユニバーサル Windows プラットフォーム: コマンドライン引数
- ユニバーサル Windows プラットフォーム: Association 起動
- AppCallbacks クラス
- ユニバーサル Windows プラットフォーム: C# スクリプトで書いた WinRT API
- ユニバーサル Windows プラットフォーム: Player Settings
- スクリプティングバックエンド
- FAQ
- ユニバーサル Windows プラットフォーム: 例
- ユニバーサル Windows プラットフォーム: コードスニペッツ
- 既知の問題
- Windows Holographic
- Web Player
- モバイル開発者チェックリスト
- 実験的機能
- 旧トピック
- ベスト プラクティス ガイド
- エキスパートガイド
- 2017.1 の新機能
- Unity マニュアル (2017.1)
- アニメーション
- Playables API
- Playable の例
Playable の例
PlayableGraph Visualizer
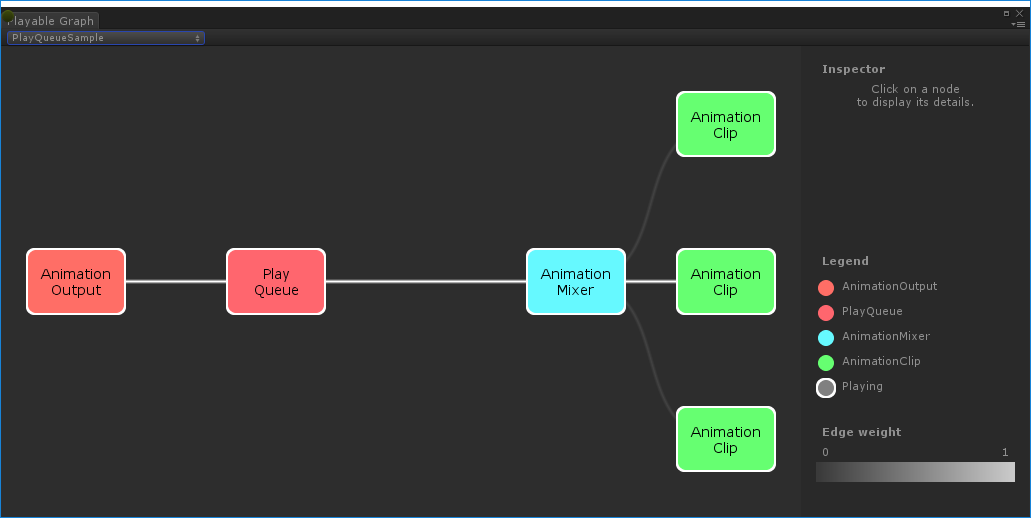
PlayableGraph Visualizer は、GitHub で手に入れることができます。このドキュメントでは、PlayableGraph Visualizer (下図) を使用して Playables API で作成したツリーとノードを説明しています。
PlayableGraph Visualizer を使用する手順は以下の通りです。
使っている Unity のバージョンに適切な PlayableGraph Visualizer を GitHub レポジトリ からダウンロードします。
Window > PlayableGraph Visualizer と選択して、PlayableGraph Visualizer を開きます。
GraphVisualizerClient.Show(PlayableGraph graph, string name) で該当するグラフを登録します。
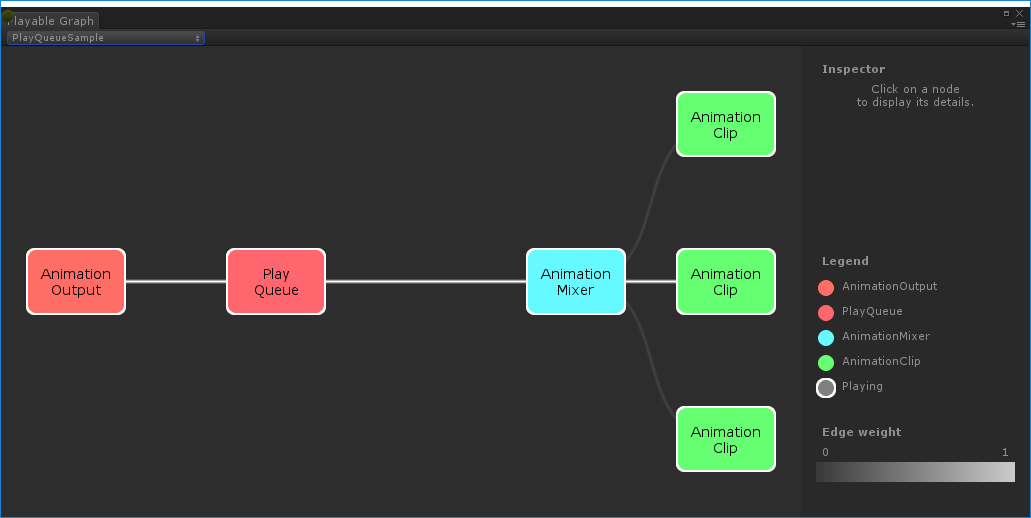
グラフの playable は色のついたノードで示されています。線の色の濃さはブレンドのウェイトを表しています。このツールの詳細は GitHub を参照してください。
ゲームオブジェクトの 1 つのアニメーションクリップを再生
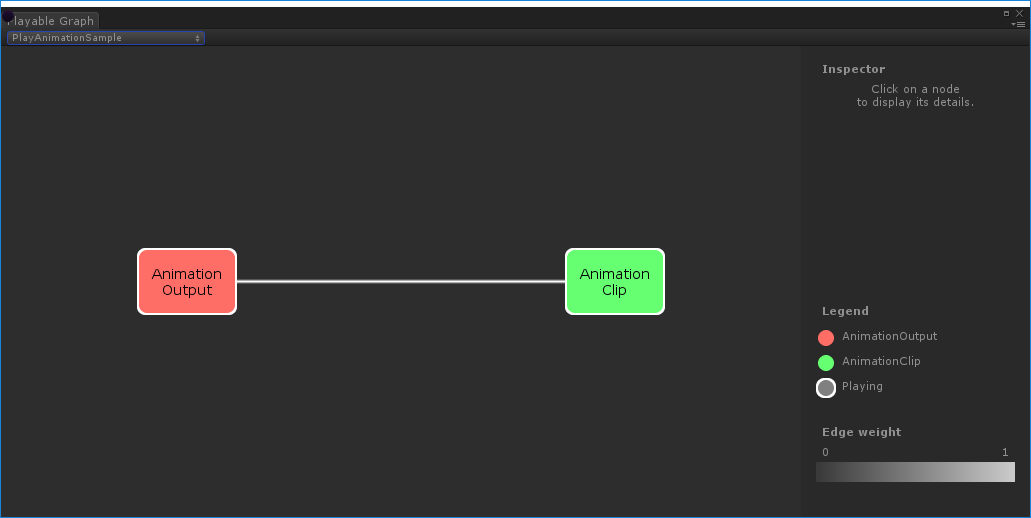
この例は、1 つの playable ノードとリンクする playable 出力を持つ、簡単な PlayableGraph を示しています。playable ノードは 1 つのアニメーションクリップ (クリップ) を再生します。AnimationClipPlayable でアニメーションクリップをラップし、Playables API と互換性を持つようにする必要があります。
using UnityEngine;

using UnityEngine.Playables;

using UnityEngine.Animations;

[RequireComponent(typeof(Animator))]

public class PlayAnimationSample : MonoBehaviour

{

    public AnimationClip clip;

    PlayableGraph playableGraph;

    void Start()

    {

        playableGraph = PlayableGraph.Create();

        playableGraph.SetTimeUpdateMode(DirectorUpdateMode.GameTime);

        var playableOutput = AnimationPlayableOutput.Create(playableGraph, "Animation", GetComponent<Animator>());

        // playable でクリップをラップします

        var clipPlayable = AnimationClipPlayable.Create(playableGraph, clip);

        // Playable を output に接続します

        playableOutput.SetSourcePlayable(clipPlayable);

        // グラフを再生します

        playableGraph.Play();

    }

    void OnDisable()

    {

        // グラフで作成されたすべての Playables と PlayableOutputs を破棄します

        playableGraph.Destroy();

    }

}
以下の例のように、AnimationPlayableUtilities を使用すると、アニメーションの playable の作成と再生を簡易化できます。
__
using UnityEngine;

using UnityEngine.Playables;

using UnityEngine.Animations;

[RequireComponent(typeof(Animator))]

public class PlayAnimationUtilitiesSample : MonoBehaviour

{

    public AnimationClip clip;

    PlayableGraph playableGraph;

    void Start()

    {

        AnimationPlayableUtilities.PlayClip(GetComponent<Animator>(), clip, out playableGraph);

    }

    void OnDisable()

    {

        // グラフで作成されたすべての Playables と Outputs を破棄します

        playableGraph.Destroy();

    }

}
アニメーションブレンドツリーの作成
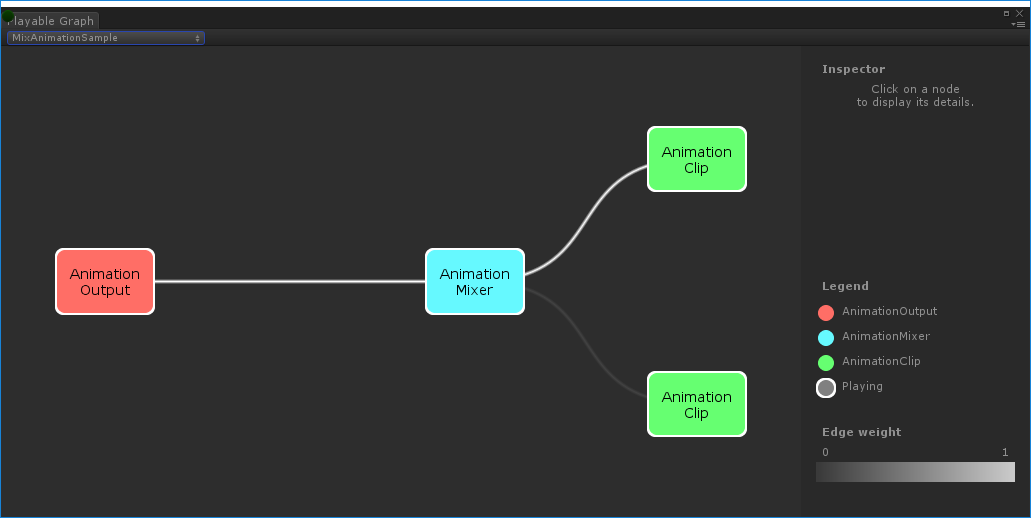
この例は、2 つのアニメーションクリップをブレンドするための AnimationMixerPlayable の使い方を示しています。アニメーションクリップをブレンドする前に、それらを playable でラップする必要があります。これを行うには、AnimationClipPlayable (clipPlayable0 と clipPlayable1) はそれぞれの AnimationClip (clip0 と clip1) をラップします。SetInputWeight() メソッドは、動的に各 playable のブレンドウェイトを調整します。
この例にはありませんが、 playable ミキサーと他の playable をブレンドするために AnimationMixerPlayable を利用することもできます。
using UnityEngine;

using UnityEngine.Playables;

using UnityEngine.Animations;

[RequireComponent(typeof(Animator))]

public class MixAnimationSample : MonoBehaviour

{

    public AnimationClip clip0;

    public AnimationClip clip1;

    public float weight;

    PlayableGraph playableGraph;

    AnimationMixerPlayable mixerPlayable;

    void Start()

    {

        // グラフとミキサーを作成し、それらを Animator にバインドします

        playableGraph = PlayableGraph.Create();

        var playableOutput = AnimationPlayableOutput.Create(playableGraph, "Animation", GetComponent<Animator>());

        mixerPlayable = AnimationMixerPlayable.Create(playableGraph, 2);

        playableOutput.SetSourcePlayable(mixerPlayable);

        // AnimationClipPlayable を作成し、それをミキサーに接続します

        var clipPlayable0 = AnimationClipPlayable.Create(playableGraph, clip0);

        var clipPlayable1 = AnimationClipPlayable.Create(playableGraph, clip1);

        playableGraph.Connect(clipPlayable0, 0, mixerPlayable, 0);

        playableGraph.Connect(clipPlayable1, 0, mixerPlayable, 1);


        // Graph を再生します

        playableGraph.Play();

    }

    void Update()

    {

        weight = Mathf.Clamp01(weight);

        mixerPlayable.SetInputWeight(0, 1.0f-weight);

        mixerPlayable.SetInputWeight(1, weight);

    }

    void OnDisable()

    {

        // グラフで作成したすべての Playables と Outputs を破棄します

        playableGraph.Destroy();

    }

}
PlayableGraphAnimationClip と AnimatorController のブレンド
この例は、AnimationClip を AnimatorController とブレンドするための AnimationMixerPlayable の使い方を示しています。
AnimationClip と AnimatorController をブレンドする前に、それらを playable でラップする必要があります。これを行うために、AnimationClipPlayable (clipPlayable) は AnimationClip (clip) をラップし、AnimatorControllerPlayable (ctrlPlayable) は RuntimeAnimatorController (controller) をラップします。SetInputWeight() メソッドは、動的に各 playable のブレンドウェイトを調整します。
using UnityEngine;

using UnityEngine.Playables;

using UnityEngine.Animations;

[RequireComponent(typeof(Animator))]

public class RuntimeControllerSample : MonoBehaviour

{

    public AnimationClip clip;

    public RuntimeAnimatorController controller;

    public float weight;

    PlayableGraph playableGraph;

    AnimationMixerPlayable mixerPlayable;

    void Start()

    {

        // グラフとミキサーを作成し、それらを Animator にバインドします

        playableGraph = PlayableGraph.Create();

        var playableOutput = AnimationPlayableOutput.Create(playableGraph, "Animation", GetComponent<Animator>());

        mixerPlayable = AnimationMixerPlayable.Create(playableGraph, 2);

        playableOutput.SetSourcePlayable(mixerPlayable);

        // AnimationClipPlayable を作成し、それをミキサーに接続します

        var clipPlayable = AnimationClipPlayable.Create(playableGraph, clip);

        var ctrlPlayable = AnimatorControllerPlayable.Create(playableGraph, controller);

        playableGraph.Connect(clipPlayable, 0, mixerPlayable, 0);

        playableGraph.Connect(ctrlPlayable, 0, mixerPlayable, 1);


        // Graph を再生します

        playableGraph.Play();

    }

    void Update()

    {

        weight = Mathf.Clamp01(weight);

        mixerPlayable.SetInputWeight(0, 1.0f-weight);

        mixerPlayable.SetInputWeight(1, weight);

    }

    void OnDisable()

    {

        // グラフで作成したすべての Playables と Outputs を破棄します

        playableGraph.Destroy();

    }

}
複数の出力を持つ PlayableGraph の作成
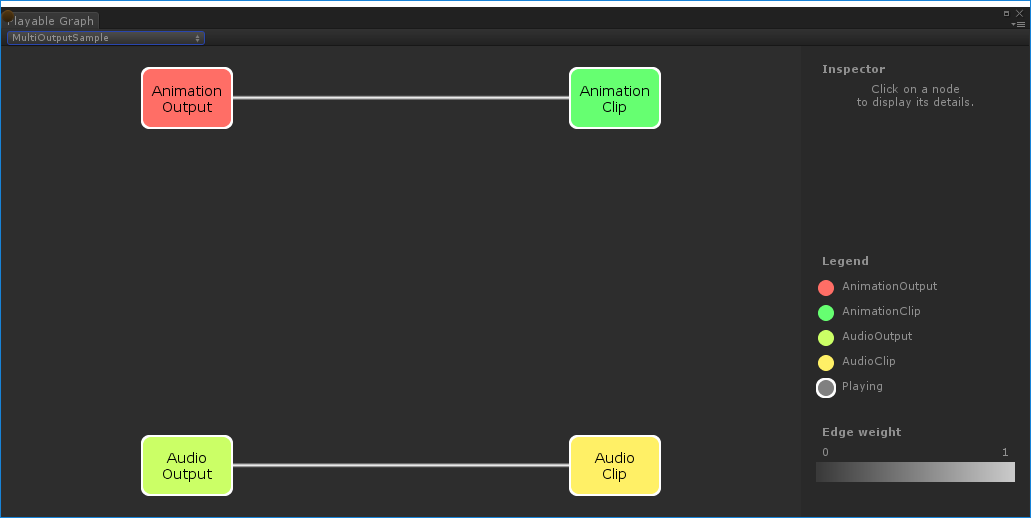
この例は、2 つの異なる playable 出力の型 AudioPlayableOutput と AnimationPlayableOutput を持つ PlayableGraph を作成する方法を示しています。
さらに、この例は、 AudioPlayableOutput に接続した AudioClipPlayable を使って、 AudioClip を再生する方法を示しています。
using UnityEngine;

using UnityEngine.Animations;

using UnityEngine.Audio;

using UnityEngine.Playables;

[RequireComponent(typeof(Animator))]

[RequireComponent(typeof(AudioSource))]

public class MultiOutputSample : MonoBehaviour

{

    public AnimationClip animationClip;

    public AudioClip audioClip;

    PlayableGraph playableGraph;

    void Start()

    {

        playableGraph = PlayableGraph.Create();

        // output を作成します

        var animationOutput = AnimationPlayableOutput.Create(playableGraph, "Animation", GetComponent<Animator>());

        var audioOutput = AudioPlayableOutput.Create(playableGraph, "Audio", GetComponent<AudioSource>());


        // playables を作成します

        var animationClipPlayable = AnimationClipPlayable.Create(playableGraph, animationClip);

        var audioClipPlayable = AudioClipPlayable.Create(playableGraph, audioClip, true);

        // playables を output に接続します

        animationOutput.SetSourcePlayable(animationClipPlayable);

        audioOutput.SetSourcePlayable(audioClipPlayable);

        // Graph を再生します

        playableGraph.Play();

    }

    void OnDisable()

    {

        // グラフで作成されたすべての Playables と Outputs を破棄します

        playableGraph.Destroy();

    }

}
PlayableGraphツリーの再生ステートの制御
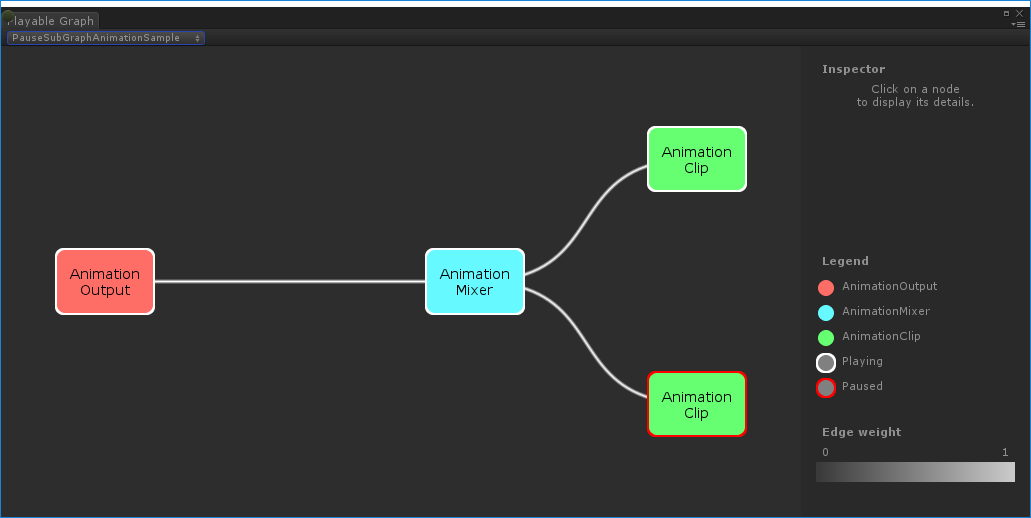
この例は、PlayableGraph ツリーでノードの再生ステートを制御する Playable.SetPlayState() メソッドの使い方を示しています。SetPlayState メソッドは、ツリー全体、ブランチの中の 1 つや、1 つのノードの再生ステートを制御します。
ノードの再生ステートを設定すると、そのステートは、子の再生ステートにかかわらず、すべての子に伝播します。例えば、任意の子ノードが明示的に一時停止だとします。親ノードを「再生中」に設定すると、そのすべての子ノードも「再生中」に設定されます。
この例では、PlayableGraph は 2 つのアニメーションクリップをブレンドするミキサーを持っています。AnimationClipPlayable は各アニメーションクリップをラップし、SetPlayState() メソッドは明示的に 2 つめの playable を一時停止させます。すると、2 つめの AnimationClipPlayable も一時停止します。そのため、その内部時間は進まず、同じ値を出力します。その値は、AnimationClipPlayable が一時停止したときの時刻によります。
using UnityEngine;

using UnityEngine.Playables;

using UnityEngine.Animations;

[RequireComponent(typeof(Animator))]

public class PauseSubGraphAnimationSample : MonoBehaviour

{

    public AnimationClip clip0;

    public AnimationClip clip1;

    PlayableGraph playableGraph;

    AnimationMixerPlayable mixerPlayable;

    void Start()

    {

        // グラフとミキサーを作成し、それらを Animator にバインドします

        playableGraph = PlayableGraph.Create();

        var playableOutput = AnimationPlayableOutput.Create(playableGraph, "Animation", GetComponent<Animator>());

        mixerPlayable = AnimationMixerPlayable.Create(playableGraph, 2);

        playableOutput.SetSourcePlayable(mixerPlayable);

        // AnimationClipPlayable を作成し、それをミキサーに接続します

        var clipPlayable0 = AnimationClipPlayable.Create(playableGraph, clip0);

        var clipPlayable1 = AnimationClipPlayable.Create(playableGraph, clip1);

        playableGraph.Connect(clipPlayable0, 0, mixerPlayable, 0);

        playableGraph.Connect(clipPlayable1, 0, mixerPlayable, 1);

        mixerPlayable.SetInputWeight(0, 1.0f);

        mixerPlayable.SetInputWeight(1, 1.0f);

        clipPlayable1.SetPlayState(PlayState.Paused);

        //  Graph を再生します

        playableGraph.Play();

    }

    void OnDisable()

    {

        // グラフで作成したすべての Playables と Outputs を破棄します

        playableGraph.Destroy();

    }

}
ツリーのタイミングの制御
この例は、PlayableGraph を再生するための Play() メソッドの使い方、playable を一時停止するための SetPlayState() メソッドの使い方、変数を使って手動で playable のローカルタイムを設定する SetTime() メソッドの使い方を示しています。
using UnityEngine;

using UnityEngine.Playables;

using UnityEngine.Animations;

[RequireComponent(typeof(Animator))]

public class PlayWithTimeControlSample : MonoBehaviour

{

    public AnimationClip clip;

    public float time;

    PlayableGraph playableGraph;

    AnimationClipPlayable playableClip;

    void Start()

    {

        playableGraph = PlayableGraph.Create();

        var playableOutput = AnimationPlayableOutput.Create(playableGraph, "Animation", GetComponent<Animator>());

        // クリップを playable にラップします

        playableClip = AnimationClipPlayable.Create(playableGraph, clip);

        //Playable を output に接続します

        playableOutput.SetSourcePlayable(playableClip);

        // Graph を再生します

        playableGraph.Play();

        // 時間が自動的に進むのを停止します

        playableClip.SetPlayState(PlayState.Paused);

    }

    void Update ()

    {

        // 手動で時間を制御します

        playableClip.SetTime(time);

    }


    void OnDisable()

    {

        // グラフで作成されたすべての Playables と Outputs を破棄します

        playableGraph.Destroy();

    }

}
PlayableBehaviour の作成
この例は、PlayableBehaviour public クラスでカスタムの playable を作成する方法を示しています。また、PlayableGraph のノードを制御する PrepareFrame() 仮想メソッドをオーバーライドする方法も紹介しています。カスタムの playable は PlayableBehaviour クラスの他の仮想メソッドをすべて、オーバーライドできます。
この例では、制御されるノードは一連のアニメーションクリップ (clipsToPlay) です。SetInputMethod() は各アニメーションクリップのブレンドウェイトを変更し、確実に 1 度に 1 つのクリップだけが再生するようにします。SetTime() メソッドがローカル時間を調整し、アニメーションクリップが有効になった時点で、再生が開始します。
using UnityEngine;

using UnityEngine.Animations;

using UnityEngine.Playables;

public class PlayQueuePlayable : PlayableBehaviour

{

    private int m_CurrentClipIndex = -1;

    private float m_TimeToNextClip;

    private Playable mixer;

    public void Initialize(AnimationClip[] clipsToPlay, Playable owner, PlayableGraph graph)

    {

        owner.SetInputCount(1);

        mixer = AnimationMixerPlayable.Create(graph, clipsToPlay.Length);

        graph.Connect(mixer, 0, owner, 0);

        owner.SetInputWeight(0, 1);

        for (int clipIndex = 0 ; clipIndex < mixer.GetInputCount() ; ++clipIndex)

        {

            graph.Connect(AnimationClipPlayable.Create(graph, clipsToPlay[clipIndex]), 0, mixer, clipIndex);

            mixer.SetInputWeight(clipIndex, 1.0f);

        }

    }

    override public void PrepareFrame(Playable owner, FrameData info)

    {

        if (mixer.GetInputCount() == 0)

            return;

        // 必要に応じて、次のクリップに進みます

        m_TimeToNextClip -= (float)info.deltaTime;

        if (m_TimeToNextClip <= 0.0f)

        {

            m_CurrentClipIndex++;

            if (m_CurrentClipIndex >= mixer.GetInputCount())

                m_CurrentClipIndex = 0;

            var currentClip = (AnimationClipPlayable)mixer.GetInput(m_CurrentClipIndex);

            // 時間をリセットします。それで、次のクリップが正確な位置で開始します。

            currentClip.SetTime(0);

            m_TimeToNextClip = currentClip.GetAnimationClip().length;

        }

        // 入力のウェイトを調整します

        for (int clipIndex = 0 ; clipIndex < mixer.GetInputCount(); ++clipIndex)

        {

            if (clipIndex == m_CurrentClipIndex)

                mixer.SetInputWeight(clipIndex, 1.0f);

            else

                mixer.SetInputWeight(clipIndex, 0.0f);

        }

    }

}

[RequireComponent(typeof (Animator))]

public class PlayQueueSample : MonoBehaviour

{

    public AnimationClip[] clipsToPlay;

    PlayableGraph playableGraph;

    void Start()

    {

        playableGraph = PlayableGraph.Create();

        var playQueuePlayable = ScriptPlayable<PlayQueuePlayable>.Create(playableGraph);

        var playQueue = playQueuePlayable.GetBehaviour();

        playQueue.Initialize(clipsToPlay, playQueuePlayable, playableGraph);

        var playableOutput = AnimationPlayableOutput.Create(playableGraph, "Animation", GetComponent<Animator>());

        playableOutput.SetSourcePlayable(playQueuePlayable);

        playableGraph.Play();

    }

    void OnDisable()

    {

        // グラフで作成したすべての Playables と Outputs を破棄します

        playableGraph.Destroy();

    }

}
