手册
- Unity User Manual (2019.1)
- 包
- Verified and Preview packages
- 2D Animation
- 2D IK
- 2D Pixel Perfect
- 2D PSD Importer
- 2D SpriteShape
- Adaptive Performance
- Addressables
- Ads IAP Mediation Adaptor
- Advertisement
- AI Planner
- Alembic
- Analytics Library
- Android Logcat
- Animation Rigging
- AP Samsung Android
- AR Foundation
- ARCore XR Plugin
- ARKit Face Tracking
- ARKit XR Plugin
- Asset Bundle Browser
- Barracuda
- Build Report Inspector
- Burst
- Cinemachine
- Collections
- Core RP Library
- DOTS Android Platform
- DOTS Linux Platform
- DOTS macOS Platform
- DOTS Platforms
- DOTS Web Platform
- DOTS Windows Platform
- Editor Coroutines
- Entities
- FBX Exporter
- Film and TV Toolbox
- Game Foundation
- Google Resonance Audio
- Google VR Android
- Google VR iOS
- High Definition RP
- Hybrid Renderer
- Immediate Window
- In App Purchasing
- Input System
- Jobs
- Lightweight RP
- Mathematics
- 内存性能分析器 (Memory Profiler)
- Mobile Notifications
- Mono Cecil
- Multiplayer HLAPI
- Oculus Android
- Oculus Desktop
- OpenVR (Desktop)
- Package Validation Suite
- PlayableGraph Visualizer
- Polybrush
- Post Processing
- ProBuilder
- Profile Analyzer
- ProGrids
- Quick Search
- Remote Config
- Scriptable Build Pipeline
- Shader Graph
- Share WebGL Game
- Terrain Tools
- TextMesh Pro
- Unity AOV Recorder
- Unity Collaborate
- Unity Distribution Portal
- Unity Physics
- Unity Recorder
- Unity Reflect
- Unity Render Streaming
- Unity User Reporting
- USD
- Vector Graphics
- Visual Effect Graph
- WebRTC
- Windows Mixed Reality
- Xiaomi SDK
- XR Legacy Input Helpers
- XR SDK Management
- 内置包
- AI
- 动画
- Asset Bundle
- Audio
- 布料
- Director
- Image Conversion
- IMGUI
- JSONSerialize
- Package Manager UI
- Particle System
- 物理 (Physics)
- Physics 2D
- Screen Capture
- Terrain
- Terrain Physics
- Tilemap
- UI
- UIElements
- Umbra
- Unity Analytics
- Unity Timeline
- Unity Web Request
- Unity Web Request Asset Bundle
- Unity Web Request Audio
- Unity Web Request Texture
- Unity Web Request WWW
- Vehicles
- Video
- VR
- Wind
- XR
- 按关键字排列的包
- Working with the Package Manager
- 创建自定义包
- Verified and Preview packages
- 在 Unity 中操作
- 安装 Unity
- 准备开始
- Asset Workflow
- The Main Windows
- 创建游戏玩法
- 编辑器功能
- 高级开发
- Editor 高级主题
- 升级指南
- 导入
- 2D
- 图形
- 图形概述
- 光照
- 摄像机
- 材质、着色器和纹理
- 纹理
- 创建和使用材质
- 标准着色器
- 标准粒子着色器
- 基于物理的渲染材质验证器
- 通过脚本访问和修改材质参数
- 编写着色器
- 旧版着色器
- 内置着色器的用途和性能
- 普通着色器系列
- 透明着色器系列
- 透明镂空着色器系列
- 自发光着色器系列
- 反光着色器系列
- 反射顶点光照 (Reflective Vertex-Lit)
- 反光漫射 (Reflective Diffuse)
- 反光镜面反射 (Reflective Specular)
- 反光凹凸漫射 (Reflective Bumped Diffuse)
- 反光凹凸镜面反射 (Reflective Bumped Specular)
- 反光视差漫射 (Reflective Parallax Diffuse)
- 反光视差镜面反射 (Reflective Parallax Specular)
- 反光法线贴图无光照 (Reflective Normal Mapped Unlit)
- 反光法线贴图顶点光照 (Reflective Normal mapped Vertex-lit)
- 视频概述
- 地形引擎
- Tree Editor(树编辑器)
- 粒子系统
- 后期处理概述
- 高级渲染功能
- 程序化网格几何体
- 优化图形性能
- 层
- 图形参考
- 摄像机参考
- 着色器参考
- 粒子系统参考
- 粒子系统 (Particle System)
- 粒子系统模块
- 粒子系统 (Particle System) 主模块
- Emission 模块
- Shape 模块
- Velocity over Lifetime 模块
- Noise 模块
- Limit Velocity Over Lifetime 模块
- Inherit Velocity 模块
- Force Over Lifetime 模块
- Color Over Lifetime 模块
- Color By Speed 模块
- Size over Lifetime 模块
- Size by Speed 模块
- Rotation Over Lifetime 模块
- Rotation By Speed 模块
- External Forces 模块
- Collision 模块
- Triggers 模块
- Sub Emitters 模块
- Texture Sheet Animation 模块
- Lights 模块
- Trails 模块
- Custom Data 模块
- Renderer 模块
- 粒子系统力场 (Particle System Force Field)
- 粒子系统(旧版,3.5 版之前)
- 视觉效果参考
- 网格组件
- 纹理组件
- 渲染组件
- 渲染管线详细信息
- 图形操作方法
- 图形教程
- 可编程渲染管线
- 图形概述
- 物理系统
- 脚本
- 多玩家和联网
- 音频
- 动画
- 时间轴
- 时间轴概述
- Using the Timeline window
- Timeline window
- Timeline properties in the Inspector window
- Playable Director 组件
- 时间轴术语表
- 用户界面 (UI)
- 导航和寻路
- Unity 服务
- 设置项目启用 Unity 服务
- Unity Organizations
- Unity Ads
- Unity Analytics
- Unity Cloud Build
- Automated Build Generation
- 支持的平台
- 支持的 Unity 版本
- 版本控制系统
- 使用 Unity 开发者控制面板 (Developer Dashboard) 对 Unity Cloud Build 进行 Git 配置
- 使用 Unity Editor 对 Unity Cloud Build 进行 Git 配置
- 使用 Unity 开发者控制面板 (Developer Dashboard) 对 Unity Cloud Build 进行 Mercurial 配置
- 使用 Unity Editor 对 Unity Cloud Build 进行 Mercurial 配置
- 将 Apache Subversion (SVN) 用于 Unity Cloud Build
- 使用 Unity 开发者控制面板 (Developer Dashboard) 对 Unity Cloud Build 进行 Perforce 配置
- 使用 Unity Editor 对 Unity Cloud Build 进行 Perforce 配置
- 发布到 iOS
- 高级选项
- 编译清单
- Cloud Build REST API
- Unity IAP
- 设置 Unity IAP
- 跨平台指南
- 应用商店指南
- 实现应用商店
- 内购推荐 (IAP Promo)
- Unity Collaborate
- Unity Cloud Diagnostics
- Unity Integrations
- Multiplayer 服务
- XR
- 开源代码仓库
- Asset Store 发布
- 特定于平台的信息
- 独立平台
- macOS
- Apple TV
- WebGL
- iOS
- Android
- Windows
- 移动平台开发者检查清单
- 实验性
- 旧版主题
- 最佳实践指南
- 专家指南
- Unity 2019.1 中的新功能
- 术语表
- Unity User Manual (2019.1)
- 时间轴
- Timeline window
- Timeline Settings
Timeline Settings
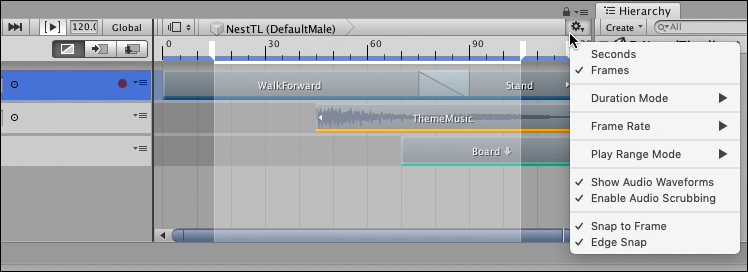
Use the Timeline Settings to choose the Timeline window and Timeline Asset settings such as the unit of measurement, the duration mode, audio waveform, and window snap settings.

Seconds or Frames
Select either Seconds or Frames to set the Timeline window to display time as either seconds or frames.
Duration Mode
Use the Duration Mode to set whether the duration of the Timeline Asset extends to the end of the last clip (Based On Clips), or ends at a specific time or frame (Fixed Length). When the Duration Mode is set to Fixed Length, use one of the following methods to change the length of the Timeline Asset:
在 Project 窗口中选择时间轴资源,然后使用 Inspector 窗口以秒或帧为单位设置持续时间 (Duration)。
In the Timeline window, drag the blue marker on the timeline. The blue marker indicates the end of the Timeline Asset. A blue line indicates the duration of the Timeline Asset.

Frame Rate
Select one of the options under Frame Rate to set the unit of measurement for the Timeline ruler. Change the Frame Rate to align clips at precise frames but changing the Frame Rate is only visual and has no effect on play speed, keys, tracks, or clips. The following standard frame rates are listed: Film (24 fps), PAL (25 fps), NTSC (29.97 fps), 30, 50, or 60.
Timeline supports custom frame rates from 1e–6 to 1000. To set a custom frame rate, you must use the Frame Rate property in the Timeline Asset settings. When the Timeline Asset is set to a custom frame rate, the Custom menu item is enabled and is automatically selected for the Timeline instance. The Custom menu item shows the custom frame rate in parentheses.
Play Range Mode
Select one of the options under Play Range Mode to set the behaviour of the Timeline window when the Play Range button is enabled.
When Play Range Mode is set to Loop, the Timeline instance plays the defined Play Range repeatedly, until playback is interrupted.
When Play Range Mode is set to Hold, the Timeline instance plays the defined Play Range once and stops at the end of the Play Range.
You can only set a play range when previewing a Timeline instance within the Timeline window. Unity ignores the play range in Play Mode.
Show Audio Waveforms
Enable Show Audio Waveforms to draw the waveforms for all audio clips on all audio tracks. For example, use an audio waveform as a guide when manually positioning an Audio clip of footsteps with the Animation clip of a humanoid walking. Disable Show Audio Waveform to hide audio waveforms. Show Audio Waveforms is enabled by default.
Enable Audio Scrubbing
Enable Audio Scrubbing to play audio while dragging the Timeline Playhead.
Disable Enable Audio Scrubbing to stop playing audio while dragging the Timeline Playhead. When disabled, Timeline only plays audio when in Timeline Playback mode.
Snap to Frame
Enable Snap to Frame to manipulate clips, preview Timeline instances, drag the Timeline Playhead, and position the Timeline Playhead using frames. Disable Snap to Frame to use subframes. Snap to Frame is enabled by default.

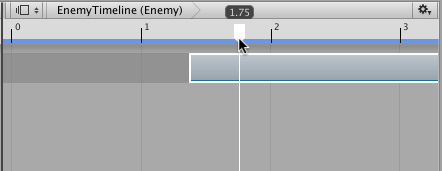
For example, when Snap to Frame is disabled and you drag the Timeline Playhead, it moves the playhead between frames. The format of Playhead Location displays differently depending on whether the Timeline window is set to Seconds or Frames:
When the Timeline window is set to Frames, the Playhead Location shows frames and subframes. For example, 8 frames and 34 subframes displays as 8.34.
When the Timeline window is set to Seconds, the Playhead Location shows seconds, frames, and subframes. For example, 6 seconds, 17 frames, and 59 subframes displays as 6:17 [.59].
在尝试将动画和效果与音频同步时,操纵剪辑、预览时间轴实例以及在子帧级别定位播放头是非常有用的操作。许多高端音频处理软件产品都能创建具有子帧精度的音频波形。
Edge Snap
Enable the Edge Snap option to snap clips when you position, trim, and create blends.
When enabled, the Timeline window snaps the start or end of a clip when dragged within 10 pixels of the Timeline Playhead, the start or end of a clip on the same track, the start or end of a clip on another track, or the start or end of the entire Timeline instance. The start guide or end guide is redrawn in white to indicate that the clip has snapped to the edge of another clip or the Timeline Playhead.
Disable Edge Snap to create more accurate blends, ease-ins, or ease-outs. Edge Snap is enabled by default.
- 2019–08–20 页面已发布并只进行了有限的编辑审查