手册
Version:
2018.4
- Unity 用户手册 (2018.4)
- 在 Unity 中操作
- Getting Started
- Asset Workflow
- The Main Windows
- Creating Gameplay
- Editor Features
- Advanced Development
- Advanced Editor Topics
- Licenses and Activation
- 升级指南
- 导入
- 2D
- Graphics
- Graphics Overview
- Lighting
- 摄像机
- Materials, Shaders & Textures
- Textures
- 创建和使用材质
- Standard Shader
- 标准粒子着色器
- 基于物理的渲染材质验证器
- Accessing and Modifying Material parameters via script
- Writing Shaders
- Legacy Shaders
- Usage and Performance of Built-in Shaders
- Normal Shader Family
- 透明着色器系列
- 透明镂空着色器系列
- 自发光着色器系列
- 反光着色器系列
- 反射顶点光照 (Reflective Vertex-Lit)
- 反光漫射 (Reflective Diffuse)
- 反光镜面反射 (Reflective Specular)
- 反光凹凸漫射 (Reflective Bumped Diffuse)
- 反光凹凸镜面反射 (Reflective Bumped Specular)
- 反光视差漫射 (Reflective Parallax Diffuse)
- 反光视差镜面反射 (Reflective Parallax Specular)
- 反光法线贴图无光照 (Reflective Normal Mapped Unlit)
- 反光法线贴图顶点光照 (Reflective Normal mapped Vertex-lit)
- Video overview
- 地形引擎
- Tree Editor
- Particle Systems
- 后期处理概述
- Advanced Rendering Features
- Procedural Mesh Geometry
- 优化图形性能
- 层
- Graphics Reference
- Cameras Reference
- 着色器参考
- Writing Surface Shaders
- 编写顶点和片元着色器
- ShaderLab Syntax
- Shader assets
- Advanced ShaderLab topics
- Unity's Rendering Pipeline
- Performance tips when writing shaders
- Rendering with Replaced Shaders
- Custom Shader GUI
- Using Depth Textures
- Camera's Depth Texture
- Platform-specific rendering differences
- Shader Level of Detail
- Texture arrays
- 使用 Visual Studio 来调试 DirectX 11/12 着色器
- 使用 PIX 来调试 DirectX 12 着色器
- Implementing Fixed Function TexGen in Shaders
- Particle Systems reference
- 粒子系统 (Particle System)
- Particle System modules
- 粒子系统 (Particle System) 主模块
- Emission 模块
- Shape 模块
- Velocity over Lifetime module
- Noise 模块
- Limit Velocity Over Lifetime module
- Inherit Velocity module
- Force Over Lifetime module
- Color Over Lifetime module
- Color By Speed module
- Size over Lifetime module
- Size by Speed module
- Rotation Over Lifetime module
- Rotation By Speed module
- External Forces 模块
- Collision module
- Triggers module
- Sub Emitters 模块
- Texture Sheet Animation 模块
- Lights module
- Trails 模块
- Custom Data module
- Renderer 模块
- 粒子系统力场 (Particle System Force Field)
- Particle Systems (Legacy, prior to release 3.5)
- Visual Effects Reference
- Mesh Components
- Texture Components
- Rendering Components
- Rendering Pipeline Details
- Graphics HOWTOs
- Graphics Tutorials
- 可编程渲染管线
- Graphics Overview
- Physics
- Scripting
- Scripting Overview
- Scripting Tools
- Event System
- C# 作业系统
- 多玩家和联网
- 多人游戏概述
- 设置多人游戏项目
- 使用 Network Manager
- 使用 Network Manager HUD
- LAN 模式下的 Network Manager HUD
- Matchmaker 模式下的 Network Manager HUD
- 将单人游戏转换为 Unity Multiplayer 多人游戏
- 调试信息
- 多玩家高级 API
- Multiplayer 组件参考
- Multiplayer 类参考
- UnityWebRequest
- Audio
- Audio Overview
- Audio files
- Tracker Modules
- Audio Mixer
- 原生音频插件 SDK
- Audio Profiler
- 立体混响声音频
- Audio Reference
- Audio Clip
- 音频监听器
- 音频源
- Audio Mixer
- Audio Filters
- Audio Effects
- Audio Low Pass Effect
- Audio High Pass Effect
- Audio Echo Effect
- Audio Flange Effect
- Audio Distortion Effect
- Audio Normalize Effect
- Audio Parametric Equalizer Effect
- Audio Pitch Shifter Effect
- Audio Chorus Effect
- Audio Compressor Effect
- Audio SFX Reverb Effect
- Audio Low Pass Simple Effect
- Audio High Pass Simple Effect
- Reverb Zones
- Microphone
- Audio Settings
- Animation
- Timeline
- UI
- Navigation and Pathfinding
- Navigation Overview
- Navigation System in Unity
- Inner Workings of the Navigation System
- 构建导航网格
- 导航网格构建组件
- 高级导航网格烘焙设置
- 创建导航网格代理
- 创建导航网格障碍物
- 创建网格外链接
- Building Off-Mesh Links Automatically
- Building Height Mesh for Accurate Character Placement
- Navigation Areas and Costs
- Loading Multiple NavMeshes using Additive Loading
- Using NavMesh Agent with Other Components
- Navigation Reference
- Navigation How-Tos
- Navigation Overview
- Unity Services
- 设置项目启用 Unity 服务
- Unity Organizations
- Unity Ads
- Unity Analytics
- Unity Analytics Overview
- Setting Up Analytics
- Analytics Dashboard
- Analytics events
- 漏斗图
- Remote Settings
- Unity Analytics A/B 测试
- Monetization
- User Attributes
- Unity Analytics 原始数据导出 (Raw Data Export)
- Data reset
- Upgrading Unity Analytics
- COPPA Compliance
- Unity Analytics 和欧盟一般数据保护条例 (GDPR)
- Analytics Metrics, Segments, and Terminology
- Unity Cloud Build
- Automated Build Generation
- Supported platforms
- Supported versions of Unity
- Version control systems
- 使用 Unity 开发者控制面板 (Developer Dashboard) 对 Unity Cloud Build 进行 Git 配置
- 使用 Unity Editor 对 Unity Cloud Build 进行 Git 配置
- 使用 Unity 开发者控制面板 (Developer Dashboard) 对 Unity Cloud Build 进行 Mercurial 配置
- 使用 Unity Editor 对 Unity Cloud Build 进行 Mercurial 配置
- Using Apache Subversion (SVN) with Unity Cloud Build
- 使用 Unity 开发者控制面板 (Developer Dashboard) 对 Unity Cloud Build 进行 Perforce 配置
- 使用 Unity Editor 对 Unity Cloud Build 进行 Perforce 配置
- 发布到 iOS
- Advanced options
- Build manifest
- Cloud Build REST API
- Unity IAP
- Setting up Unity IAP
- Cross Platform Guide
- Store Guides
- Implementing a Store
- 内购推荐 (IAP Promo)
- Unity Collaborate
- Unity Cloud Diagnostics
- Unity Integrations
- Multiplayer Services
- Unity 分发平台
- XR
- Open-source repositories
- Asset Store Publishing
- Platform-specific
- Standalone
- macOS
- Apple TV
- WebGL
- iOS
- Android
- Android 开发入门
- Android 平台的 Player 设置
- Android 2D 纹理覆盖
- Gradle for Android
- Android 清单
- Windows
- Windows General
- Universal Windows Platform
- 准备开始
- Universal Windows Platform: Deployment
- 通用 Windows 平台:性能分析器
- Universal Windows Platform: Command line arguments
- 通用 Windows 平台:关联启动
- AppCallbacks class
- 通用 Windows 平台:C# 脚本中的 WinRT API
- 通用 Windows 平台的 Player 设置
- 脚本后端
- 常见问题解答
- Universal Windows Platform: Examples
- Universal Windows Platform: Code snippets
- 已知问题
- Web Player
- Mobile Developer Checklist
- Experimental
- Legacy Topics
- 最佳实践指南
- 专家指南
- Unity 2018.3 中的新功能
- 包文档
- 术语表
光照贴图:入门
本页将介绍 Unity 中的光照贴图。光照贴图过程将预先计算场景中表面的亮度,并将结果存储在图表或“光照贴图”中供以后使用。
Unity 使用一个名为渐进光照贴图 (Progressive Lightmapper) 的系统,该系统根据 Unity 中的场景设置来为场景烘焙光照贴图,同时考虑网格、材质、纹理和光源。光照贴图是渲染引擎不可或缺的一部分;在创建光照贴图后,游戏对象会自动使用它们。
有关与特定光照贴图相关的设置的信息,请参阅全局光照的文档。
准备场景并烘焙光照贴图
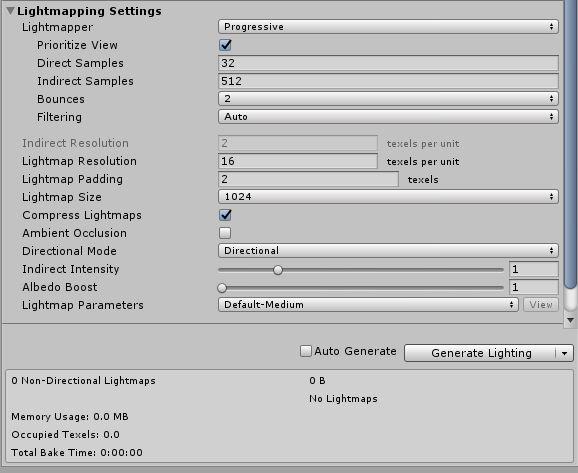
从 Unity Editor 菜单中选择 Window > Lighting > Settings 以打开 Lighting 窗口。确保要应用光照贴图的网格具有适当的 UV 以进行光照贴图。最简单的方法是打开网格导入设置并启用 Generate Lightmap UVs 设置。
接下来,要控制光照贴图的分辨率,请前往 Lightmapping Settings 部分并调整 Lightmap Resolution 值。
注意:__为了更好地理解如何使用光照贴图纹理像素,请在 Scene 视图__中找到__Shaded调试场景可视化模式,切换到 Baked Lightmap__,并勾选 Show Resolution__ 复选框。
在游戏对象的 Mesh Renderer 和 Terrain 组件中,启用 Lightmap Static 属性。这将告知 Unity,这些游戏对象不会移动和变化,因此 Unity 可以将它们添加到光照贴图中。在 Mesh Renderer 组件中,还可以使用 Scale In Lightmap 参数来调整光照贴图的静态__网格__或__地形__的分辨率。
此外,还可在 Light Explorer 中调整光源设置。

要为场景生成光照贴图,请执行以下操作:
在 Lighting 窗口中的 Scene 选项卡底部,单击 Generate Lighting__(或者确保勾选了 Auto Generate__)。
Unity Editor 状态栏中将显示一个进度条(在右下角)。
烘焙完成后,您可以在 Lighting 窗口的 Global Maps 和 Object Maps 选项卡中查看所有烘焙光照贴图。
当光照贴图完成时,Unity 的 Scene 和 Game 视图会自动更新。
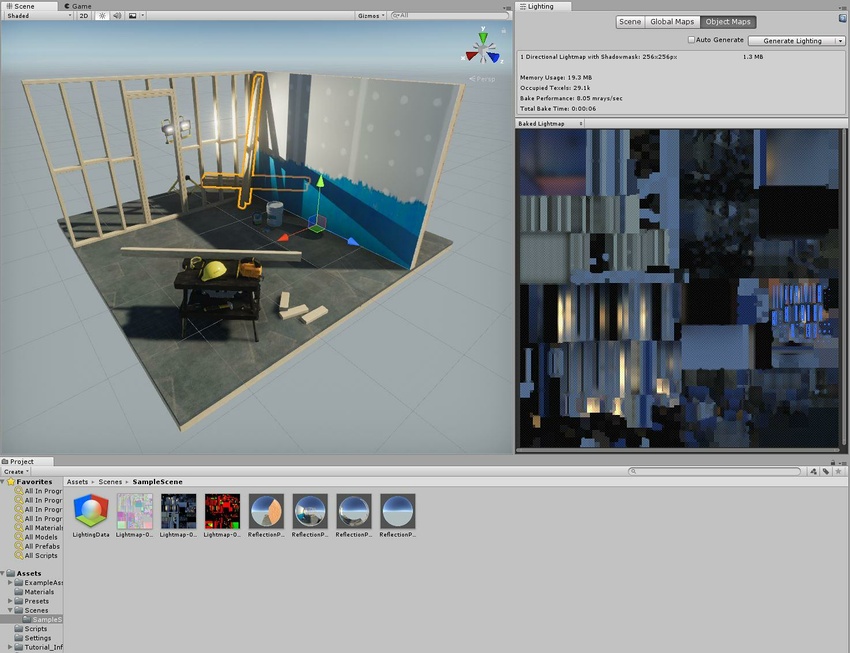
要查看网格的 UV 图表,请单击启用了 Lightmap Static 的游戏对象,然后导航到 Inspector 窗口并选择 Object Maps 选项卡。在此处,您可以切换不同的光照贴图可视化模式。手动生成光照时,Unity 将向 Assets 文件夹中添加光照数据资源、烘焙光照贴图和反射探针。
调整烘焙设置
场景的最终外观取决于光照设置和烘焙设置。我们来看一些可以提高光照质量的基本设置的示例。
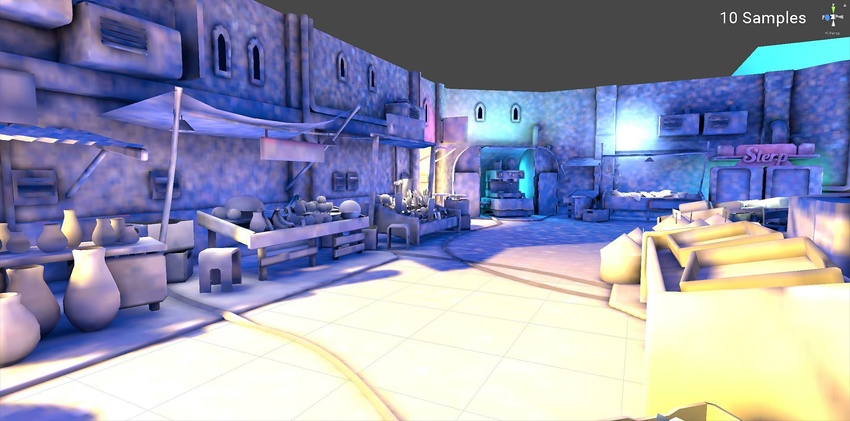
样本计数: 渐进光照贴图生成由单个光线产生的颜色值以便消除噪点。这些颜色值称为样本。有两种设置可控制渐进光照贴图用于直接和间接光照计算的样本数:__Direct Samples__ 和 Indirect Samples。要找到这两个设置,请打开 Lighting 窗口 (Window > Lighting > Settings),然后选择 Lightmapping Settings > Lightmapper。
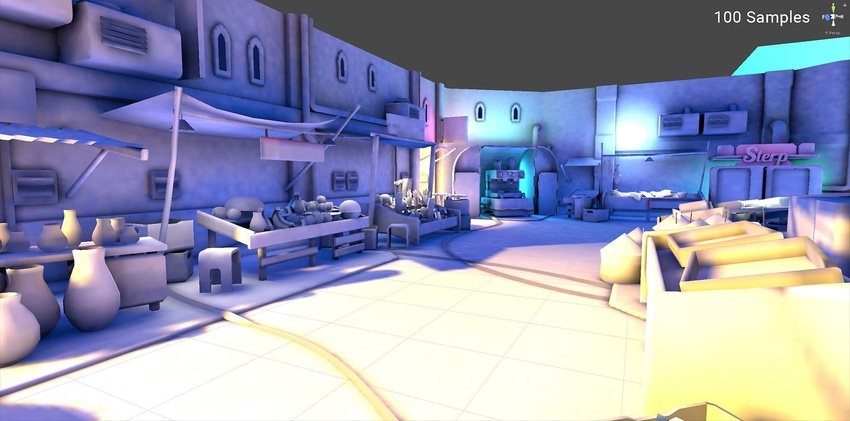
较高的采样值可降低噪点并可提高光照贴图的质量,但也会增加烘焙时间。下面的图像显示了更多样本如何在不使用滤波的情况下提高光照贴图的质量,并产生噪点较小的结果。

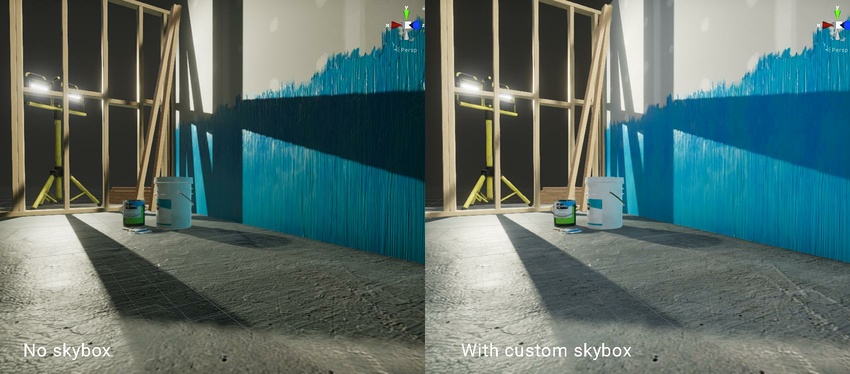
环境光照
除了所有光源之外,环境光照也会影响全局光照。您可以分配一个自定义天空盒材质 (Skybox Material) 来代替默认的__程序化天空盒 (Procedural Skybox)__ 并调整强度。下面的图像分别显示了在包含和不含__环境光照__的场景中光照如何变化,并提供了较柔和的结果。两个场景中的光源设置相同。Unity 在 Asset Store 中提供了一些自定义的 HDRI 资源。
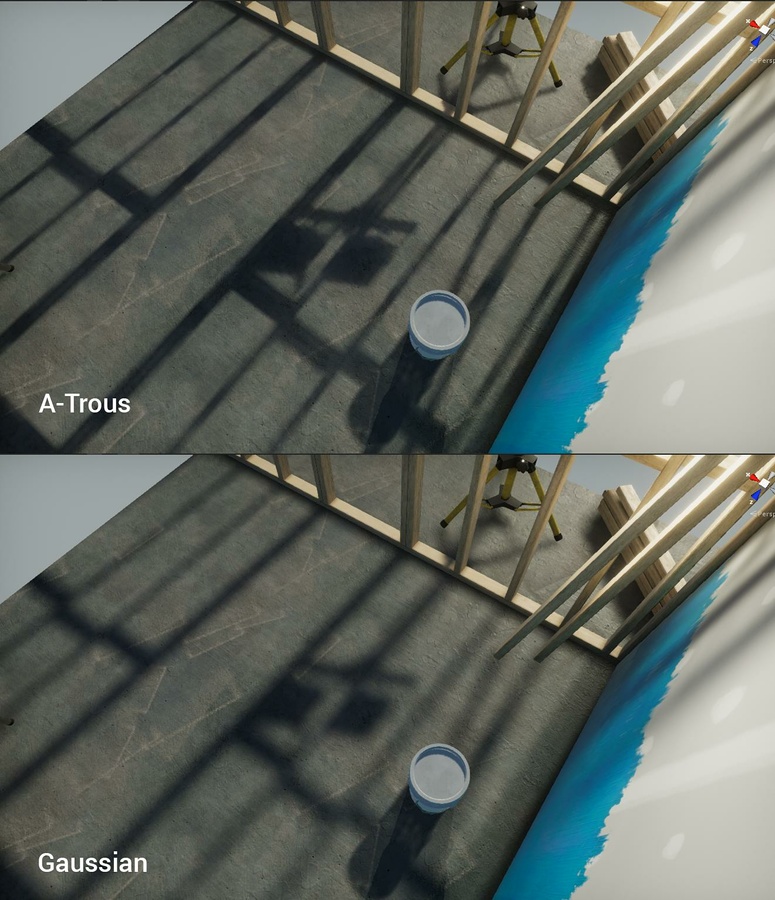
滤波
滤波可以模糊噪点效果。渐进光照贴图提供了两种不同类型的滤波:__Gaussian__ 和 A-Trous。启用 Advanced 设置后,可单独对 Direct、Indirect __ 和 Ambient Occlusion__ 应用这些过滤器。有关更多信息,请参阅有关渐进光照贴图的文档。
2018–03–28 页面已修订并只进行了有限的编辑审查
在 2018.1 版中添加了渐进光照贴图 NewIn20181
Did you find this page useful? Please give it a rating:
Thanks for rating this page!
What kind of problem would you like to report?
Thanks for letting us know! This page has been marked for review based on your feedback.
If you have time, you can provide more information to help us fix the problem faster.
Provide more information
You've told us this page needs code samples. If you'd like to help us further, you could provide a code sample, or tell us about what kind of code sample you'd like to see:
You've told us there are code samples on this page which don't work. If you know how to fix it, or have something better we could use instead, please let us know:
You've told us there is information missing from this page. Please tell us more about what's missing:
You've told us there is incorrect information on this page. If you know what we should change to make it correct, please tell us:
You've told us this page has unclear or confusing information. Please tell us more about what you found unclear or confusing, or let us know how we could make it clearer:
You've told us there is a spelling or grammar error on this page. Please tell us what's wrong:
You've told us this page has a problem. Please tell us more about what's wrong:
Thank you for helping to make the Unity documentation better!
Your feedback has been submitted as a ticket for our documentation team to review.
We are not able to reply to every ticket submitted.
版权所有 © 2020 Unity Technologies. Publication 2018.4