手册
Version:
2023.1
- Unity User Manual 2023.1 (beta)
- New in Unity 2023.1
- Packages and feature sets
- Released packages
- 2D Animation
- 2D Aseprite Importer
- 2D Pixel Perfect
- 2D PSD Importer
- 2D SpriteShape
- 2D Tilemap Extras
- Adaptive Performance
- Addressables
- Ads Mediation
- Advertisement Legacy
- AI Navigation
- Alembic
- Analytics
- Android Logcat
- Animation Rigging
- Apple ARKit XR Plugin
- AR Foundation
- Authentication
- Build Automation
- Burst
- CCD Management
- Cinemachine
- Cloud Code
- Cloud Diagnostics
- Cloud Save
- Code Coverage
- Collections
- Deployment
- Device Simulator Devices
- Economy
- Editor Coroutines
- FBX Exporter
- Friends
- Google ARCore XR Plugin
- In App Purchasing
- Input System
- iOS 14 Advertising Support
- JetBrains Rider 编辑器
- Leaderboards
- Live Capture
- Lobby
- Localization
- Magic Leap XR Plugin
- Matchmaker
- Mathematics
- 内存性能分析器 (Memory Profiler)
- ML Agents
- Mobile Notifications
- Multiplay
- Multiplayer Tools
- Netcode for GameObjects
- Oculus XR Plugin
- OpenXR 插件
- Player Accounts
- Polybrush
- Post Processing
- ProBuilder
- Profile Analyzer
- Push Notifications
- Python Scripting
- Recorder
- Relay
- Remote Config
- Scriptable Build Pipeline
- Sequences
- Splines
- Sysroot Base
- Sysroot Linux x64
- System Metrics Mali
- Terrain Tools
- Test Framework
- TextMeshPro
- 时间轴
- Toolchain Linux x64
- Toolchain MacOS Linux x64
- Toolchain Win Linux x64
- Tutorial Authoring Tools
- Tutorial Framework
- Unity Distribution Portal
- Unity OpenXR Meta
- Unity Profiling Core API
- Unity Transport
- User Generated Content
- User Generated Content Bridge
- User Reporting
- 版本控制
- Visual Scripting
- Visual Studio 编辑器
- WebGL Publisher
- XR Hands
- XR Interaction Toolkit
- XR Plugin Management
- Release Candidates
- Pre-release packages
- 核心包
- 内置包
- AI
- Android JNI
- 动画
- Asset Bundle
- Audio
- 布料
- Director
- Image Conversion
- IMGUI
- JSONSerialize
- NVIDIA
- Particle System
- 物理 (Physics)
- Physics 2D
- Screen Capture
- Terrain
- Terrain Physics
- Tilemap
- UI
- UIElements
- Umbra
- Unity Analytics
- Unity Web Request
- Unity Web Request Asset Bundle
- Unity Web Request Audio
- Unity Web Request Texture
- Unity Web Request WWW
- Vehicles
- Video
- VR
- Wind
- XR
- Experimental packages
- 按关键字排列的包
- Deprecated packages
- Unity 的 Package Manager
- How Unity works with packages
- 概念
- 配置
- Package Manager 窗口
- Access the Package Manager window
- 列表视图
- 详细信息视图
- Features (detail) view
- Finding packages and feature sets
- Adding and removing
- Install a feature set from the Unity registry
- Install a package from a registry
- Install a package from a local folder
- Install a package from a local tarball file
- Install a package from a Git URL
- Install a package from a registry by name
- Removing an installed package from a project
- 禁用内置包
- 切换到另一个包版本
- 导入 Asset Store 资源包
- 更新 Asset Store 资源包
- Remove imported assets from a project
- Delete a package from the Asset Store cache
- Perform an action on multiple packages
- 查找包文档
- 检查包
- 包的脚本 API
- Scoped registries
- 解析和冲突
- 项目清单
- 故障排除
- 创建自定义包
- Feature sets
- Released packages
- Install Unity
- 许可证和激活
- Upgrade Unity
- Create with Unity
- 2D 还是 3D 项目
- Unity 的界面
- Quickstart guides
- Advanced best practice guides
- Create Gameplay
- 编辑器功能
- 分析
- Memory in Unity
- 性能分析器概述
- 应用程序性能分析
- 常见性能分析器标记
- Profiler 窗口
- Asset Loading Profiler module
- Audio Profiler 模块
- CPU Usage Profiler 模块
- File Access Profiler module
- Global Illumination Profiler 模块
- GPU Usage Profiler 模块
- Memory Profiler 模块
- Physics Profiler 模块
- Physics 2D Profiler module
- Rendering Profiler 模块
- UI 和 UI Details Profiler
- Video Profiler 模块
- Virtual Texturing Profiler 模块
- Customizing the Profiler
- 低级原生插件 Profiler API
- Profiling tools
- Log files
- 了解 Unity 中的优化
- 资源加载指标
- 资源工作流程
- 输入
- 2D game development
- Introduction to 2D
- 2D game development quickstart guide
- 2D 排序
- Work with sprites
- Tilemaps
- Physics 2D Reference
- 图形
- 渲染管线
- 摄像机
- 光照
- 模型
- 网格
- 纹理
- 导入纹理
- Texture Import Settings
- Default Import Settings reference
- Normal map Import Settings reference
- Editor GUI and Legacy GUI Import Settings reference
- Sprite (2D and UI) Import Settings reference
- Cursor Import Settings reference
- Cookie Import Settings reference
- Lightmap Import Settings reference
- Directional Lightmap Import Settings reference
- Shadowmask Import Settings reference
- Single Channel Import Settings reference
- Texture Import Settings
- Texture formats
- Mipmaps
- 渲染纹理
- 自定义渲染纹理
- 电影纹理 (Movie Textures)
- 3D 纹理
- 纹理数组
- 立方体贴图
- 立方体贴图数组
- Streaming Virtual Texturing
- 稀疏纹理
- 加载纹理和网格数据
- 导入纹理
- 着色器
- 着色器核心概念
- 内置着色器
- 标准着色器
- 标准粒子着色器
- Autodesk Interactive 着色器
- 旧版着色器
- 内置着色器的用途和性能
- 普通着色器系列
- 透明着色器系列
- 透明镂空着色器系列
- 自发光着色器系列
- 反光着色器系列
- 反射顶点光照 (Reflective Vertex-Lit)
- 反光漫射 (Reflective Diffuse)
- 反光镜面反射 (Reflective Specular)
- 反光凹凸漫射 (Reflective Bumped Diffuse)
- 反光凹凸镜面反射 (Reflective Bumped Specular)
- 反光视差漫射 (Reflective Parallax Diffuse)
- 反光视差镜面反射 (Reflective Parallax Specular)
- 反光法线贴图无光照 (Reflective Normal Mapped Unlit)
- 反光法线贴图顶点光照 (Reflective Normal mapped Vertex-lit)
- 使用 Shader Graph
- 编写着色器
- 编写着色器概述
- ShaderLab
- ShaderLab:定义 Shader 对象
- ShaderLab:定义子着色器
- ShaderLab:定义一个通道
- ShaderLab:添加着色器程序
- ShaderLab: specifying package requirements
- ShaderLab:命令
- ShaderLab:使用 Category 代码块对命令进行分组
- ShaderLab 命令:AlphaToMask
- ShaderLab 命令:Blend
- ShaderLab 命令:BlendOp
- ShaderLab 命令:ColorMask
- ShaderLab 命令:Conservative
- ShaderLab 命令:Cull
- ShaderLab 命令:Offset
- ShaderLab 命令:模板
- ShaderLab 命令:UsePass
- ShaderLab 命令:GrabPass
- ShaderLab 命令:ZClip
- ShaderLab 命令:ZTest
- ShaderLab 命令:ZWrite
- ShaderLab 旧版功能
- Unity 中的 HLSL
- Unity 中的 GLSL
- 着色器示例
- 编写表面着色器
- 为不同的图形 API 编写着色器
- Understanding shader performance
- 材质
- Visual effects
- Post-processing and full-screen effects
- 粒子系统
- 选择粒子系统解决方案
- 内置粒子系统
- 使用内置粒子系统
- 粒子系统顶点流和标准着色器支持
- 粒子系统 GPU 实例化
- 粒子系统 C# 作业系统集成
- 组件和模块
- 粒子系统 (Particle System)
- 粒子系统模块
- Main module
- Emission 模块
- Shape module
- Velocity over Lifetime 模块
- Noise 模块
- Limit Velocity over Lifetime module
- Inherit Velocity 模块
- Lifetime by Emitter Speed module
- Force over Lifetime module
- Color over Lifetime module
- Color by Speed module
- Size over Lifetime 模块
- Size by Speed 模块
- Rotation over Lifetime module
- Rotation by Speed module
- External Forces 模块
- Collision 模块
- Triggers 模块
- Sub Emitters 模块
- Texture Sheet Animation 模块
- Lights 模块
- Trails 模块
- Custom Data 模块
- Renderer 模块
- 粒子系统力场 (Particle System Force Field)
- Visual Effect Graph
- Decals and projectors
- Lens flares and halos
- Lines, trails, and billboards
- 天空
- 颜色
- 图形 API 支持
- Graphics performance and profiling
- World building
- 物理系统
- Built-in 3D Physics
- Character control
- Rigidbody physics
- Collision
- Introduction to collision
- 连续碰撞检测 (CCD)
- Create a vehicle with Wheel Colliders
- Physics Debug window reference
- Box Collider component reference
- Capsule Collider component reference
- Terrain Collider component reference
- Wheel Collider component reference
- Mesh Collider component reference
- Sphere Collider component reference
- Physic Material component reference
- Joints
- Articulations
- Ragdoll physics
- 布料
- 多场景物理
- Built-in 3D Physics
- 脚本
- Audio
- 视频概述
- 动画
- User interface (UI)
- Unity 中 UI 系统的对比
- UI 工具包
- Get started with UI Toolkit
- UI Builder
- Structure UI
- The visual tree
- Structure UI with UXML
- Structure UI with C# scripts
- Custom controls
- Best practices for managing elements
- Encapsulate UXML documents with logic
- UXML 元素参考
- UXML element BindableElement
- UXML element VisualElement
- UXML element BoundsField
- UXML element BoundsIntField
- UXML element Box
- UXML element Button
- UXML element ColorField
- UXML element CurveField
- UXML element DoubleField
- UXML element DropdownField
- UXML element EnumField
- UXML element EnumFlagsField
- UXML element FloatField
- UXML element Foldout
- UXML element GradientField
- UXML element GroupBox
- UXML element Hash128Field
- UXML element HelpBox
- UXML element IMGUIContainer
- UXML element Image
- UXML element InspectorElement
- UXML element IntegerField
- UXML element Label
- UXML element LayerField
- UXML element LayerMaskField
- UXML element LongField
- UXML element ListView
- UXML element MaskField
- UXML element MinMaxSlider
- UXML element MultiColumnListView
- UXML element MultiColumnTreeView
- UXML element ObjectField
- UXML element PopupWindow
- UXML element ProgressBar
- UXML element PropertyField
- UXML element RadioButton
- UXML element RadioButtonGroup
- UXML element RectField
- UXML element RectIntField
- UXML element RepeatButton
- UXML element ScrollView
- UXML element Scroller
- UXML element Slider
- UXML element SliderInt
- UXML element TagField
- UXML element TextElement
- UXML element TextField
- UXML element Toggle
- UXML element Toolbar
- UXML element ToolbarBreadcrumbs
- UXML element ToolbarButton
- UXML element ToolbarMenu
- UXML element ToolbarPopupSearchField
- UXML element ToolbarSearchField
- UXML element ToolbarSpacer
- UXML element ToolbarToggle
- UXML element TreeView
- UXML element TwoPaneSplitView
- UXML element UnsignedIntegerField
- UXML element UnsignedLongField
- UXML element Vector2Field
- UXML element Vector2IntField
- UXML element Vector3Field
- UXML element Vector3IntField
- UXML element Vector4Field
- Structure UI examples
- Create list and tree views
- Create a complex list view
- Create a list view runtime UI
- Wrap content inside a scroll view
- Create a tabbed menu for runtime
- Create a pop-up window
- Use Toggle to create a conditional UI
- Create a custom control with two attributes
- Create a slide toggle custom control
- Create a bindable custom control
- Create a custom style for a custom control
- Style UI
- UI Toolkit Debugger
- Control behavior with events
- UI Renderer
- Support for Editor UI
- Create a custom Editor window
- Create a Custom Inspector
- SerializedObject data binding
- Bindable elements reference
- Bindable data types and fields
- Binding system implementation details
- Binding examples
- Bind with binding path in C# script
- Bind without the binding path
- Bind with UXML and C# script
- Create a binding with the Inspector
- Bind to nested properties
- Bind to a UXML template
- Receive callbacks when a bound property changes
- Receive callbacks when any bound properties change
- Bind to a list with ListView
- Bind to a list without ListView
- Bind a custom control
- Bind a custom control to custom data type
- View data persistence
- Support for runtime UI
- Work with text
- Examples
- Migration guides
- Unity UI
- 即时模式 GUI (IMGUI)
- Unity 服务
- XR
- Unity Asset Store
- 平台开发
- 将“Unity 用作库”用于其他应用程序
- Deep linking
- Xcode frame debugger Unity integration
- Android
- Introducing Android
- Getting started with Android
- Developing for Android
- Android 移动端脚本
- Input for Android devices
- Android application size restrictions
- Graphics for Android
- Testing and debugging
- Optimization for Android
- Create and use plug-ins in Android
- 将 Unity 集成到 Android 应用程序中
- Android application entry points
- Deep linking on Android
- Device features and permissions
- Handle Android crashes
- Quit a Unity Android application
- Building and delivering for Android
- ChromeOS
- Dedicated Server
- iOS
- Introducing iOS
- Getting started with iOS
- Developing for iOS
- Building and delivering for iOS
- 在 iOS 设备上进行故障排除
- 报告 iOS 上的崩溃错误
- Linux
- macOS
- tvOS
- WebGL
- WebGL introduction
- WebGL development
- WebGL Player 设置
- Interaction with browser scripting
- WebGL native plug-ins for Emscripten
- Memory in Unity WebGL
- Cache behavior in WebGL
- WebGL graphics
- Audio in WebGL
- Video playback in WebGL
- Texture compression in WebGL
- Embedded resources in WebGL
- Input in WebGL
- Configure a WebGL Canvas size
- WebGL browser access to device features
- WebGL networking
- Cursor locking and full-screen mode in WebGL
- WebGL performance considerations
- Debug and troubleshoot WebGL builds
- Build and distribute a WebGL application
- Windows
- Universal Windows Platform
- Introduction to Universal Windows Platform
- Get started with Universal Windows Platform
- Develop for Universal Windows Platform
- Build and deliver for Universal Windows Platform
- Unity Search
- Legacy navigation and pathfinding
- 术语表
- Unity User Manual 2023.1 (beta)
- XR
- XR Project set up
- Choose XR provider plug-ins
Choose XR provider plug-ins
Provider plug-ins are packages created to support XR devices and platforms.
Use the XR Plug-in Management settings to manage which XR devices and platforms your project supports. You can also configure key settings for these XR provider plug-ins.
See XR provider plug-in framework for information about provider plug-ins and how they work.
先决条件
Before you can enable XR plug-ins, you must install the XR Plug-in Management package. You can install the package directly from the Project Settings window:
Open the Project Settings window (menu: Edit > Project Settings).
-
Select XR Plug-in Management from the list of settings areas along the left side of the settings window.
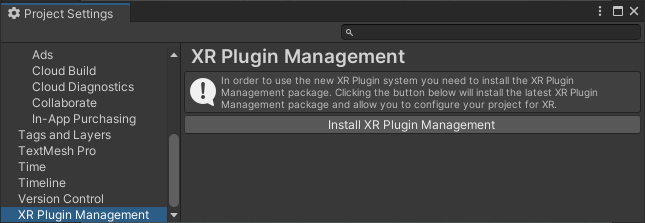
Before installing the XR Plug-in Management package -
If necessary, click Install XR Plug-in Management.
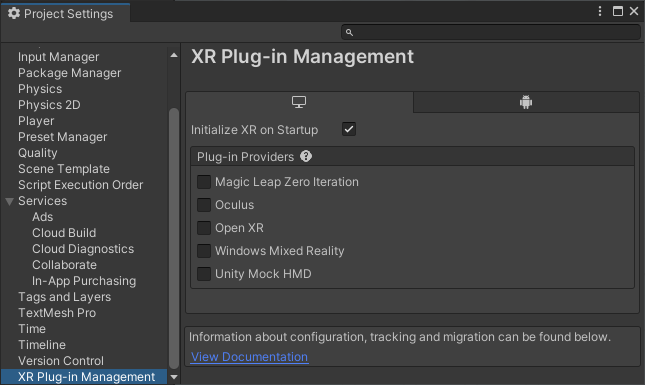
After installing the XR Plug-in Management package
The XR Plug-in Management settings page displays a tab for each available build target. Each tab displays the list of available XR provider plug-ins for that platform. This list contains the plug-ins officially supported by Unity or its partners and also any third-party provider plug-ins you have installed with the Package Manager.
Tip: Use the Unity Hub to install platform modules, such as Android or iOS, to add support for additional build targets. See Add modules in the Unity Hub documentation for instructions.
Enable provider plug-ins
When you enable a plug-in, XR Plug-in Management installs the associated package.
To enable a provider plug-in:
Open the Project Settings window (menu: Edit > Project Settings) and select the XR Plug-in Management section.
-
Select the tab for the target build platform. For example, to enable a plug-in for a device that runs the Android operating system, click the tab with the Android icon.

Android build platform with the ARCore provider enabled Enable the desired provider plug-in.
Repeat for additional plug-ins.
注意:
- Disabling a provider does not remove the package; to remove a provider plug-in, remove the associated package with the Package Manager.
- If you do not see a provider in the list, you might need to install the associated package with the Package Manager. Some provider plug-in packages are distributed by the device maker, not by Unity.
Set provider plug-in options
After you enable a provider plug-in and Unity installs the associated package, any settings for the provider are displayed as subsections under the XR Plug-in Management settings.
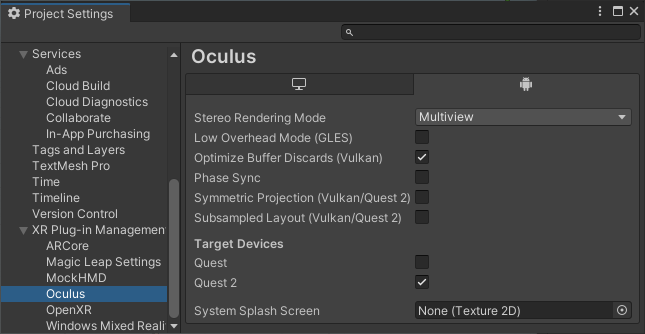
Oculus provider plug-in settings under XR Plug-in Management
If a plug-in supports more than one build target, its settings page includes a tab so that you can configure the settings for each target independently.
To configure the settings for a provider plug-in:
- Open the Project Settings window (menu: Edit > Project Settings).
- Under XR Plug-in Management, select the name of the provider plug-in.
- If present, select the tab for the platform build target. For example, to configure settings for Android devices, click the tab with the Android icon. (The tabs are only shown when a plug-in supports more than one build target.)
- Configure the settings as required.
See the documentation of individual plug-ins for information about plug-in settings. You can access the documentation using the View documentation link in the Package Manager.
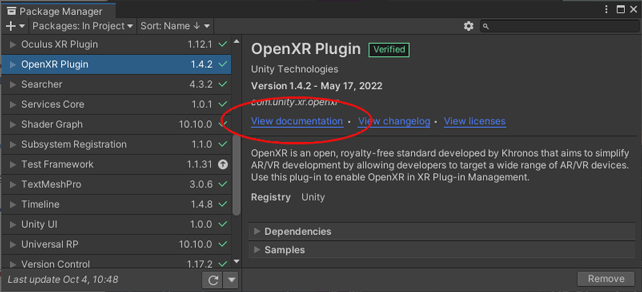
Use the View documentation link to access plug-in documentation
Project validation
Some provider plug-ins and other packages implement project validation checks to help ensure that your project is set up correctly. You can view the status of these checks on the Project Validation section underneath XR Plug-in Management on the Player Settings window.

Project validation checks
If a validation check is followed by a Fix button, you can click the button to automatically fix the issue. Otherwise, you must fix the issue manually. Clicking Edit opens the settings UI to the appropriate section so that you can make any needed changes. Validation checks marked with a red stop icon must be corrected. Checks marked with a yellow warning icon can be ignored or deffered, but you should fix them if possible for best performance or compatibility.
Refer to XR project validation window for additional information.
Support multiple provider plug-ins
You can enable more than one provider plug-in to support multiple XR devices and platforms in the same project.
Note: In some cases, one provider plug-in can support more than one device and operating system. For example, the OpenXR plug-in supports multiple XR devices, operating systems, and build targets.
Unity includes all the enabled plug-ins for the current build target when you make a build. At runtime, Unity uses the first plug-in that loads successfully. Unity attempts to load provider plug-ins in the order they are shown in the XR Plug-in Management list, which is in alphabetical order by default. If you need more control over which plug-in is loaded, you can do one of the following:
- Disable Initialize XR at startup and include your own application logic for selecting the provider at runtime.
- Include your own custom build script to sort the list of providers in the desired order.
- Manually enable only the desired provider before building.
See XR loading for more information about customizing how provider plug-ins are loaded and initialized.
Note: The Mock HMD Loader plug-in only works in the Unity Editor during Play mode and does not affect builds.
Did you find this page useful? Please give it a rating:
Thanks for rating this page!
What kind of problem would you like to report?
Thanks for letting us know! This page has been marked for review based on your feedback.
If you have time, you can provide more information to help us fix the problem faster.
Provide more information
You've told us this page needs code samples. If you'd like to help us further, you could provide a code sample, or tell us about what kind of code sample you'd like to see:
You've told us there are code samples on this page which don't work. If you know how to fix it, or have something better we could use instead, please let us know:
You've told us there is information missing from this page. Please tell us more about what's missing:
You've told us there is incorrect information on this page. If you know what we should change to make it correct, please tell us:
You've told us this page has unclear or confusing information. Please tell us more about what you found unclear or confusing, or let us know how we could make it clearer:
You've told us there is a spelling or grammar error on this page. Please tell us what's wrong:
You've told us this page has a problem. Please tell us more about what's wrong:
Thank you for helping to make the Unity documentation better!
Your feedback has been submitted as a ticket for our documentation team to review.
We are not able to reply to every ticket submitted.
Copyright © 2022 Unity Technologies. Publication 2023.1