매뉴얼
- Unity 사용자 매뉴얼(2019.2)
- 패키지
- 검증 패키지와 프리뷰 패키지
- 2D 애니메이션
- 2D IK
- 2D 픽셀 퍼펙트
- 2D PSD 임포터
- 2D SpriteShape
- 어댑티브 퍼포먼스
- 어드레서블
- 광고 IAP 중개 어댑터
- 광고
- AI 플래너
- Alembic
- 분석 라이브러리
- Android 로그캣
- 애니메이션 리깅
- AP Samsung Android
- AR 파운데이션
- AR 서브시스템
- ARCore XR 플러그인
- ARKit 얼굴 추적
- ARKit XR 플러그인
- 에셋 번들 브라우저
- 에셋 그래프
- Barracuda
- 빌드 보고 인스펙터
- 버스트
- 시네머신
- 컬렉션
- 코어 RP 라이브러리
- 커스텀 NUnit
- DOTS Android 플랫폼
- DOTS 에디터
- DOTS Linux 플랫폼
- DOTS macOS 플랫폼
- DOTS 플랫폼
- DOTS 웹 플랫폼
- DOTS Windows 플랫폼
- 에디터 코루틴
- 엔티티
- FBX 익스포터
- 영화 및 TV 툴박스
- 게임 파운데이션
- Google Resonance Audio
- Google VR Android
- Google VR iOS
- Havok 피직스
- 고해상도 RP
- 하이브리드 렌더러
- 직접 실행 창
- 인앱 구매
- 입력 시스템
- 잡
- 경량 RP
- 수학
- 메모리 프로파일러
- 모바일 알림
- Mono Cecil
- 멀티플레이어 HLAPI
- Oculus Android
- Oculus 데스크톱
- OpenVR(데스크톱)
- 패키지 확인 제품군
- 성능 테스트 API
- 플레이어블 그래프 비주얼라이저
- Polybrush
- 포스트 프로세싱
- ProBuilder
- 프로파일 분석기
- ProGrids
- 빠른 검색
- 원격 설정
- 스크립터블 빌드 파이프라인
- 셰이더 그래프
- WebGL 게임 공유
- 하위 시스템 등록
- 터레인 툴
- 테스트 프레임워크
- TextMesh Pro
- UI 빌더
- Unity AOV 레코더
- Unity 콜라보레이트
- Unity 퍼블리싱 포털
- Unity 피직스
- Unity 레코더
- Unity 리플렉트
- Unity 렌더 스트리밍
- Unity 사용자 보고
- USD
- 벡터 그래픽스
- 비주얼 이펙트 그래프
- Vuforia 엔진 AR
- WebRTC
- Windows Mixed Reality
- Windows XR 플러그인
- Xiaomi SDK
- XR 인터랙션 툴킷
- XR 레거시 입력 도우미
- XR 관리
- 빌트인 패키지
- 키워드별 패키지
- 패키지 관리자
- 커스텀 패키지 생성
- 검증 패키지와 프리뷰 패키지
- Unity에서 작업 수행
- Unity 설치
- 시작하기
- 에셋 워크플로
- 메인 창
- 게임플레이 생성
- 에디터 기능
- 고급 개발
- 고급 에디터 토픽
- 업그레이드 가이드
- 자동 API 업데이터 사용
- Unity 2019.2로 업그레이드
- Unity 2019.1로 업그레이드
- Unity 2018.3으로 업그레이드
- Unity 2018.2로 업그레이드
- Unity 2018.1로 업그레이드
- Unity 2017.3으로 업그레이드
- Unity 2017.2로 업그레이드
- Unity 2017.1로 업그레이드
- Unity 5.6으로 업그레이드
- Unity 5.5로 업그레이드
- Unity 5.4로 업그레이드
- Unity 5.3으로 업그레이드
- Unity 5.2으로 업그레이드
- Unity 5.0으로 업그레이드
- Unity 4.0으로 업그레이드
- Unity 3.5로 업그레이드
- 임포트
- 2D
- 그래픽스
- 그래픽스 개요
- 조명
- 카메라
- 머티리얼, 셰이더, 텍스처
- 동영상 개요
- 터레인 엔진
- 트리 에디터
- 파티클 시스템
- 포스트 프로세싱 개요
- 고급 렌더링 기능
- 절차적 메시 지오메트리
- 그래픽스 퍼포먼스 최적화
- 레이어
- 그래픽스 레퍼런스
- 그래픽스 작업 수행 방법
- 그래픽스 튜토리얼
- 스크립터블 렌더 파이프라인
- 그래픽스 개요
- 물리
- 스크립팅
- 스크립팅 개요
- 스크립팅 툴
- 이벤트 시스템
- C# 잡 시스템
- 멀티플레이어 및 네트워킹
- 네트워킹 개요
- 멀티플레이어 프로젝트 설정
- 네트워크 관리자 사용
- 네트워크 관리자 HUD 사용
- LAN 모드의 Network Manager HUD
- 매치메이커 모드의 Network Manager HUD
- 싱글 플레이어 게임을 Unity 멀티플레이어 게임으로 전환
- 디버깅 정보
- 멀티플레이어 고수준 API
- 멀티플레이어 컴포넌트 레퍼런스
- 멀티플레이어 클래스 레퍼런스
- UnityWebRequest
- 오디오
- 애니메이션
- 타임라인
- 사용자 인터페이스(UI)
- 내비게이션과 경로 탐색
- 내비게이션 개요
- 내비게이션 레퍼런스
- 내비게이션 작업 수행 방법
- Unity 서비스
- Unity 서비스를 위한 프로젝트 설정
- Unity 조직
- Unity 애즈
- Unity 애널리틱스
- Unity 클라우드 빌드
- Unity IAP
- Unity IAP 설정
- 크로스 플랫폼 가이드
- 스토어 가이드
- 스토어 구현
- IAP Promo
- Unity 콜라보레이트
- Unity 클라우드 다이어그노스틱
- Unity 통합
- 멀티플레이어 서비스
- XR
- 오픈 소스 저장소
- 에셋 스토어 퍼블리싱
- 플랫폼 개발
- 스탠드얼론
- macOS
- Apple TV
- WebGL
- iOS
- Android
- Windows
- Windows 일반
- 유니버설 Windows 플랫폼
- 모바일 개발자 체크리스트
- 실험 기능
- 레거시 항목
- 베스트 프랙티스 가이드
- 전문가 가이드
- Unity 2019.2의 새로운 기능
- 용어집
- Unity 사용자 매뉴얼(2019.2)
- 애니메이션
- 플레이어블 API
- 플레이어블 예제
플레이어블 예제
플레이어블 그래프 비주얼라이저(PlayableGraph Visualizer)
이 문서의 모든 예제에서는 PlayableGraph Visualizer(아래 사진 참조)를 사용하여 플레이어블 API로 생성된 트리와 노드를 도해로 설명합니다. PlayableGraph Visualizer는 GitHub를 통해 제공되는 도구입니다.
PlayableGraph Visualizer를 사용하는 방법은 다음과 같습니다.
사용 중인 Unity 버전에 해당하는 PlayableGraph Visualizer를 GitHub 저장소에서 다운로드합니다.
Window > PlayableGraph Visualizer 를 선택하여 도구를 엽니다.
GraphVisualizerClient.Show(PlayableGraph 그래프, 문자열 이름)를 사용하여 그래프를 등록합니다.
그래프에서 플레이어블은 컬러 노드로 표시됩니다. 연결선의 컬러 채도는 블렌딩 가중치를 나타냅니다. 이 도구에 대한 자세한 내용은 GitHub를 참조하십시오.
게임 오브젝트의 단일 애니메이션 클립 재생
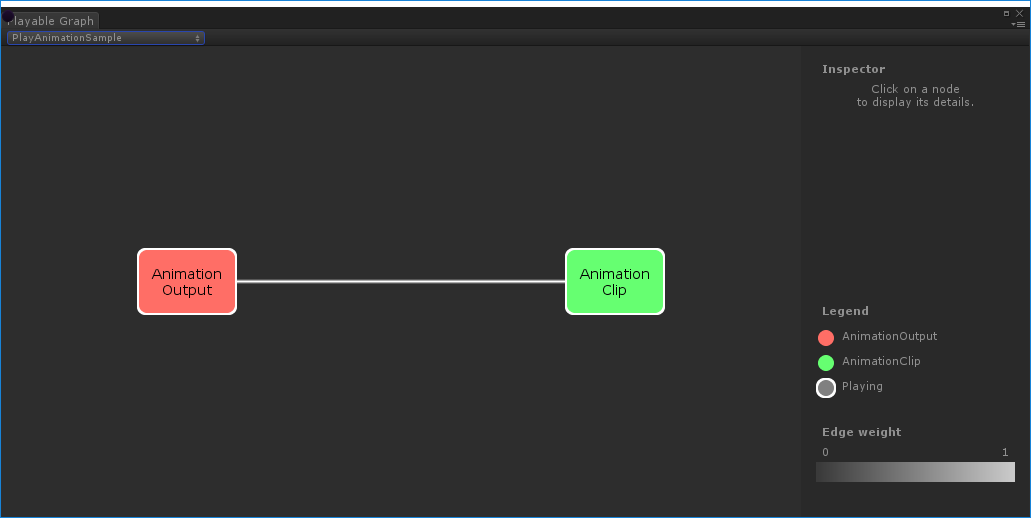
다음는 플레이어블 노드 하나에 연결된 플레이어블 출력 하나가 있는 단순 PlayableGraph의 예제입니다. 플레이어블 노드는 애니메이션 클립 하나를 재생합니다. 애니메이션 클립을 플레이어블 API와 호환되게 하려면 AnimationClipPlayable으로 래핑(wrapping)해야 합니다.
using UnityEngine;

using UnityEngine.Playables;

using UnityEngine.Animations;

[RequireComponent(typeof(Animator))]

public class PlayAnimationSample : MonoBehaviour

{

    public AnimationClip clip;

    PlayableGraph playableGraph;

    void Start()

    {

        playableGraph = PlayableGraph.Create();

        playableGraph.SetTimeUpdateMode(DirectorUpdateMode.GameTime);

        var playableOutput = AnimationPlayableOutput.Create(playableGraph, "Animation", GetComponent<Animator>());

        // Wrap the clip in a playable

        var clipPlayable = AnimationClipPlayable.Create(playableGraph, clip);

        // Connect the Playable to an output

        playableOutput.SetSourcePlayable(clipPlayable);

        // Plays the Graph.

        playableGraph.Play();

    }

    void OnDisable()

    {

        // Destroys all Playables and PlayableOutputs created by the graph.

        playableGraph.Destroy();

    }

}
아래 예제와 같이 AnimationPlayableUtilities를 사용하여 애니메이션 플레이어블의 생성과 재생을 간소화할 수 있습니다.
using UnityEngine;

using UnityEngine.Playables;

using UnityEngine.Animations;

[RequireComponent(typeof(Animator))]

public class PlayAnimationUtilitiesSample : MonoBehaviour

{

    public AnimationClip clip;

    PlayableGraph playableGraph;

    void Start()

    {

        AnimationPlayableUtilities.PlayClip(GetComponent<Animator>(), clip, out playableGraph);

    }

    void OnDisable()

    {

        // Destroys all Playables and Outputs created by the graph.

        playableGraph.Destroy();

    }

}
애니메이션 블렌드 트리 생성
다음은 AnimationMixerPlayable을 사용하여 애니메이션 클립 두 개를 블렌드하는 예제입니다. 애니메이션 클립을 블렌드하기 전에 플레이어블로 래핑해야 합니다. 그러기 위해서는 AnimationClipPlayable(clipPlayable0 및 clipPlayable1)이 각 AnimationClip(clip0 및 clip1)을 래핑해야 합니다. SetInputWeight() 메서드는 각 플레이어블의 블렌드 가중치를 동적으로 조절합니다.
아래 예제에는 나와 있지 않지만, AnimationMixerPlayable을 사용하여 플레이어블 믹서와 기타 플레이어블을 블렌드할 수도 있습니다.
using UnityEngine;

using UnityEngine.Playables;

using UnityEngine.Animations;

[RequireComponent(typeof(Animator))]

public class MixAnimationSample : MonoBehaviour

{

    public AnimationClip clip0;

    public AnimationClip clip1;

    public float weight;

    PlayableGraph playableGraph;

    AnimationMixerPlayable mixerPlayable;

    void Start()

    {

        // Creates the graph, the mixer and binds them to the Animator.

        playableGraph = PlayableGraph.Create();

        var playableOutput = AnimationPlayableOutput.Create(playableGraph, "Animation", GetComponent<Animator>());

        mixerPlayable = AnimationMixerPlayable.Create(playableGraph, 2);

        playableOutput.SetSourcePlayable(mixerPlayable);

        // Creates AnimationClipPlayable and connects them to the mixer.

        var clipPlayable0 = AnimationClipPlayable.Create(playableGraph, clip0);

        var clipPlayable1 = AnimationClipPlayable.Create(playableGraph, clip1);

        playableGraph.Connect(clipPlayable0, 0, mixerPlayable, 0);

        playableGraph.Connect(clipPlayable1, 0, mixerPlayable, 1);


        // Plays the Graph.

        playableGraph.Play();

    }

    void Update()

    {

        weight = Mathf.Clamp01(weight);

        mixerPlayable.SetInputWeight(0, 1.0f-weight);

        mixerPlayable.SetInputWeight(1, weight);

    }

    void OnDisable()

    {

        // Destroys all Playables and Outputs created by the graph.

        playableGraph.Destroy();

    }

}
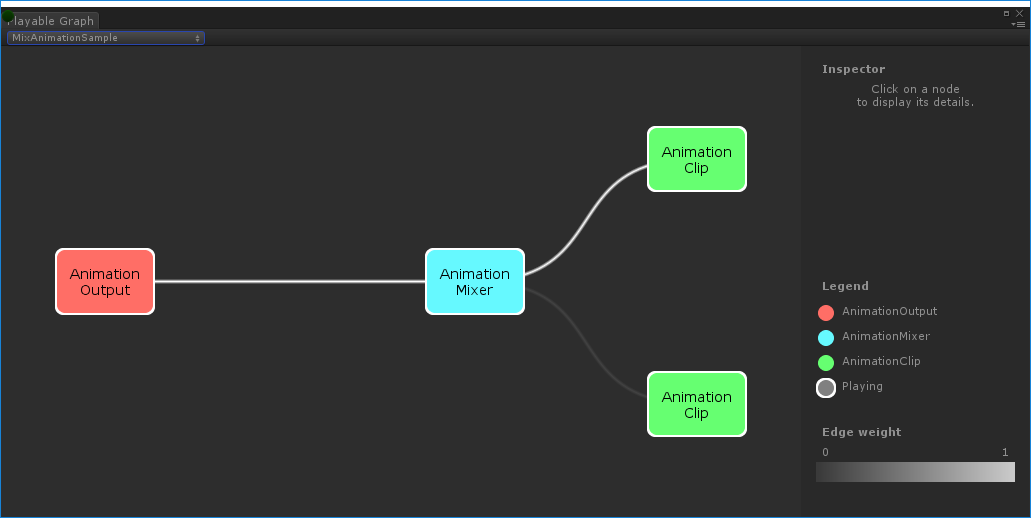
MixAnimationSample로 생성된PlayableGraph`AnimationClip과 AnimatorController 블렌드
다음은 AnimationMixerPlayable을 사용하여 AnimationClip을 AnimatorController와 블렌드하는 방법을 보여주는 예제입니다.
AnimationClip과 AnimatorController를 블렌드하기 전에 플레이어블로 래핑해야 합니다. 그러기 위해서는 AnimationClipPlayable(clipPlayable)이 AnimationClip(clip)을 래핑하고 AnimatorControllerPlayable(ctrlPlayable)이 RuntimeAnimatorController(controller)를 래핑해야 합니다. SetInputWeight() 메서드는 각 플레이어블의 블렌드 가중치를 동적으로 조절합니다.
using UnityEngine;

using UnityEngine.Playables;

using UnityEngine.Animations;

[RequireComponent(typeof(Animator))]

public class RuntimeControllerSample : MonoBehaviour

{

    public AnimationClip clip;

    public RuntimeAnimatorController controller;

    public float weight;

    PlayableGraph playableGraph;

    AnimationMixerPlayable mixerPlayable;

    void Start()

    {

        // Creates the graph, the mixer and binds them to the Animator.

        playableGraph = PlayableGraph.Create();

        var playableOutput = AnimationPlayableOutput.Create(playableGraph, "Animation", GetComponent<Animator>());

        mixerPlayable = AnimationMixerPlayable.Create(playableGraph, 2);

        playableOutput.SetSourcePlayable(mixerPlayable);

        // Creates AnimationClipPlayable and connects them to the mixer.

        var clipPlayable = AnimationClipPlayable.Create(playableGraph, clip);

        var ctrlPlayable = AnimatorControllerPlayable.Create(playableGraph, controller);

        playableGraph.Connect(clipPlayable, 0, mixerPlayable, 0);

        playableGraph.Connect(ctrlPlayable, 0, mixerPlayable, 1);


        // Plays the Graph.

        playableGraph.Play();

    }

    void Update()

    {

        weight = Mathf.Clamp01(weight);

        mixerPlayable.SetInputWeight(0, 1.0f-weight);

        mixerPlayable.SetInputWeight(1, weight);

    }

    void OnDisable()

    {

        // Destroys all Playables and Outputs created by the graph.

        playableGraph.Destroy();

    }

}
여러 출력이 있는 PlayableGraph 생성
다음은 두 가지 플레이어블 출력 타입인 AudioPlayableOutput과 AnimationPlayableOutput이 있는 PlayableGraph를 생성하는 방법을 보여주는 예제입니다. PlayableGraph에는 타입이 다른 여러 플레이어블 출력이 포함될 수 있습니다.
아래 예제에서 AudioPlayableOutput에 연결된 AudioClipPlayable을 통해 AudioClip을 재생하는 방법도 확인할 수 있습니다.
using UnityEngine;

using UnityEngine.Animations;

using UnityEngine.Audio;

using UnityEngine.Playables;

[RequireComponent(typeof(Animator))]

[RequireComponent(typeof(AudioSource))]

public class MultiOutputSample : MonoBehaviour

{

    public AnimationClip animationClip;

    public AudioClip audioClip;

    PlayableGraph playableGraph;

    void Start()

    {

        playableGraph = PlayableGraph.Create();

        // Create the outputs.

        var animationOutput = AnimationPlayableOutput.Create(playableGraph, "Animation", GetComponent<Animator>());

        var audioOutput = AudioPlayableOutput.Create(playableGraph, "Audio", GetComponent<AudioSource>());


        // Create the playables.

        var animationClipPlayable = AnimationClipPlayable.Create(playableGraph, animationClip);

        var audioClipPlayable = AudioClipPlayable.Create(playableGraph, audioClip, true);

        // Connect the playables to an output

        animationOutput.SetSourcePlayable(animationClipPlayable);

        audioOutput.SetSourcePlayable(audioClipPlayable);

        // Plays the Graph.

        playableGraph.Play();

    }

    void OnDisable()

    {

        // Destroys all Playables and Outputs created by the graph.

        playableGraph.Destroy();

    }

}
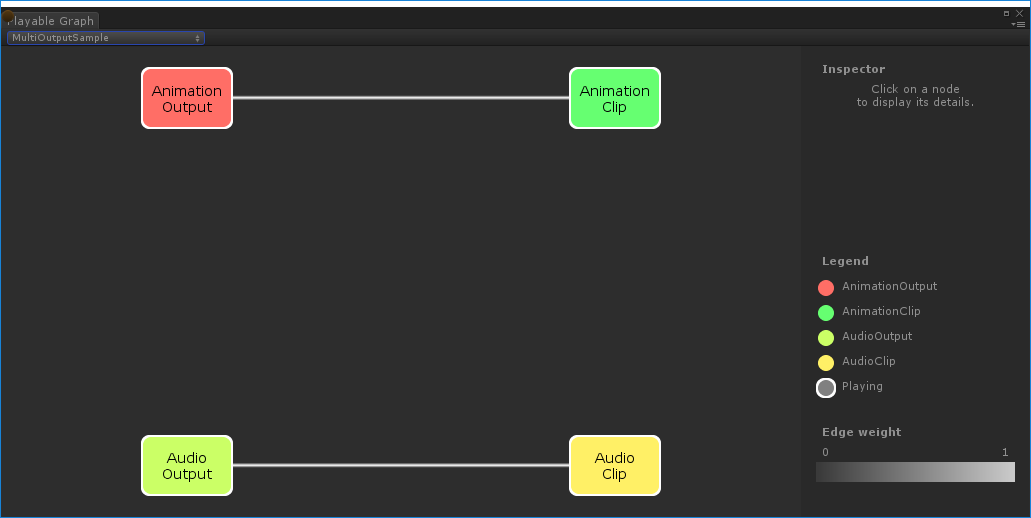
MultiOutputSample로 생성된PlayableGraph`트리의 재생 상태 제어
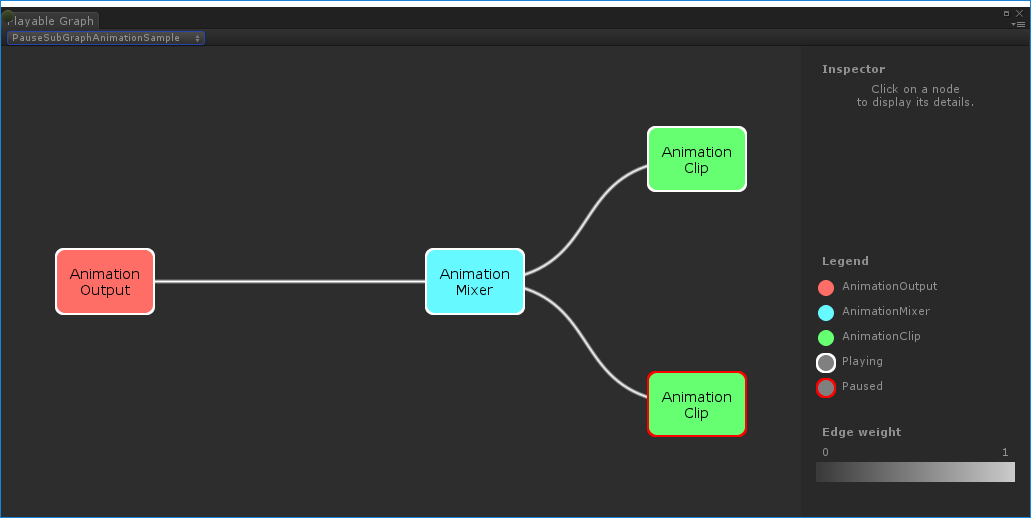
다음은 Playable.SetPlayState() 메서드를 사용하여 PlayableGraph 트리의 노드 재생 상태를 제어하는 방법을 보여주는 예제입니다. SetPlayState 메서드는 전체 트리, 트리의 브랜치 하나, 또는 노드 하나의 재생 상태를 제어합니다.
노드의 재생 상태를 설정하면 자식의 재생 상태에 관계없이 노드의 모든 자식에게 상태가 전이됩니다. 예를 들어 자식 노드가 명백하게 일지 정지되어 있더라도 부모 노드를 “playing”으로 설정하면 모든 자식 노드도 “playing”으로 설정됩니다.
아래 예제에서 PlayableGraph에는 두 애니메이션 클립을 블렌드하는 믹서가 포함되어 있습니다. AnimationClipPlayable은 각 애니메이션 클립을 래핑하고 SetPlayState() 메서드는 두 번째 플레이어블을 명백하게 일시 정지합니다. 두 번째 AnimationClipPlayable은 명백하게 일시 정지되었으므로 내부 시간이 진행되지 않고 같은 값을 출력합니다. 정확한 값은 AnimationClipPlayable이 일시 정지된 특정 시간에 따라 다릅니다.
using UnityEngine;

using UnityEngine.Playables;

using UnityEngine.Animations;

[RequireComponent(typeof(Animator))]

public class PauseSubGraphAnimationSample : MonoBehaviour

{

    public AnimationClip clip0;

    public AnimationClip clip1;

    PlayableGraph playableGraph;

    AnimationMixerPlayable mixerPlayable;

    void Start()

    {

        // Creates the graph, the mixer and binds them to the Animator.

        playableGraph = PlayableGraph.Create();

        var playableOutput = AnimationPlayableOutput.Create(playableGraph, "Animation", GetComponent<Animator>());

        mixerPlayable = AnimationMixerPlayable.Create(playableGraph, 2);

        playableOutput.SetSourcePlayable(mixerPlayable);

        // Creates AnimationClipPlayable and connects them to the mixer.

        var clipPlayable0 = AnimationClipPlayable.Create(playableGraph, clip0);

        var clipPlayable1 = AnimationClipPlayable.Create(playableGraph, clip1);

        playableGraph.Connect(clipPlayable0, 0, mixerPlayable, 0);

        playableGraph.Connect(clipPlayable1, 0, mixerPlayable, 1);

        mixerPlayable.SetInputWeight(0, 1.0f);

        mixerPlayable.SetInputWeight(1, 1.0f);

        clipPlayable1.SetPlayState(PlayState.Paused);

        // Plays the Graph.

        playableGraph.Play();

    }

    void OnDisable()

    {

        // Destroys all Playables and Outputs created by the graph.

        playableGraph.Destroy();

    }

}
트리의 타이밍 제어
다음은 Play() 메서드를 사용하여 PlayableGraph를 재생하고, SetPlayState() 메서드를 사용하여 플레이어블을 일시 정지하고, SetTime() 메서드를 사용하여 플레이어블의 로컬 시간을 변수를 통해 수동으로 설정하는 방법을 보여주는 예제입니다.
using UnityEngine;

using UnityEngine.Playables;

using UnityEngine.Animations;

[RequireComponent(typeof(Animator))]

public class PlayWithTimeControlSample : MonoBehaviour

{

    public AnimationClip clip;

    public float time;

    PlayableGraph playableGraph;

    AnimationClipPlayable playableClip;

    void Start()

    {

        playableGraph = PlayableGraph.Create();

        var playableOutput = AnimationPlayableOutput.Create(playableGraph, "Animation", GetComponent<Animator>());

        // Wrap the clip in a playable

        playableClip = AnimationClipPlayable.Create(playableGraph, clip);

        // Connect the Playable to an output

        playableOutput.SetSourcePlayable(playableClip);

        // Plays the Graph.

        playableGraph.Play();

        // Stops time from progressing automatically.

        playableClip.SetPlayState(PlayState.Paused);

    }

    void Update ()

    {

        // Control the time manually

        playableClip.SetTime(time);

    }


    void OnDisable()

    {

        // Destroys all Playables and Outputs created by the graph.

        playableGraph.Destroy();

    }

}
PlayableBehaviour 생성
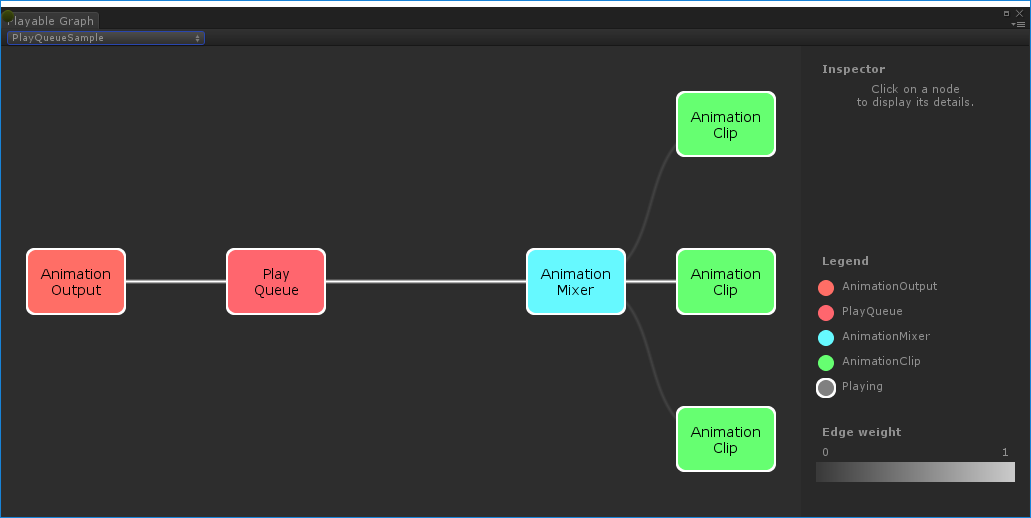
다음은 PlayableBehaviour 공용 클래스를 사용하여 커스텀 플레이어블을 생성하는 방법을 보여주는 예제입니다. 아래 예제에서 PrepareFrame() 가상 메서드를 오버라이드하여 PlayableGraph의 노드를 제어하는 방법도 확인할 수 있습니다. 커스텀 플레이어블은 PlayableBehaviour 클래스의 다른 가상 메서드를 오버라이드할 수 있습니다.
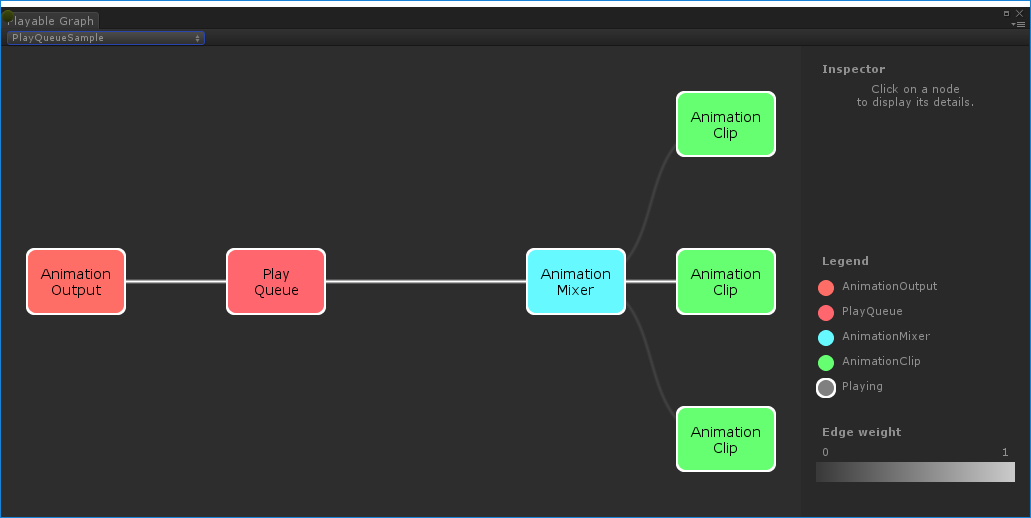
아래 예제에서 제어되는 노드는 일련의 애니메이션 클립(clipsToPlay)입니다. SetInputMethod()는 각 애니메이션 클립의 블렌드 가중치를 수정하여 클립이 한 번에 하나씩만 재생되도록 하고, SetTime() 메서드는 로컬 시간을 조정하여 애니메이션 클립이 활성화되는 순간에 재생이 시작되도록 합니다.
using UnityEngine;

using UnityEngine.Animations;

using UnityEngine.Playables;

public class PlayQueuePlayable : PlayableBehaviour

{

    private int m_CurrentClipIndex = -1;

    private float m_TimeToNextClip;

    private Playable mixer;

    public void Initialize(AnimationClip[] clipsToPlay, Playable owner, PlayableGraph graph)

    {

        owner.SetInputCount(1);

        mixer = AnimationMixerPlayable.Create(graph, clipsToPlay.Length);

        graph.Connect(mixer, 0, owner, 0);

        owner.SetInputWeight(0, 1);

        for (int clipIndex = 0 ; clipIndex < mixer.GetInputCount() ; ++clipIndex)

        {

            graph.Connect(AnimationClipPlayable.Create(graph, clipsToPlay[clipIndex]), 0, mixer, clipIndex);

            mixer.SetInputWeight(clipIndex, 1.0f);

        }

    }

    override public void PrepareFrame(Playable owner, FrameData info)

    {

        if (mixer.GetInputCount() == 0)

            return;

        // Advance to next clip if necessary

        m_TimeToNextClip -= (float)info.deltaTime;

        if (m_TimeToNextClip <= 0.0f)

        {

            m_CurrentClipIndex++;

            if (m_CurrentClipIndex >= mixer.GetInputCount())

                m_CurrentClipIndex = 0;

            var currentClip = (AnimationClipPlayable)mixer.GetInput(m_CurrentClipIndex);

            // Reset the time so that the next clip starts at the correct position

            currentClip.SetTime(0);

            m_TimeToNextClip = currentClip.GetAnimationClip().length;

        }

        // Adjust the weight of the inputs

        for (int clipIndex = 0 ; clipIndex < mixer.GetInputCount(); ++clipIndex)

        {

            if (clipIndex == m_CurrentClipIndex)

                mixer.SetInputWeight(clipIndex, 1.0f);

            else

                mixer.SetInputWeight(clipIndex, 0.0f);

        }

    }

}

[RequireComponent(typeof (Animator))]

public class PlayQueueSample : MonoBehaviour

{

    public AnimationClip[] clipsToPlay;

    PlayableGraph playableGraph;

    void Start()

    {

        playableGraph = PlayableGraph.Create();

        var playQueuePlayable = ScriptPlayable<PlayQueuePlayable>.Create(playableGraph);

        var playQueue = playQueuePlayable.GetBehaviour();

        playQueue.Initialize(clipsToPlay, playQueuePlayable, playableGraph);

        var playableOutput = AnimationPlayableOutput.Create(playableGraph, "Animation", GetComponent<Animator>());

        playableOutput.SetSourcePlayable(playQueuePlayable);
        playableOutput.SetSourceInputPort(0);

        playableGraph.Play();

    }

    void OnDisable()

    {

        // Destroys all Playables and Outputs created by the graph.

        playableGraph.Destroy();

    }

}
2017–07–04
Unity 2017.1의 새로운 기능 NewIn20171