Unity Manual
- Unity User Manual (2018.4)
- Packages
- Verified packages
- Adaptive Performance
- Adaptive Performance Samsung Android
- Addressables
- Advertisement
- Alembic
- Analytics Library
- ARCore XR Plugin
- ARKit Face Tracking
- ARKit XR Plugin
- Asset Bundle Browser
- Barracuda
- Burst
- Cinemachine
- Editor Coroutines
- In App Purchasing
- iOS 14 Advertising Support
- Mathematics
- ML Agents
- Mobile Notifications
- Oculus Android
- Oculus Desktop
- OpenVR (Desktop)
- Package Manager UI
- Polybrush
- Post Processing
- ProBuilder
- Profile Analyzer
- Quick Search
- Remote Config
- Scriptable Build Pipeline
- TextMeshPro
- Unity Collaborate
- Unity Distribution Portal
- Windows Mixed Reality
- Xiaomi SDK
- Preview packages
- 2D Animation
- 2D IK
- 2D Pixel Perfect
- 2D PSD Importer
- 2D SpriteShape
- AR Foundation
- Asset Graph
- Build Report Inspector
- Collections
- Entities
- FBX Exporter
- Film and TV Toolbox
- Game Foundation
- Hybrid Renderer
- Immediate Window
- Input System
- Jobs
- Memory Profiler
- Package Validation Suite
- Performance testing API
- PlayableGraph Visualizer
- ProGrids
- Render-Pipelines Core
- Render-Pipelines High-Definition
- Render-Pipelines Lightweight
- Share WebGL Game
- Unity Recorder
- Unity Reflect
- Unity Simulation Client
- Unity Simulation Core
- Unity User Reporting
- USD
- Vector Graphics
- Visual Effect Graph
- XR SDK Management
- Built-in packages
- AI
- Animation
- Asset Bundle
- Audio
- Cloth
- Director
- Image Conversion
- IMGUI
- JSONSerialize
- Particle System
- Physics
- Physics 2D
- Screen Capture
- Terrain
- Terrain Physics
- Tilemap
- UI
- UIElements
- Umbra
- Unity Analytics
- Unity Web Request
- Unity Web Request Asset Bundle
- Unity Web Request Audio
- Unity Web Request Texture
- Unity Web Request WWW
- Vehicles
- Video
- VR
- Wind
- XR
- Packages by keywords
- Verified packages
- Working in Unity
- Getting Started
- System Requirements for Unity 2018.4
- Unity Hub
- Installing the Unity Hub
- Adding modules to the Unity Editor
- Installing Unity without the hub
- Installing Unity offline without the Hub
- Unity Hub advanced deployment considerations
- 2D or 3D projects
- Project Templates
- Starting Unity for the first time
- Opening existing Projects
- Learning the interface
- Upgrading Unity
- Using the Automatic API Updater
- Upgrading to Unity 2018 LTS
- Legacy Upgrade Guides
- Asset Workflow
- The Main Windows
- Creating Gameplay
- Editor Features
- Advanced Development
- Advanced Editor Topics
- Licenses and activation
- Getting Started
- Importing
- 2D
- Gameplay in 2D
- 2D Sorting
- Sprites
- Tilemap
- Physics Reference 2D
- Graphics
- Graphics Overview
- Lighting
- Lighting overview
- Lighting Window
- Light Explorer
- Light sources
- Shadows
- Global Illumination
- Lightmapping
- Lightmap Parameters
- Baked ambient occlusion
- LOD for baked lightmaps
- Light Probes
- Reflection probes
- Lighting Modes
- GI visualizations in the Scene view
- Lighting Data Asset
- Lightmap Directional Modes
- Lightmaps: Technical information
- Material properties and the GI system
- Global Illumination UVs
- GI cache
- Light troubleshooting and performance
- Related topics
- Cameras
- Occlusion culling
- Materials, Shaders & Textures
- Textures
- Creating and Using Materials
- Standard Shader
- Standard Particle Shaders
- Autodesk Interactive shader
- Physically Based Rendering Material Validator
- Accessing and Modifying Material parameters via script
- Writing Shaders
- Legacy Shaders
- Video overview
- Terrain Engine
- Tree Editor
- Particle Systems
- Post-processing overview
- Advanced Rendering Features
- Procedural Mesh Geometry
- Optimizing graphics performance
- Layers
- Lighting
- Graphics Reference
- Cameras Reference
- Shader Reference
- Writing Surface Shaders
- Writing vertex and fragment shaders
- Vertex and fragment shader examples
- Shader semantics
- Accessing shader properties in Cg/HLSL
- Providing vertex data to vertex programs
- Built-in shader include files
- Predefined Shader preprocessor macros
- Built-in shader helper functions
- Built-in shader variables
- Making multiple shader program variants
- GLSL Shader programs
- Shading Language used in Unity
- Shader Compilation Target Levels
- Shader data types and precision
- Using sampler states
- ShaderLab Syntax
- Shader assets
- Advanced ShaderLab topics
- Unity's Rendering Pipeline
- Performance tips when writing shaders
- Rendering with Replaced Shaders
- Custom Shader GUI
- Using Depth Textures
- Camera's Depth Texture
- Platform-specific rendering differences
- Shader Level of Detail
- Using texture arrays in shaders
- Debugging DirectX 11/12 shaders with Visual Studio
- Debugging DirectX 12 shaders with PIX
- Implementing Fixed Function TexGen in Shaders
- Particle Systems reference
- Particle System
- Particle System modules
- Particle System Main module
- Emission module
- Shape Module
- Velocity over Lifetime module
- Noise module
- Limit Velocity Over Lifetime module
- Inherit Velocity module
- Force Over Lifetime module
- Color Over Lifetime module
- Color By Speed module
- Size over Lifetime module
- Size by Speed module
- Rotation Over Lifetime module
- Rotation By Speed module
- External Forces module
- Collision module
- Triggers module
- Sub Emitters module
- Texture Sheet Animation module
- Lights module
- Trails module
- Custom Data module
- Renderer module
- Particle System Force Field
- Visual Effects Reference
- Mesh Components
- Texture Components
- Rendering Components
- Rendering Pipeline Details
- Graphics HOWTOs
- Graphics Tutorials
- Scriptable Render Pipeline
- Graphics Overview
- Physics
- Scripting
- Scripting Overview
- Creating and Using Scripts
- Variables and the Inspector
- Controlling GameObjects using components
- Event Functions
- Time and Framerate Management
- Creating and Destroying GameObjects
- Coroutines
- Namespaces
- Attributes
- Order of execution for event functions
- Understanding Automatic Memory Management
- Platform dependent compilation
- Special folders and script compilation order
- Script compilation and assembly definition files
- Managed code stripping
- .NET profile support
- Referencing additional class library assemblies
- Stable scripting runtime: known limitations
- Generic Functions
- Scripting restrictions
- Script Serialization
- UnityEvents
- What is a Null Reference Exception?
- Important Classes
- Vector Cookbook
- Scripting Tools
- Event System
- C# Job System
- Scripting Overview
- Multiplayer and Networking
- Multiplayer Overview
- Setting up a multiplayer project
- Using the Network Manager
- Using the Network Manager HUD
- The Network Manager HUD in LAN mode
- The Network Manager HUD in Matchmaker mode
- Converting a single-player game to Unity Multiplayer
- Debugging Information
- The Multiplayer High Level API
- Multiplayer Component Reference
- Multiplayer Classes Reference
- UnityWebRequest
- Audio
- Audio Overview
- Audio files
- Tracker Modules
- Audio Mixer
- Native Audio Plugin SDK
- Audio Profiler
- Ambisonic Audio
- Audio Reference
- Audio Clip
- Audio Listener
- Audio Source
- Audio Mixer
- Audio Filters
- Audio Effects
- Audio Low Pass Effect
- Audio High Pass Effect
- Audio Echo Effect
- Audio Flange Effect
- Audio Distortion Effect
- Audio Normalize Effect
- Audio Parametric Equalizer Effect
- Audio Pitch Shifter Effect
- Audio Chorus Effect
- Audio Compressor Effect
- Audio SFX Reverb Effect
- Audio Low Pass Simple Effect
- Audio High Pass Simple Effect
- Reverb Zones
- Microphone
- Audio Settings
- Animation
- Animation System Overview
- Animation Clips
- Animator Controllers
- Retargeting of Humanoid animations
- Performance and optimization
- Animation Reference
- Animation FAQ
- Playables API
- A Glossary of animation terms
- Timeline
- Timeline overview
- Using the Timeline window
- Timeline window
- Timeline properties in the Inspector window
- Playable Director component
- Timeline glossary
- UI
- Navigation and Pathfinding
- Navigation Overview
- Navigation System in Unity
- Inner Workings of the Navigation System
- Building a NavMesh
- NavMesh building components
- Advanced NavMesh Bake Settings
- Creating a NavMesh Agent
- Creating a NavMesh Obstacle
- Creating an Off-mesh Link
- Building Off-Mesh Links Automatically
- Building Height Mesh for Accurate Character Placement
- Navigation Areas and Costs
- Loading Multiple NavMeshes using Additive Loading
- Using NavMesh Agent with Other Components
- Navigation Reference
- Navigation How-Tos
- Navigation Overview
- Unity Services
- Setting up your project for Unity Services
- Unity Organizations
- Unity Ads
- Unity Analytics
- Unity Analytics Overview
- Setting Up Analytics
- Analytics Dashboard
- Analytics events
- Funnels
- Remote Settings
- Unity Analytics A/B Testing
- Monetization
- User Attributes
- Unity Analytics Raw Data Export
- Data reset
- Upgrading Unity Analytics
- COPPA Compliance
- Unity Analytics and the EU General Data Protection Regulation (GDPR)
- Analytics Metrics, Segments, and Terminology
- Unity Cloud Build
- Automated Build Generation
- Supported platforms
- Supported versions of Unity
- Share links
- Version control systems
- Using the Unity Developer Dashboard to configure Unity Cloud Build for Git
- Using the Unity Editor to configure Unity Cloud Build for Git
- Using the Unity Developer Dashboard to configure Unity Cloud Build for Mercurial
- Using the Unity Editor to configure Unity Cloud Build for Mercurial
- Using Apache Subversion (SVN) with Unity Cloud Build
- Using the Unity Developer Dashboard to configure Unity Cloud Build for Perforce
- Using the Unity Editor to configure Unity Cloud Build for Perforce
- Using the Unity Developer Dashboard to configure Unity Cloud Build for Plastic
- Building for iOS
- Advanced options
- Using Addressables in Unity Cloud Build
- Build manifest
- Scheduled builds
- Cloud Build REST API
- Unity IAP
- Setting up Unity IAP
- Cross Platform Guide
- Codeless IAP
- Defining products
- Subscription Product support
- Initialization
- Browsing Product Metadata
- Initiating Purchases
- Processing Purchases
- Handling purchase failures
- Restoring Transactions
- Purchase Receipts
- Receipt validation
- Store Extensions
- Cross-store installation issues with Android in-app purchase stores
- Store Guides
- Implementing a Store
- Unity Collaborate
- Setting up Unity Collaborate
- Adding team members to your Unity Project
- Viewing history
- Enabling Cloud Build with Collaborate
- Managing Unity Editor versions
- Reverting files
- Resolving file conflicts
- Excluding Assets from publishing to Collaborate
- Publishing individual files to Collaborate
- Restoring previous versions of a project
- In-Progress edit notifications
- Managing cloud storage
- Moving your Project to another version control system
- Collaborate troubleshooting tips
- Unity Cloud Diagnostics
- Unity Integrations
- Multiplayer Services
- Unity Distribution Portal
- XR
- XR SDKs
- Google VR
- Vuforia
- Windows Mixed Reality
- Unity XR input
- XR API reference
- Mixed Reality Devices
- VR overview
- VR devices
- Single Pass Stereo rendering (Double-Wide rendering)
- VR Audio Spatializers
- VR frame timing
- XR SDKs
- Open-source repositories
- Asset Store Publishing
- Creating your Publisher Account
- Creating a new package draft
- Deleting a package draft
- Uploading Assets to your package
- Filling in the package details
- Submitting your package for approval
- Viewing the status of your Asset Store submissions
- Collecting revenue
- Providing support to your customers
- Adding tags to published packages
- Connecting your account to Google Analytics
- Promoting your Assets
- Refunding your customers
- Upgrading packages
- Deprecating your Assets
- Issuing vouchers
- Managing your publishing team
- Asset Store Publisher portal
- Platform development
- Standalone
- macOS
- Apple TV
- WebGL
- Player settings for the WebGL platform
- Getting started with WebGL development
- WebGL Browser Compatibility
- Building and running a WebGL project
- WebGL: Deploying compressed builds
- Debugging and troubleshooting WebGL builds
- WebGL Graphics
- WebGL Networking
- Using Audio In WebGL
- WebGL performance considerations
- Memory in WebGL
- WebGL: Interacting with browser scripting
- Using WebGL Templates
- Cursor locking and full-screen mode in WebGL
- Input in WebGL
- iOS
- Getting started with iOS development
- iOS build settings
- Player settings for the iOS platform
- iOS 2D Texture Overrides
- iOS Advanced Topics
- Troubleshooting on iOS devices
- Reporting crash bugs on iOS
- Android
- Getting started with Android development
- Android environment setup
- Unity Remote
- Troubleshooting Android development
- Building apps for Android
- Reporting crash bugs under Android
- Support for APK expansion files (OBB)
- Android Scripting
- Building and using plug-ins for Android
- Customizing an Android Splash Screen
- Single-Pass Stereo Rendering for Android
- Player settings for the Android platform
- Android 2D Textures Overrides
- Gradle for Android
- Android Manifest
- Getting started with Android development
- Windows
- Windows General
- Universal Windows Platform
- Getting Started
- Universal Windows Platform: Deployment
- Universal Windows Platform: Profiler
- Universal Windows Platform: Command line arguments
- Universal Windows Platform: Association launching
- AppCallbacks class
- Universal Windows Platform: WinRT API in C# scripts
- Player settings for the Universal Windows platform
- Scripting Backends
- FAQ
- Universal Windows Platform: Examples
- Universal Windows Platform: Code snippets
- Known issues
- Mobile Developer Checklist
- Experimental
- Legacy Topics
- Best practice guides
- New in Unity 2018
- Glossary
- Unity User Manual (2018.4)
- Importing
- Model Import Settings window
- Animation tab
Animation tab
Switch to Scripting
Animation Clips are the smallest building blocks of animation in Unity. They represent an isolated piece of motion, such as RunLeft, Jump, or Crawl, and can be manipulated and combined in various ways to produce lively end results (see Animation State MachinesA graph within an Animator Controller that controls the interaction of Animation States. Each state references an Animation Blend Tree or a single Animation Clip. More info
See in Glossary, Animator ControllerControls animation through Animation Layers with Animation State Machines and Animation Blend Trees, controlled by Animation Parameters. The same Animator Controller can be referenced by multiple models with Animator components. More info
See in Glossary, or Blend Trees).
You can select Animation Clips from imported FBX data.
When you click on the model containing animation clips, these properties appear:
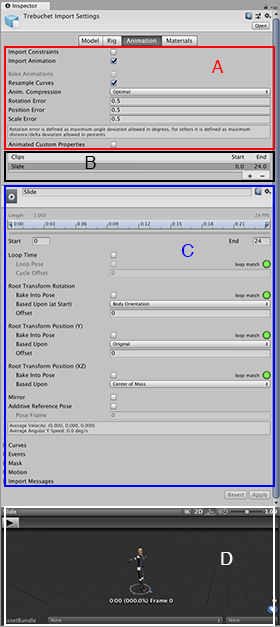
There are four areas on the AnimationA collection of images that create a moving image when played sequentially. In Unity, an animation is the result of adding two different animation keys, at two different times, for the same animatable property. More info
See in Glossary tab of the InspectorA Unity window that displays information about the currently selected GameObject, Asset or Project Settings, allowing you to inspect and edit the values. More info
See in Glossary window:
- (A) Asset-specific properties. These settings define import options for the entire AssetAny media or data that can be used in your game or Project. An asset may come from a file created outside of Unity, such as a 3D model, an audio file or an image. You can also create some asset types in Unity, such as an Animator Controller, an Audio Mixer or a Render Texture. More info
See in Glossary. - (B) Clip selection list. You can select any item from this list to display its properties and preview its animation. You can also define new clips.
- (C) Clip-specific properties. These settings define import options for the selected Animation Clip.
- (D) Animation preview. You can playback the animation and select specific frames here.
Asset-specific properties
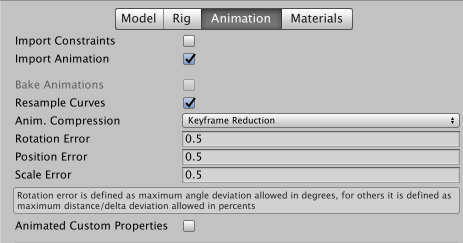
These properties apply to all animation clips and constraints defined within this Asset:
| Property: | Function: | |
|---|---|---|
| Import Constraints | Import constraintsSettings on Joint components which limit movement or rotation. The type and number of constraints vary depending on the type of Joint. More info See in Glossary from this asset. |
|
| Import Animation | Import animation from this asset. Note: If disabled, all other options on this page are hidden and no animation is imported. |
|
| Bake Animations | Bake animations created using IK or Simulation to forward kinematic keyframes. Only available for Autodesk® Maya®, Autodesk® 3ds Max® and Cinema 4D files. |
|
| Resample Curves | Resample animation curves as Quaternion values and generate a new Quaternion keyframe for every frame in the animation. This option is enabled by default. Disable this to keep animation curves as they were originally authored this only if you’re having issues with the interpolation between keys in your original animation Only appears if the import file contains Euler curves. |
|
| Anim. Compression | The type of compressionA method of storing data that reduces the amount of storage space it requires. See Texture Compression, Animation Compression, Audio Compression, Build Compression. See in Glossary to use when importing the animation. |
|
| Off | Disable animation compressionThe method of compressing animation data to significantly reduce file sizes without causing a noticeable reduction in motion quality. Animation compression is a trade off between saving on memory and image quality. More info See in Glossary . This means that Unity doesn’t reduce keyframeA frame that marks the start or end point of a transition in an animation. Frames in between the keyframes are called inbetweens. See in Glossary count on import, which leads to the highest precision animations, but slower performance and bigger file and runtime memory size. It is generally not advisable to use this option - if you need higher precision animation, you should enable keyframe reduction and lower allowed Animation Compression Error values instead. |
|
| Keyframe ReductionA process that removes redundant keyframes. More info See in Glossary |
Reduce redundant keyframes on import. If selected, the Animation Compression Errors options are displayed. This affects both file size (runtime memory) and how curves are evaluated. | |
| Keyframe Reduction and Compression | Reduce keyframes on import and compress keyframes when storing animations in files. This affects only file size - the runtime memory size is the same as Keyframe Reduction. If selected, the Animation Compression Errors options are displayed. | |
| Optimal | Let Unity decide how to compress, either by keyframe reduction or by using dense format. Only for Generic and Humanoid Animation Type rigs. |
|
| Animation Compression Errors | Only available when Keyframe Reduction or Optimal compression is enabled. | |
| Rotation Error | How much to reduce rotation curves. The smaller the value, the higher the precision. | |
| Position Error | How much to reduce position curves. The smaller the value, the higher the precision. | |
| Scale Error | How much to reduce scale curves. The smaller the value, the higher the precision. | |
| Animated Custom Properties | Import any FBX properties that you designated as custom user properties. Unity only supports a small subset of properties when importing FBX files (such as translation, rotation, scale and visibility). However, you can treat standard FBX properties like user properties by naming them in your importer script via the extraUserProperties member. During import, Unity then passes any named properties to the Asset postprocessor just like ‘real’ user properties. |
|
Clip selection list
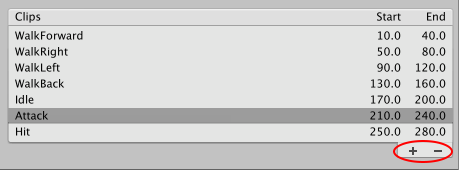
You can perform these tasks in this area of the Animation tab:
- Select a clip from the list to display its clip-specific properties.
- Play a selected clip in the clip preview pane.
-
Create a new clip for this file with the add (
+) button. - Remove the selected clip definition with the delete (
-) button.
Warning: If you manually change any properties of the imported clips, Unity will not import new animation clips when the source Asset changes. For example, if you create a new clip or change a clip’s timing on the Animation tab, that clip list will not change even if you add clips to the FBX file outside of Unity. Unity will ignore the new animation clips.
Clip-specific properties
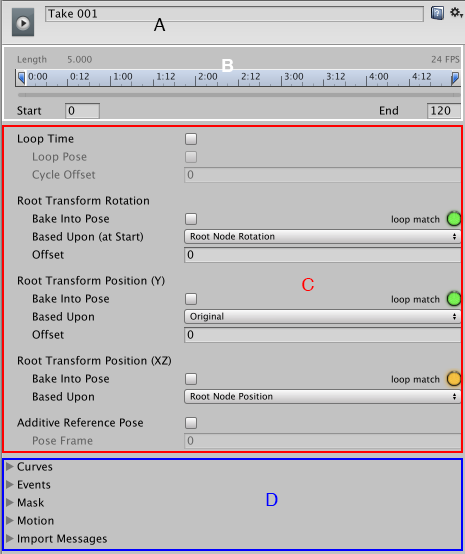
This area of the Animation tab displays these features:
- (A) The (editable) name of the selected clip
- (B) The animation clip timeline
- (C) Clip properties to control looping and pose
- (D) Expandable sections for: defining curves, events, masks, and motion roots; and viewing messages from the import process
You can set these properties separately for each animation clip defined within this asset:
| Property: | Function: | |
|---|---|---|
| Area A (editable name) | ||
 |
The take in the source file to use as a source for this animation clip. This is what defines a set of animation as separated in Motionbuilder, Autodesk® Maya® and other 3D packages. Unity can import these takes as individual clips. You can create them from the whole file or from a subset of frames. |
|
| Area B (timeline features) | ||
 |
You can use the drag the start and end indicators around the timelineGeneric term within Unity that refers to all features, windows, editors, and components related to creating, modifying, or reusing cut-scenes, cinematics, and game-play sequences. More info See in Glossary to define frame ranges for each clip. |
|
| Start | Start frame of the clip. | |
| End | End frame of the clip. | |
| Area C (looping and pose control) | ||
| Loop Time | Play the animation clip through and restart when the end is reached. | |
| Loop Pose | Loop the motion seamlessly. | |
| Cycle Offset | Offset to the cycle of a looping animation, if it starts at a different time. | |
| Root Transform Rotation | ||
| Bake into Pose | Bake root rotation into the movement of the bones. Disable to store as root motionMotion of character’s root node, whether it’s controlled by the animation itself or externally. More info See in Glossary . |
|
| Based Upon | Basis of root rotation. | |
| Original | Keep the original rotation from the source file. | |
| Root Node Rotation | Use the rotation of the root node. Only available for the Generic Animation Type. |
|
| Body Orientation | Keep the upper body pointing forward. Only available for the Humanoid Animation Type. |
|
| Offset | Offset to the root rotation (in degrees). | |
| Root Transform Position (Y) | ||
| Bake into Pose | Bake vertical root motion into the movement of the bones. Disable to store as root motion. | |
| Based Upon (at Start) | Basis of vertical root position. | |
| Original | Keep the vertical position from the source file. | |
| Root Node Position | Use the vertical root position. Only available for the Generic Animation Type. |
|
| Center of MassRepresents the average position of all mass in a Rigidbody for the purposes of physics calculations. By default it is computed from all colliders belonging to the Rigidbody, but can be modified via script. More info See in Glossary |
Keep center of mass aligned with the root transform position. Only available for the Humanoid Animation Type. |
|
| Feet | Keep feet aligned with the root transform position. Only available for the Humanoid Animation Type. |
|
| Offset | Offset to the vertical root position. | |
| Root Transform Position (XZ) | ||
| Bake into Pose | Bake horizontal root motion into the movement of the bones. Disable to store as root motion. | |
| Based Upon | Basis of horizontal root position. | |
| Original | Keep the horizontal position from the source file. | |
| Root Node Position | Use the horizontal root transform position. Only available for the Generic Animation Type. |
|
| Center of Mass | Keep aligned with the root transform position. Only available for the Humanoid Animation Type. |
|
| Offset | Offset to the horizontal root position. | |
| Mirror | Mirror left and right in this clip. Only appears if the Animation Type is set to Humanoid. |
|
| Additive Reference Pose | Enable to set frame for the reference pose used as the base for the additive animation layer. A blue marker becomes visible in the timeline editor: 
|
|
| Pose Frame | Enter a frame number to use as the reference pose. You can also drag the blue marker in the timeline to update this value. Only available if Additive Reference Pose is enabled. |
|
| Area D (expandable sections) | ||
| Curves | Expand this section to manage animation curves on imported clips. | |
| Events | Expand this section to manage animation events on imported clips. | |
| MaskCan refer to a Sprite Mask, a UI Mask, or a Layer Mask More info See in Glossary |
Expand this section to manage masking imported clips. | |
| Motion | Expand this section to manage selecting a root motion node. | |
| Import Messages | Expand this section to see detailed information about how your animation was imported, including an optional RetargetingApplying animations created for one model to another. More info See in Glossary Quality Report. |
|
Creating clips is essentially defining the start and end points for segments of animation. In order for these clips to loop, they should be trimmed in such a way to match the first and last frame as best as possible for the desired loop.
Animation import warnings
If any problems occur during the animation import process, a warning appears at the top of the Animations Import inspector:

The warnings do not necessarily mean your animation has not imported or doesn’t work. It may just mean that the imported animation looks slightly different from the source animation.
To see more information, expand the Import Messages section:
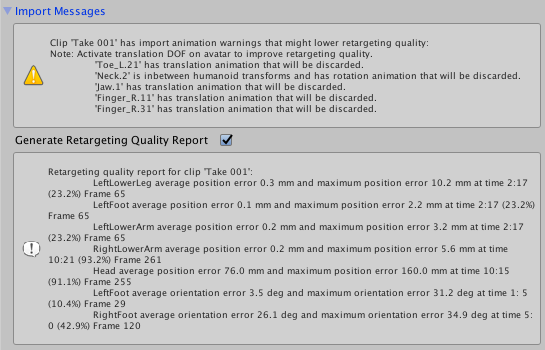
In this case, Unity has provided a Generate Retargeting Quality Report option which you can enable to see more specific information on the retargeting problems.
Other warning details you may see include the following:
- Default bone length found in this file is different from the one found in the source avatarAn interface for retargeting animation from one rig to another. More info
See in Glossary
. - Inbetween bone default rotation found in this file is different from the one found in the source avatar.
- Source avatar hierarchy doesn’t match one found in this model.
- This animation has Has translation animation that will be discarded.
- Humanoid animationAn animation using humanoid skeletons. Humanoid models generally have the same basic structure, representing the major articulate parts of the body, head and limbs. This makes it easy to map animations from one humanoid skeleton to another, allowing retargeting and inverse kinematics. More info
See in Glossary
has inbetween transforms and rotation that will be discarded. - Has scale animation that will be discarded.
These messages indicate that some data present in your original file was omitted when Unity imported and converted your animation to its own internal format. These warnings essentially tell you that the retargeted animation may not exactly match the source animation.
Note: Unity does not support pre- and post-extrapolate modes (also known as pre- and post-infinity modes) other than constant, and converts these to constant when imported.
Animation preview
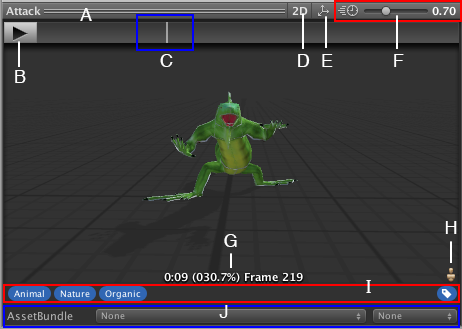
The preview area of the Animation tab provides these features:
- (A) The name of the selected clip
- (B) The play/pause button
- (C) The playback head on the preview timeline (allows scrubbing back and forth)
- (D) The 2D preview mode button (switches between orthographic and perspective camera)
- (E) The pivot and mass center display button (switches between displaying and hiding the gizmos)
- (F) The animation preview speed slider (move left to slow down; right to speed up)
- (G) The playback status indicator (displays the location of the playback in seconds, percentage, and frame number)
- (H) The Avatar selector (change which GameObject will preview the action)
- (I) The TagA reference word which you can assign to one or more GameObjects to help you identify GameObjects for scripting purposes. For example, you might define and “Edible” Tag for any item the player can eat in your game. More info
See in Glossary
bar, where you can define and apply Tags to your clip - (J) The AssetBundles bar, where you can define AssetBundles and Variants
2018–04–25 Page amended
2017–12–05 Page amended
Materials tab added in 2017.2 NewIn20172