Position GameObjects
To alter the Transform component of the GameObjectThe fundamental object in Unity scenes, which can represent characters, props, scenery, cameras, waypoints, and more. A GameObject’s functionality is defined by the Components attached to it. More info
See in Glossary, use the mouse to manipulate any GizmoA graphic overlay associated with a GameObject in a Scene, and displayed in the Scene View. Built-in scene tools such as the move tool are Gizmos, and you can create custom Gizmos using textures or scripting. Some Gizmos are only drawn when the GameObject is selected, while other Gizmos are drawn by the Editor regardless of which GameObjects are selected. More info
See in Glossary axis, or type values directly into the number fields of the Transform component in the InspectorA Unity window that displays information about the currently selected GameObject, asset or project settings, allowing you to inspect and edit the values. More info
See in Glossary.
Alternatively, you can select each of the five Transform modes from the SceneA Scene contains the environments and menus of your game. Think of each unique Scene file as a unique level. In each Scene, you place your environments, obstacles, and decorations, essentially designing and building your game in pieces. More info
See in Glossary view’s Tools Overlay or with a hotkey:
- W for Move
- E for Rotate
- R for Scale
- T for RectTransform
- Y for Transform

Move
At the center of the Move Gizmo, there are three small squares you can use to drag the GameObject within a single plane (meaning you can move two axes at once while the third keeps still).
If you hold shift while clicking and dragging in the center of the Move Gizmo, the center of the Gizmo changes to a flat square. The flat square indicates that you can move the GameObject around on a plane relative to the direction the Scene viewAn interactive view into the world you are creating. You use the Scene View to select and position scenery, characters, cameras, lights, and all other types of Game Object. More info
See in Glossary CameraA component which creates an image of a particular viewpoint in your scene. The output is either drawn to the screen or captured as a texture. More info
See in Glossary is facing.
Rotate
With the Rotate tool selected, change the GameObject’s rotation by clicking and dragging the axes of the wireframe sphere Gizmo that appears around it. As with the Move Gizmo, the last axis you changed will be colored yellow. Think of the red, green and blue circles as performing rotation around the red, green and blue axes that appear in the Move mode (red is the x-axis, green in the y-axis, and blue is the z-axis). Finally, use the outermost circle to rotate the GameObject around the Scene view z-axis. Think of this as rotating in screen space.
Scale
The Scale tool lets you rescale the GameObject evenly on all axes at once by clicking and dragging on the cube at the center of the Gizmo. You can also scale the axes individually, but you should take care if you do this when there are child GameObjects, because the effect can look quite strange.
RectTransform
The RectTransform is commonly used for positioning 2D elements such as SpritesA 2D graphic objects. If you are used to working in 3D, Sprites are essentially just standard textures but there are special techniques for combining and managing sprite textures for efficiency and convenience during development. More info
See in Glossary or UI elements, but it can also be useful for manipulating 3D GameObjects. It combines moving, scaling and rotation into a single Gizmo:
- Click and drag within the rectangular Gizmo to move the GameObject.
- Click and drag any corner or edge of the rectangular Gizmo to scale the GameObject.
- Drag an edge to scale the GameObject along one axis.
- Drag a corner to scale the GameObject on two axes.
- To rotate the GameObject, position your cursor just beyond a corner of the rectangle. The cursor changes to display a rotation icon. Click and drag from this area to rotate the GameObject.
Note that in 2D mode, you can’t change the z-axis in the Scene using the Gizmos. However, it is useful for certain scripting techniques to use the z-axis for other purposes, so you can still set the z-axis using the Transform component in the Inspector.
For more information on transforming GameObjects, see documentation on the Transform ComponentA Transform component determines the Position, Rotation, and Scale of each object in the scene. Every GameObject has a Transform. More info
See in Glossary.
Transform
The Transform tool combines the Move, Rotate and Scale tools. Its Gizmo provides handles for movement and rotation. When the Tool Handle Rotation is set to Local (see below), the Transform tool also provides handles for scaling the selected GameObject.
Gizmo handle position toggles
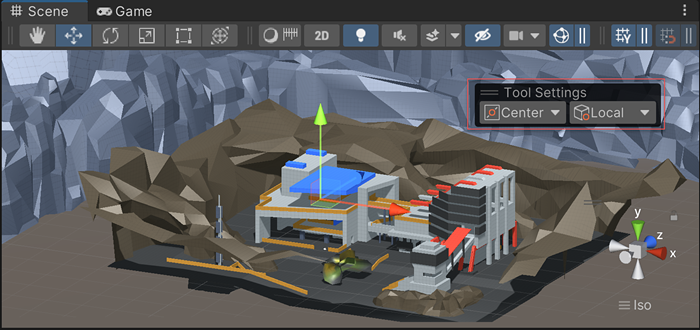
The Gizmo handle position toggles found in the Tool Settings Overlay are used to define the location of any Transform tool Gizmo, and the handles used to manipulate the Gizmo itself.
For position
Use the dropdown menu to switch between Pivot and Center.
- Pivot positions the Gizmo at the actual pivot point of the GameObject, as defined by the Transform component.
- Center positions the Gizmo at a center position based on the selected GameObjects.
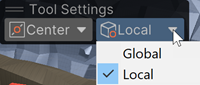
For rotation
Use the dropdown menu to switch between Local and Global.
- Local keeps the Gizmo’s rotation relative to the GameObject’s.
- Global clamps the Gizmo to world space orientation.
Snapping
Unity provides three types of snapping:
- World grid snapping: Snap a GameObject to a grid projected along the X, Y, or Z axes or transform a GameObject in increments along the X, Y, or Z axes. This is only available while using the World, or Global, handle orientation.
-
Surface snapping: Snap the GameObject to the intersection of any ColliderAn invisible shape that is used to handle physical collisions for an object. A collider doesn’t need to be exactly the same shape as the object’s mesh - a rough approximation is often more efficient and indistinguishable in gameplay. More info
See in Glossary. -
Vertex snapping: Snap any vertex from a given MeshThe main graphics primitive of Unity. Meshes make up a large part of your 3D worlds. Unity supports triangulated or Quadrangulated polygon meshes. Nurbs, Nurms, Subdiv surfaces must be converted to polygons. More info
See in Glossary to the position of another Mesh’s vertex or surface. You can snap vertex to vertex, vertex to surface, and pivot to vertex.
When you drag a PrefabAn asset type that allows you to store a GameObject complete with components and properties. The prefab acts as a template from which you can create new object instances in the scene. More info
See in Glossary into a scene, Unity places them at the cursor position by default. You can preserve any offsets in the Prefab in relation to the cursor position by holding the Alt key while dragging a Prefab.
Surface snapping
To snap a GameObject to the intersection of a Collider, do the following:
- Make sure the Move tool is active.
- Hold Shift+Ctrl (macOS: Shift+Command), then click and hold a GameObject’s tool handle.
- Drag the GameObject on to another GameObject with a Collider.
Vertex snapping
Use vertex snapping to quickly assemble your Scenes: take any vertex from a given Mesh and place that vertex in the same position as any vertex from any other Mesh you choose. For example, use vertex snapping to align road sections precisely in a racing game, or to position power-up items at the vertices of a Mesh.
Follow the steps below to use vertex snapping:
- Select the Mesh you want to manipulate and make sure the Move tool is active.
- Press and hold the V key to activate the vertex snapping mode.
- Move your cursor over the vertex on your Mesh that you want to use as the pivot point.
- Hold down the left mouse button once your cursor is over the vertex you want and drag your Mesh next to any other vertex on another Mesh.
- To snap a vertex to a surface on another Mesh, add and hold Shift+Ctrl (macOS: Shift+Command) while you move over the surface you want to snap to.
- To snap the pivot to a vertex on another Mesh, add and hold Ctrl (macOS: Command) while you move the cursor to the vertex you want to snap to.
- Release the mouse button and the V key when you are happy with the results (Shift+V acts as a toggle of this functionality).
Rotate a GameObject towards a point on a collider
Use look-at rotation to rotate a GameObject towards a point on the surface of a collider. This is useful to orient GameObjects towards a target, such as a camera or player.
To use look-at rotation:
- In the Scene view, select the GameObject you want to rotate.
- In the Tools overlay, select the Rotate tool or press E.
- Click the rotate Gizmo handle to select it.
- Hold Shift+Ctrl (macOS: Shift+Command) and move your mouse over the surface of a collider you want to rotate the selected GameObject towards.
Screen Space Transform
While using the Transform tool, hold down the Shift key to enable Screen Space mode. This mode allows you to move, rotate and scale GameObjects as they appear on the screen, rather than in the Scene.
Additional resources
Did you find this page useful? Please give it a rating: